Let's get started with setting up the workspace and installations.
To install and run Flutter, your development environment must meet these minimum requirements:
-
Operating Systems: MacOS,Linux (64-bit) or Windows // We'll be working on rhel-8
-
Disk Space: 600 MB (does not include disk space for IDE/tools).
-
Tools: Flutter depends on these command-line tools being available in your environment like bash, curl, file, git 2.x, mkdir, rm, unzip, which, xz-utils, zip
-
Shared libraries: Flutter test command depends on this library being available in your environment.
-
libGLU.so.1 - provided by mesa packages such as libglu1-mesa on Ubuntu/Debian and mesa-libGLU on Fedora.
 Download rhel-8 from here.
Also follow this amazing rhel installation tutorial by the founder of Linux World and RHCSA-level-22 Mr. Vimal Daga for technical insights while installation.
- Download the following installation bundle to get the latest stable release of the Flutter SDK from here
- Extract the file in the desired location, for example:
$ cd ~/development
$ tar xf ~/Downloads/flutter_linux_1.17.5-stable.tar.xz
- Add the flutter tool to your path:
$ export PATH="$PATH:`pwd`/flutter/bin"
This command sets your PATH variable for the current terminal window only. To make it permanent and run flutter commands in any terminal session follow next steps for modifying this variable permanently for all terminal sessions are machine-specific. Typically you add a line to a file that is executed whenever you open a new window. For example:
- Determine the directory where you placed the Flutter SDK. You need this in Step 3.
- Open (or create) the rc file for your shell. For example, Linux uses the Bash shell by default, so edit $HOME/.bashrc. If you are using a different shell, the file path and filename will be different on your machine.
- Add the following line and change [PATH_TO_FLUTTER_DIRECTORY] to be the path where you cloned Flutter’s git repo:
$ export PATH="$PATH:[PATH_TO_FLUTTER_DIRECTORY]/flutter/bin"
- Run
source $HOME/.<rc file>to refresh the current window, or open a new terminal window to automatically source the file.
Else you can also do the same thing in /etc/profile if you have administrator privileges.
Run the following command to see if there are any dependencies you need to install to complete the setup (for verbose output, add the -v flag):
$ flutter doctor -v
This command checks your environment and displays a report to the terminal window. The Dart SDK is bundled with Flutter;
it is not necessary to install Dart separately.
Once you have installed any missing dependencies, run the $ flutter doctor command again to verify that you’ve set everything up correctly.
Basically by using the doctor option you can check if we need to install further dependencies.
Flutter relies on a full installation of Android Studio to supply its Android platform dependencies like emulator. However, you can write your Flutter apps in a number of editors; a later step discusses where we'll be writing in VSCode and use the emulator of android studio.
- Download and install Android Studio.
- Start Android Studio, and go through the ‘Android Studio Setup Wizard’. This installs the latest Android SDK, Android SDK Command-line Tools, and Android SDK Build-Tools, which are required by Flutter when developing for Android.
If you prefer to use Android Studio as your main IDE to develop Flutter, you have to set dart language support to Android Studio as shown below.
Preferences → Plugins → Browse Repository → type Dart in search bar → Install and Restart android studio.
Preferences → Plugins → Browse Repository → type Flutter in search bar → Install and Restart android studio.
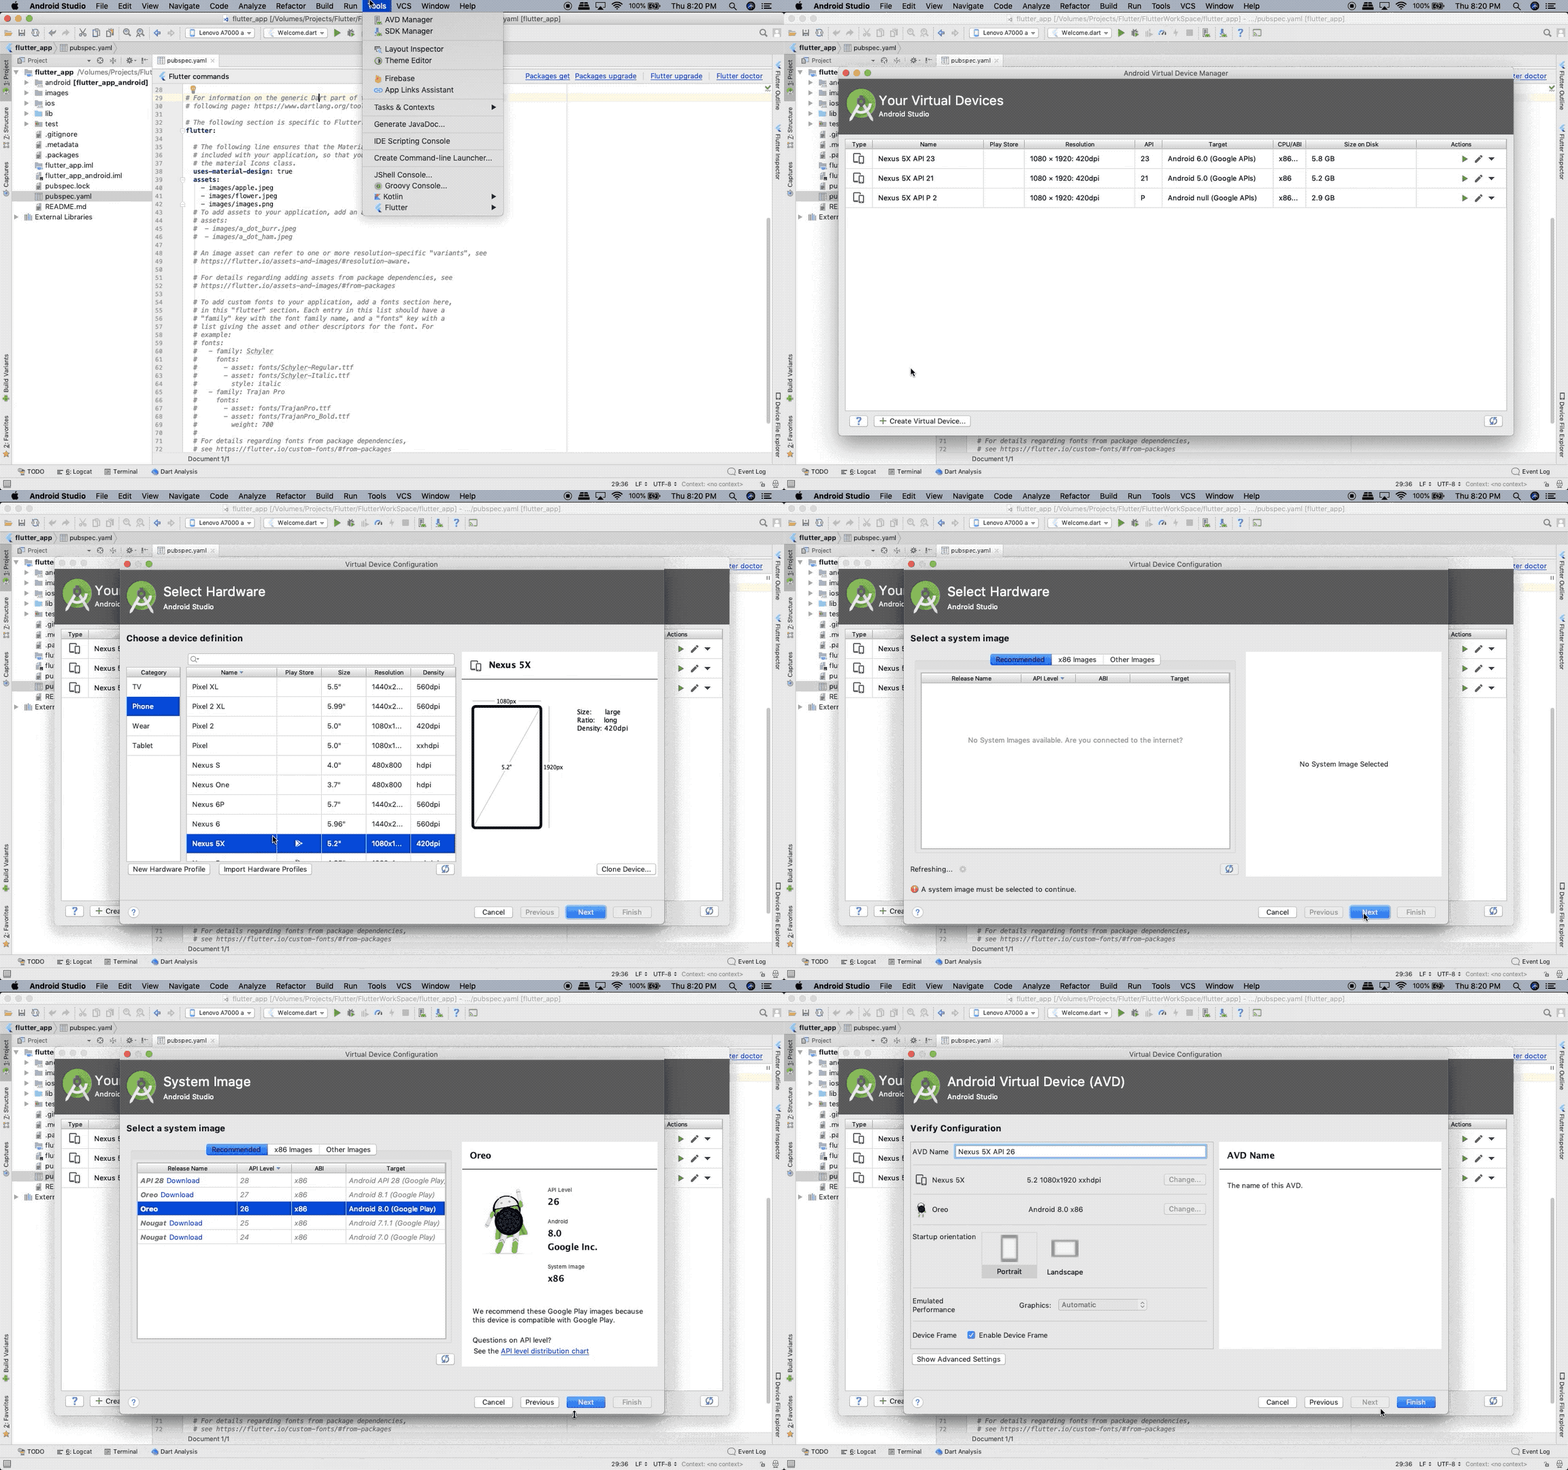
To prepare, run and test your Flutter app on the Android emulator, follow these steps:
-
Tools → AVD Manager → Opens a window
-
Select → Create Virtual Device
-
Phone → [Choose Any] → [Choose System Image, typically the highest one is most preferred] → Android 8.1 → AVD Name(Pixel 2 API 27)
-
Choose Graphics → Hardware → Finish
-
Select Pixel 2 API 27 emulator → click on Launch AVD(start) button
This IDE is quite handy for managing dart code and can be easily integrated with the android emulator.
Download Visual Studio Code from here, Then switch to the extension tab and search for “flutter”:

The first entry in the search result list is the extension we’re looking for. By installing this extension we’re adding support for editing, refactoring, running, and reloading Flutter application, as well as support for the Dart programming language.
Happy Fluttering! 💓
You are always welcome to add more or improve any resource in this repository by following these instructions.

.gif)
