-
Notifications
You must be signed in to change notification settings - Fork 5
/
chapter_2-2.qmd
499 lines (368 loc) · 34 KB
/
chapter_2-2.qmd
1
2
3
4
5
6
7
8
9
10
11
12
13
14
15
16
17
18
19
20
21
22
23
24
25
26
27
28
29
30
31
32
33
34
35
36
37
38
39
40
41
42
43
44
45
46
47
48
49
50
51
52
53
54
55
56
57
58
59
60
61
62
63
64
65
66
67
68
69
70
71
72
73
74
75
76
77
78
79
80
81
82
83
84
85
86
87
88
89
90
91
92
93
94
95
96
97
98
99
100
101
102
103
104
105
106
107
108
109
110
111
112
113
114
115
116
117
118
119
120
121
122
123
124
125
126
127
128
129
130
131
132
133
134
135
136
137
138
139
140
141
142
143
144
145
146
147
148
149
150
151
152
153
154
155
156
157
158
159
160
161
162
163
164
165
166
167
168
169
170
171
172
173
174
175
176
177
178
179
180
181
182
183
184
185
186
187
188
189
190
191
192
193
194
195
196
197
198
199
200
201
202
203
204
205
206
207
208
209
210
211
212
213
214
215
216
217
218
219
220
221
222
223
224
225
226
227
228
229
230
231
232
233
234
235
236
237
238
239
240
241
242
243
244
245
246
247
248
249
250
251
252
253
254
255
256
257
258
259
260
261
262
263
264
265
266
267
268
269
270
271
272
273
274
275
276
277
278
279
280
281
282
283
284
285
286
287
288
289
290
291
292
293
294
295
296
297
298
299
300
301
302
303
304
305
306
307
308
309
310
311
312
313
314
315
316
317
318
319
320
321
322
323
324
325
326
327
328
329
330
331
332
333
334
335
336
337
338
339
340
341
342
343
344
345
346
347
348
349
350
351
352
353
354
355
356
357
358
359
360
361
362
363
364
365
366
367
368
369
370
371
372
373
374
375
376
377
378
379
380
381
382
383
384
385
386
387
388
389
390
391
392
393
394
395
396
397
398
399
400
401
402
403
404
405
406
407
408
409
410
411
412
413
414
415
416
417
418
419
420
421
422
423
424
425
426
427
428
429
430
431
432
433
434
435
436
437
438
439
440
441
442
443
444
445
446
447
448
449
450
451
452
453
454
455
456
457
458
459
460
461
462
463
464
465
466
467
468
469
470
471
472
473
474
475
476
477
478
479
480
481
482
483
484
485
486
487
488
489
490
491
492
493
494
495
496
497
498
# 2.2 Smart Hygrometer and Thermometer {.unnumbered}
<br />
Thermometers and hygrometers are ubiquitous in daily life, providing real-time measurement of temperature and humidity in our environment. We frequently use them to measure body temperature when we feel feverish or unwell. The invention of these devices has brought tremendous convenience to our lives. Despite their size, these devices hold a great deal of science. In this section, we will create a smart hygrometer and thermometer using a temperature and humidity sensor. Do you know what a temperature and humidity sensor is and what it can do?
## 2.2.1 Background Knowledge
### 2.2.1.1 Temperature
Temperature is closely tied to our daily lives; it informs what clothes we wear before stepping out, and ensures the food or drink we consume is not too hot or too cold. When you step outside your home, you can sense the cold or heat, but to quantify exactly how cold or hot it is, we use "temperature".
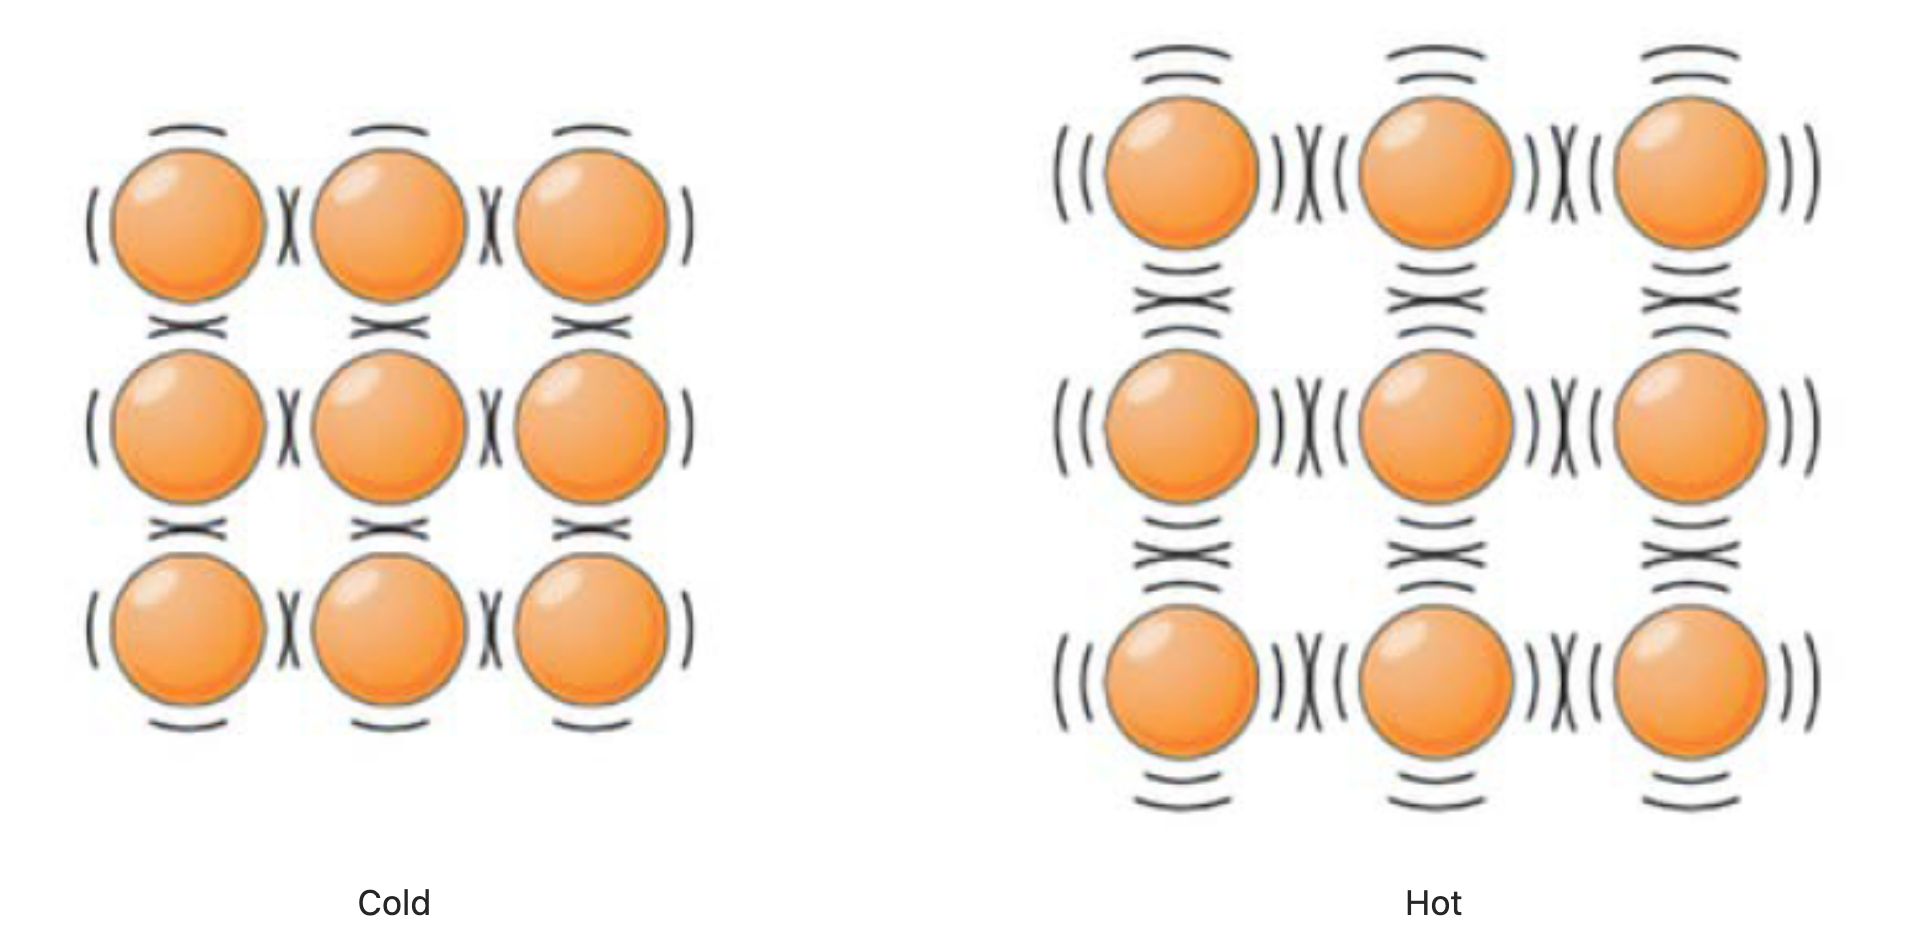
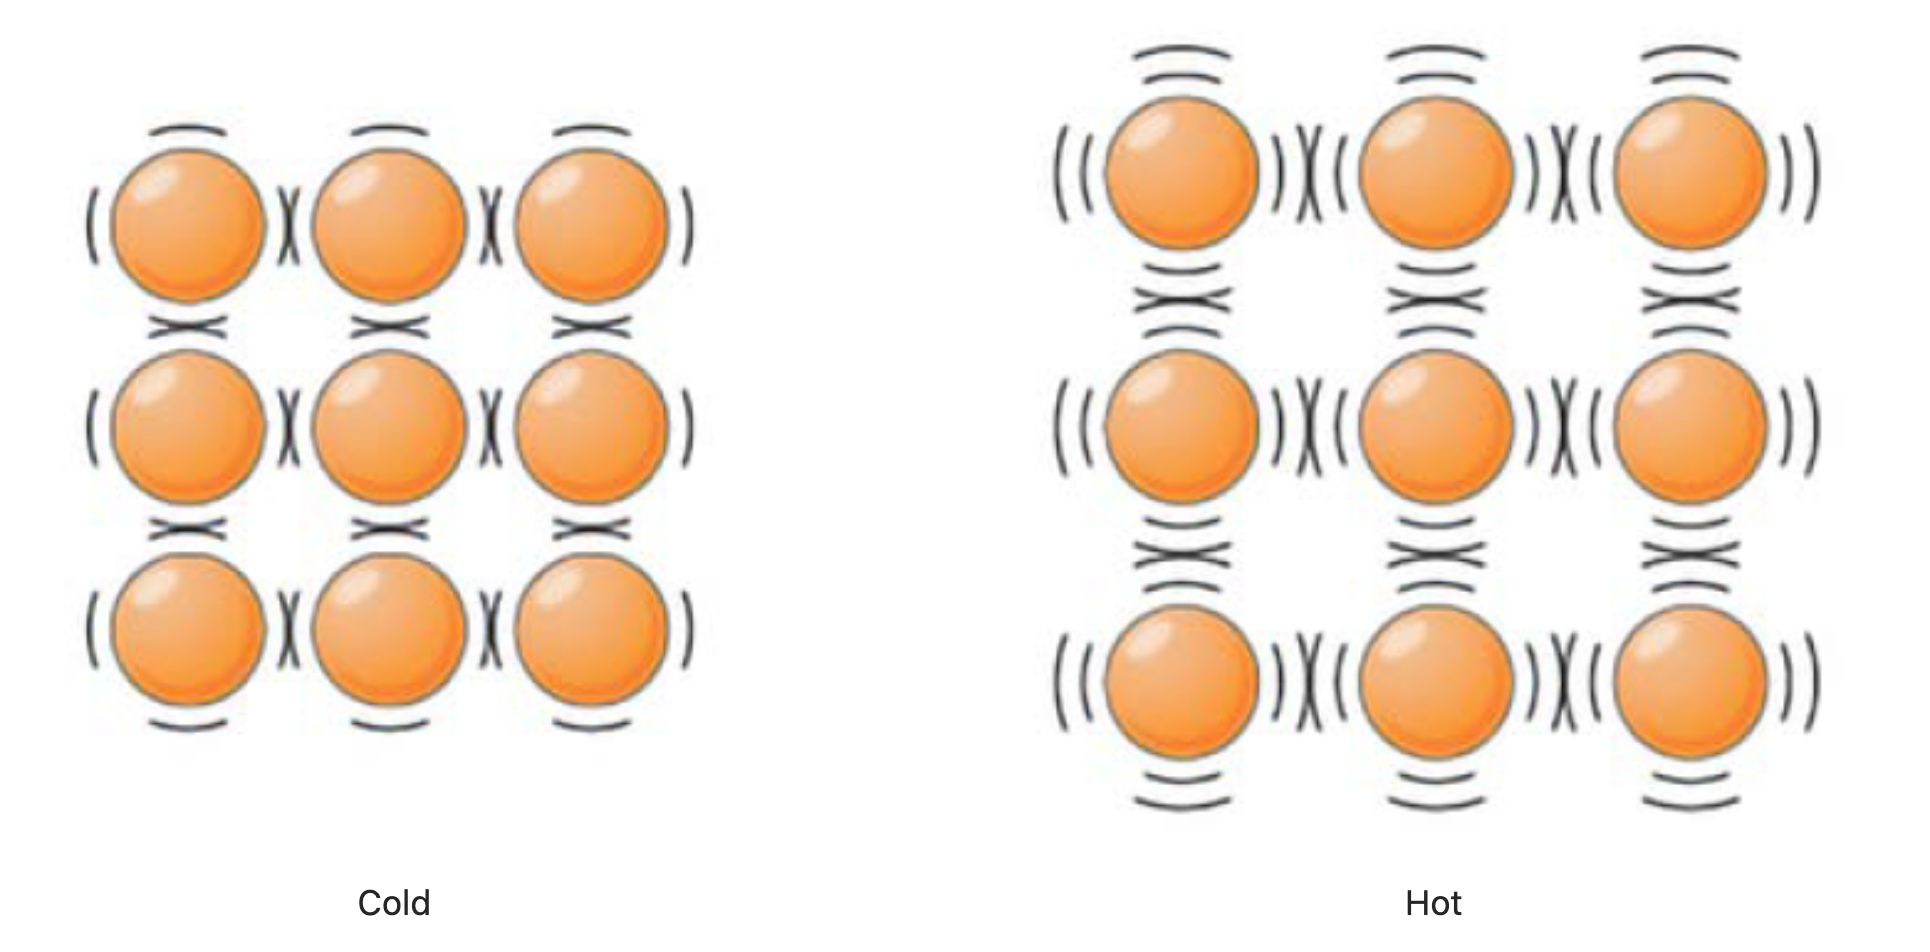
Temperature is a physical quantity that indicates the degree of coldness or hotness of an object. The high and low temperature of an object is a macroscopic phenomenon that reflects the intensity of thermal motion of the molecules that make up the object at the microscopic level. Hence, the temperature is a manifestation of the intensity of thermal motion of a large number of molecules that constitute an object. The faster the molecular motion, the higher the temperature, and the hotter the object; the slower the molecular motion, the lower the temperature, and the colder the object.
To measure temperature accurately, we need to establish a temperature unit standard and design corresponding temperature measurement tools.
<!--  -->
#### **Temperature Scale **
The unit standard for temperature is known as the temperature scale. Throughout the development of science, a variety of temperature scales have been devised, but their core methodology is the same: by stipulating the temperature values of certain phenomena or things, all other temperatures can be calibrated. Common temperature scales include Fahrenheit, Celsius, and Kelvin. Only five countries, including the United States and a few other English-speaking countries, still use the Fahrenheit scale. The vast majority of the world, including China, uses the Celsius scale. In research fields, scientists prefer to use the Kelvin scale.
- In the Fahrenheit scale, under standard atmospheric pressure, the temperature at which water begins to freeze is set at 32 degrees Fahrenheit and the temperature at which water boils is 212 degrees Fahrenheit. The scale is divided into 180 equal parts between these two points, with each part being one degree Fahrenheit, denoted as 1℉. In the Fahrenheit scale, normal human body temperature is around 98℉.
- In the Celsius scale, under standard atmospheric pressure, the temperature at which water begins to freeze is set at 0 degrees Celsius and the temperature at which water boils is 100 degrees Celsius. The scale is divided into 100 equal parts between these two points, with each part being one degree Celsius, denoted as 1℃. In the Celsius scale, normal human body temperature is around 36.5℃.
- The Kelvin scale is established on the basis of absolute zero. Scientists found that there is a minimum temperature in the universe, -273.15℃, which cannot be reached but only asymptotically approached. This minimum temperature was designated as absolute zero, and set as 0 Kelvin, denoted as 0K. The temperature at which water begins to freeze under standard atmospheric pressure is set at 273.15K, and the temperature at which water boils is 373.15K. In the Kelvin scale, normal human body temperature is around 309.7K.
### 2.2.1.2 Thermometer
A thermometer is a tool for measuring temperature. Since temperature is not a physical quantity that can be seen directly, the measurement of temperature requires the assistance of physical phenomena directly related to temperature. For instance, in ancient China, there is a record of 'lustrous pure blue flame,' which is measured by observing the color of the flame.
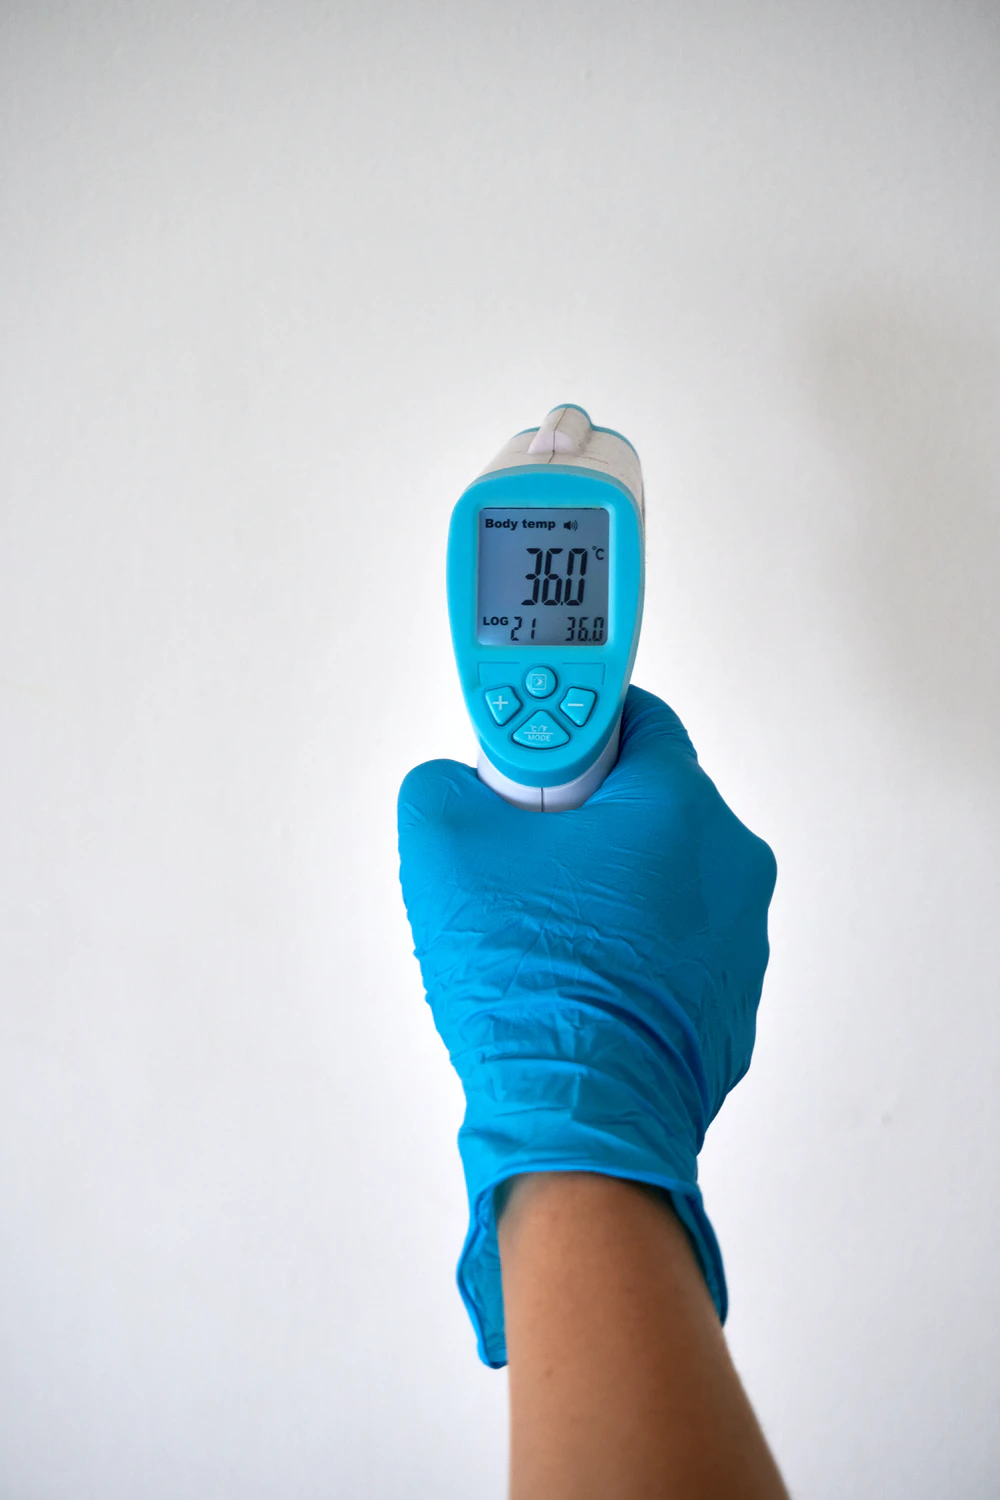
Another example is the infrared thermometer, as shown in the image to the right, which measures temperature through the radiation differences of objects at different temperatures. Humans, like other organisms, also radiate infrared energy around them. This energy typically has a wavelength of 9-13μm and falls within the near-infrared band of 0.76-100μm. Since light within this wavelength range is not absorbed by air, the surface temperature of the human body can be accurately measured by simply measuring the infrared energy radiated by the human body. The human body infrared temperature sensor is designed and manufactured based on this principle.
<!--  -->
<img src="https://files.seeedstudio.com/wiki/XIAO_Big_Power-Board-ebook-photo/chapter_2-2/chapter_2-2_2.png" width="300" height="auto" />
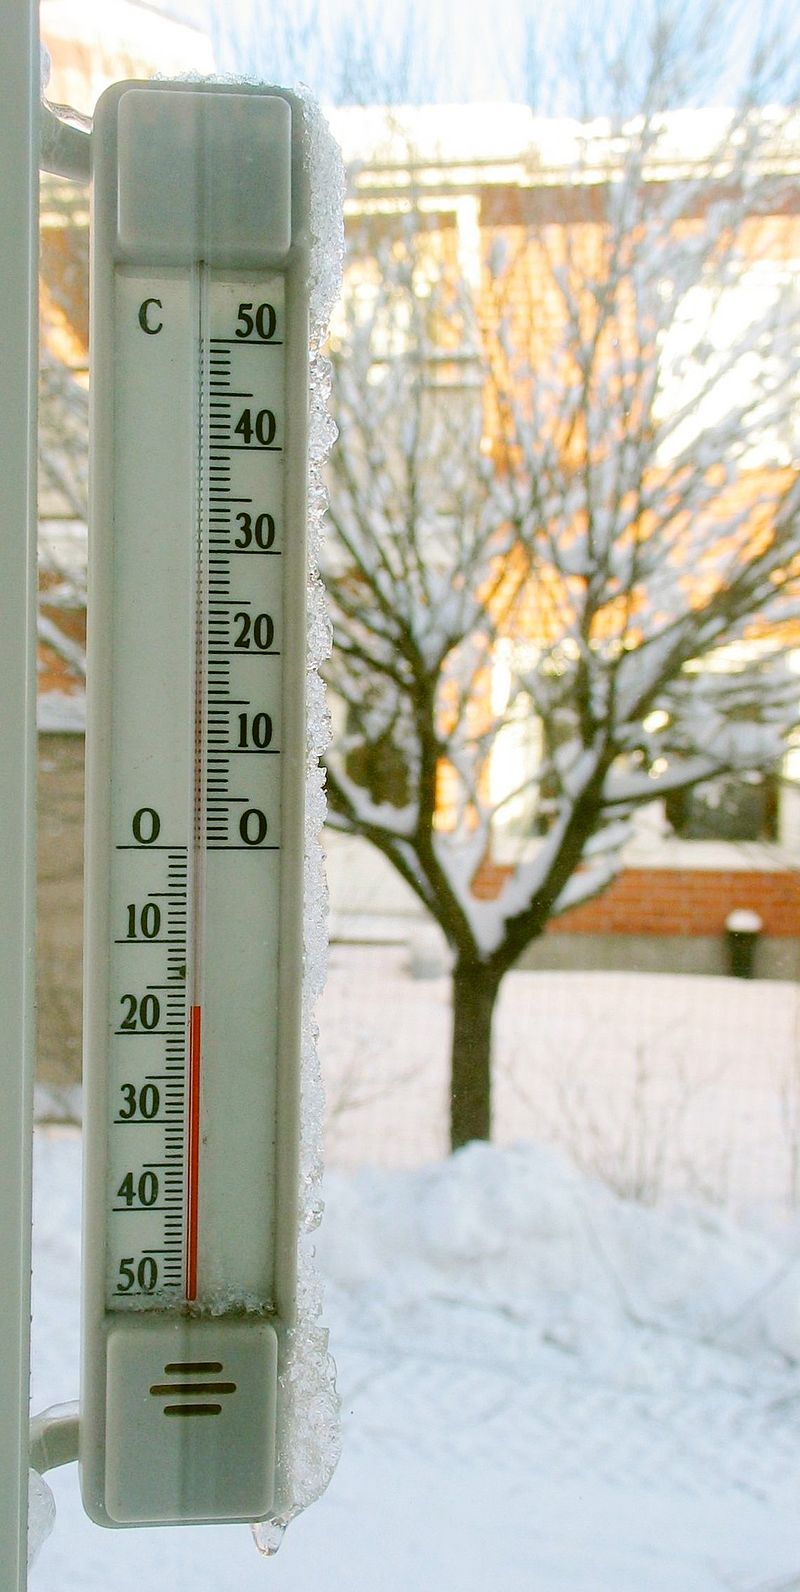
Furthermore, the phenomenon of thermal expansion and contraction is often used in temperature measurement. Commonly seen thermometers and body thermometers are based on the principle of measuring temperature by the expansion and contraction of a liquid when heated or cooled. The image below shows a commonly used alcohol thermometer that measures temperature by the property of alcohol's expansion and contraction with temperature. The winter daytime temperature displayed in the image is -17°C.
<!--  -->
<img src="https://files.seeedstudio.com/wiki/XIAO_Big_Power-Board-ebook-photo/chapter_2-2/chapter_2-2_3.jpg" width="400" height="auto" />
### 2.2.1.3 Humidity
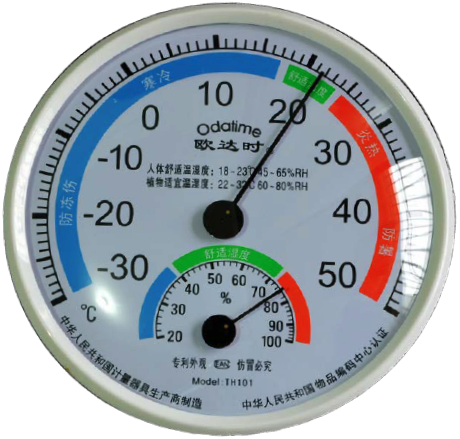
Humidity is a physical quantity that indicates the degree of dryness in the atmosphere. Under a certain temperature, the less water vapor a certain volume of air contains, the drier the air; the more water vapor, the more humid the air. The dryness or wetness of air is called "humidity." Weather forecasts typically report humidity values in terms of relative humidity, which is a percentage obtained by comparing the actual amount of water vapor in the air to the maximum amount of water vapor the air can hold at the same temperature.
<!--  -->
<img src="https://files.seeedstudio.com/wiki/XIAO_Big_Power-Board-ebook-photo/chapter_2-2/chapter_2-2_4.png" width="300" height="auto" />
### 2.2.1.4 Temperature and Humidity Sensor ------ Grove Temperature and Humidity Sensor V2.0 (DHT20)
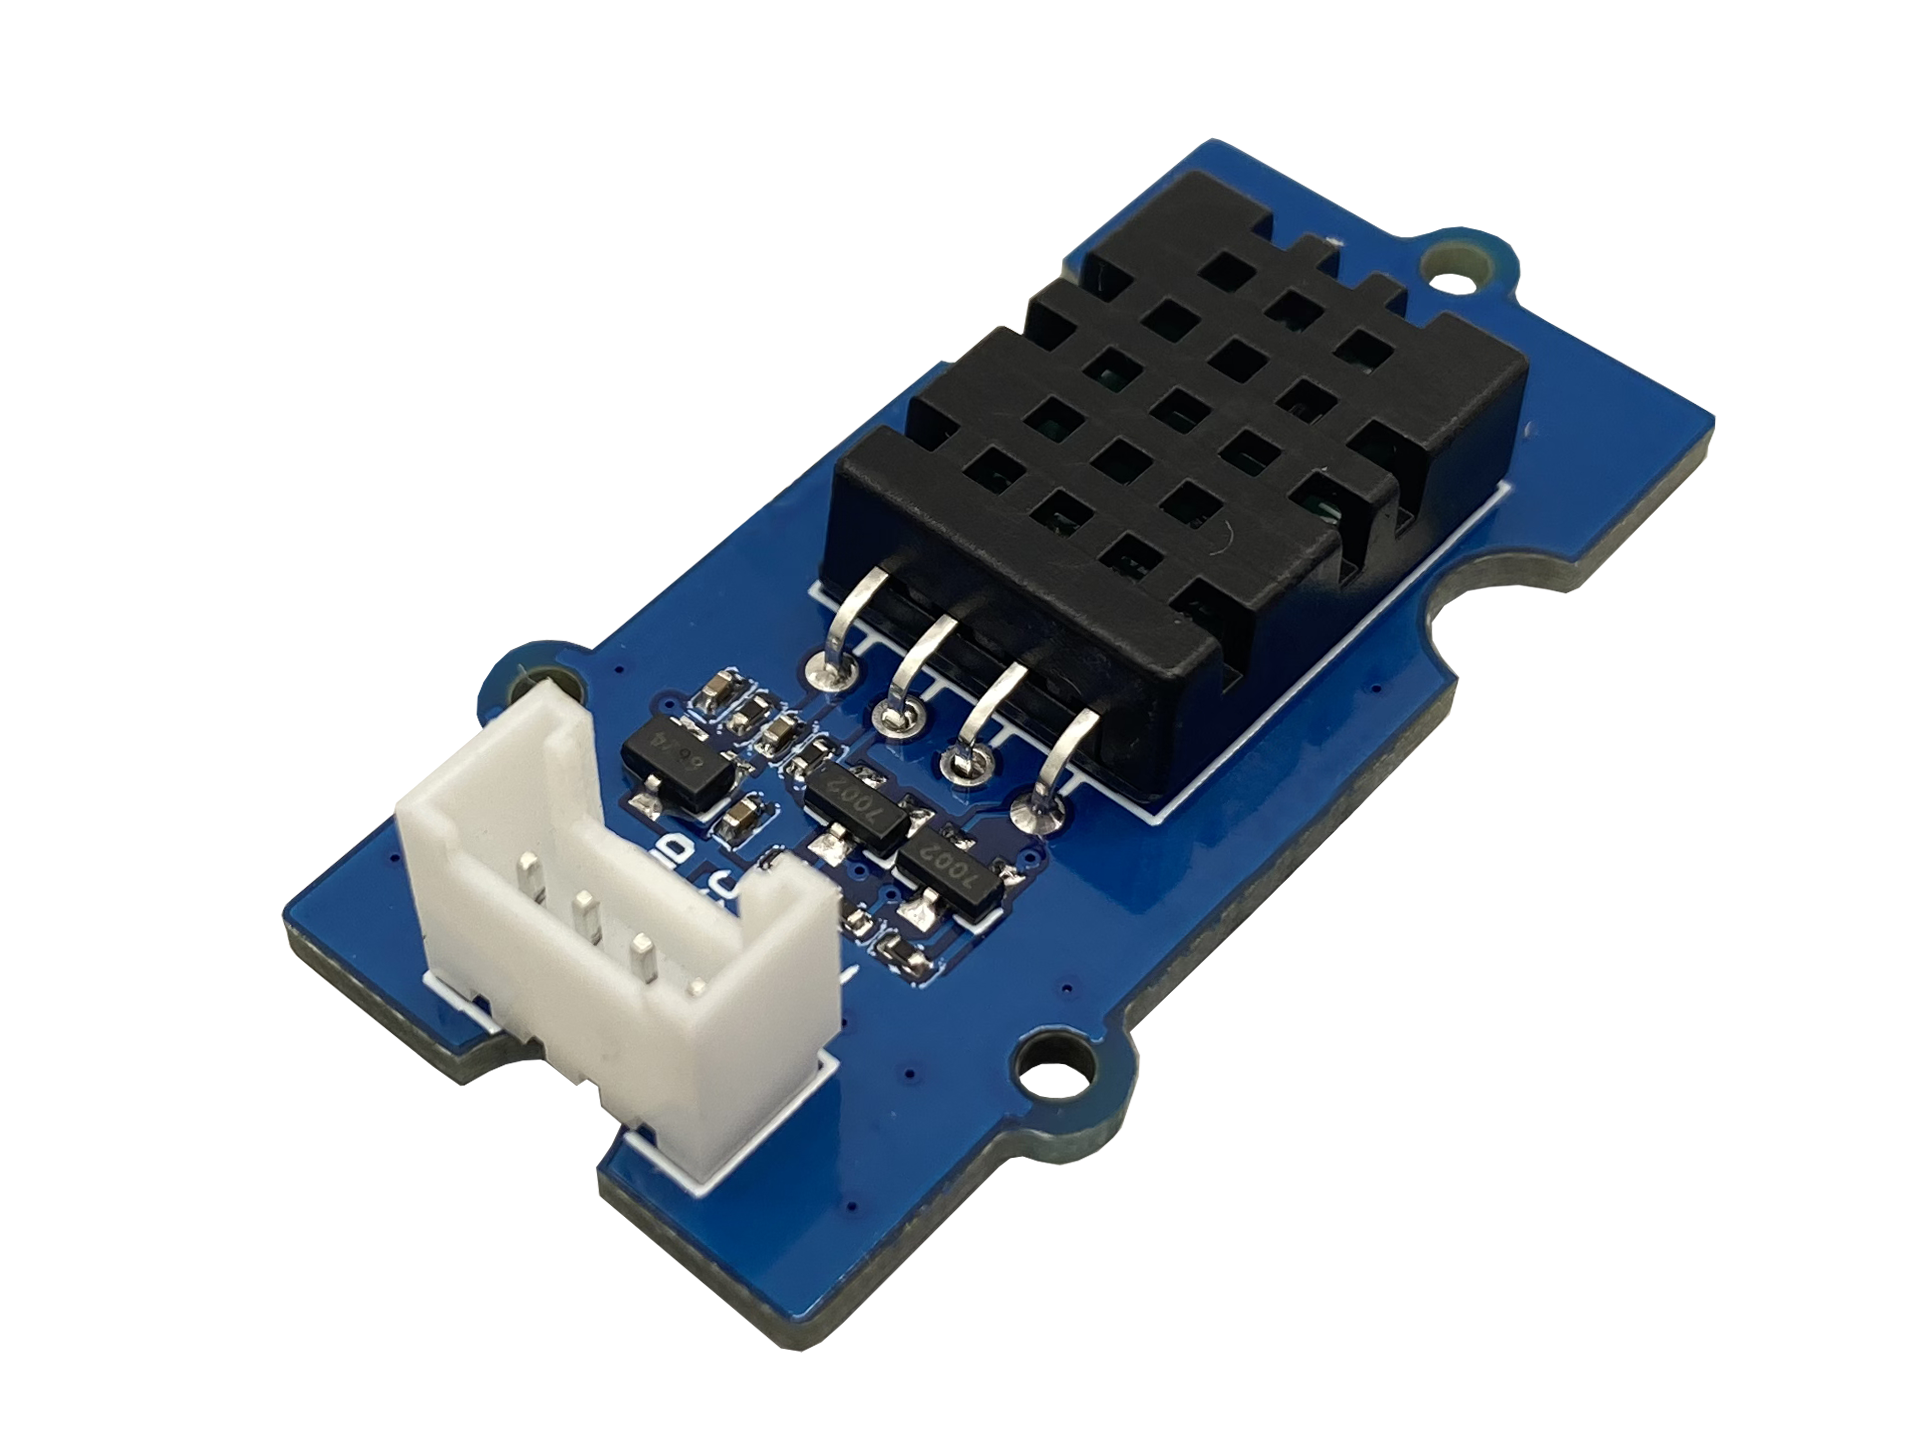
As the name implies, a temperature and humidity sensor is a sensor that can detect the temperature and humidity in the environment. There are many types of temperature and humidity sensors, and the one we chose is [Grove Temperature and Humidity Sensor V2.0 (DHT20)](https://www.seeedstudio.com/Grove-Temperature-Humidity-Sensor-V2-0-DHT20-p-4967.html). This is a low-power, high-precision, and high-stability product with a fully calibrated digital I2C interface and a temperature measurement range of -40\~80°C. Temperature and humidity sensors have a wide range of applications in the fields of agriculture, environmental protection, and home life.
<!-- ") -->
<img src="https://files.seeedstudio.com/wiki/XIAO_Big_Power-Board-ebook-photo/chapter_2-2/chapter_2-2_5.png" width="300" height="auto" />
> ⚠️ **Grove - Temperature and Humidity Sensor (DHT11)**
<!-- >[Grove Temperature and Humidity Sensor (DHT11)](https://cdn.nlark.com/yuque/0/2021/png/2746511/1613984130973-15b0e6ea-7277-4253-a82f-60b3a198c4f4.png?x-oss-process=image%2Fresize%2Cw_600#averageHue=%23a39e95&from=paste&height=155&id=TB2aD&originHeight=450&originWidth=600&originalType=url&ratio=1&rotation=0&showTitle=true&status=done&style=none&title=Grove%20Temperature%20and%20Humidity%20Sensor%20%28DHT11%29%5D&width=207 "Grove Temperature and Humidity Sensor (DHT11)\]") -->
><img src="https://files.seeedstudio.com/wiki/XIAO_Big_Power-Board-ebook-photo/chapter_2-2/chapter_2-2_6.png" width="300" height="auto" />
>
>If you are using the Grove [DHT11 version](https://wiki.seeedstudio.com/Grove-TemperatureAndHumidity_Sensor/) of the temperature and humidity sensor (with a blue sensor case), please refer to this version's [Wiki document](https://wiki.seeedstudio.com/Grove-TemperatureAndHumidity_Sensor/). DHT11 is a temperature and humidity sensor that outputs calibrated digital signals. The biggest difference between it and DHT20 is their communication method: DHT11 uses a single-bus digital signal, while DHT20 uses an I2C signal.
## 2.2.2 Task 1: Reading Temperature and Humidity Values in the Serial Monitor (Based on the DHT20 model)
#### **Adding the `Grove_Temperature_And_Humidity_Sensor` Library File**
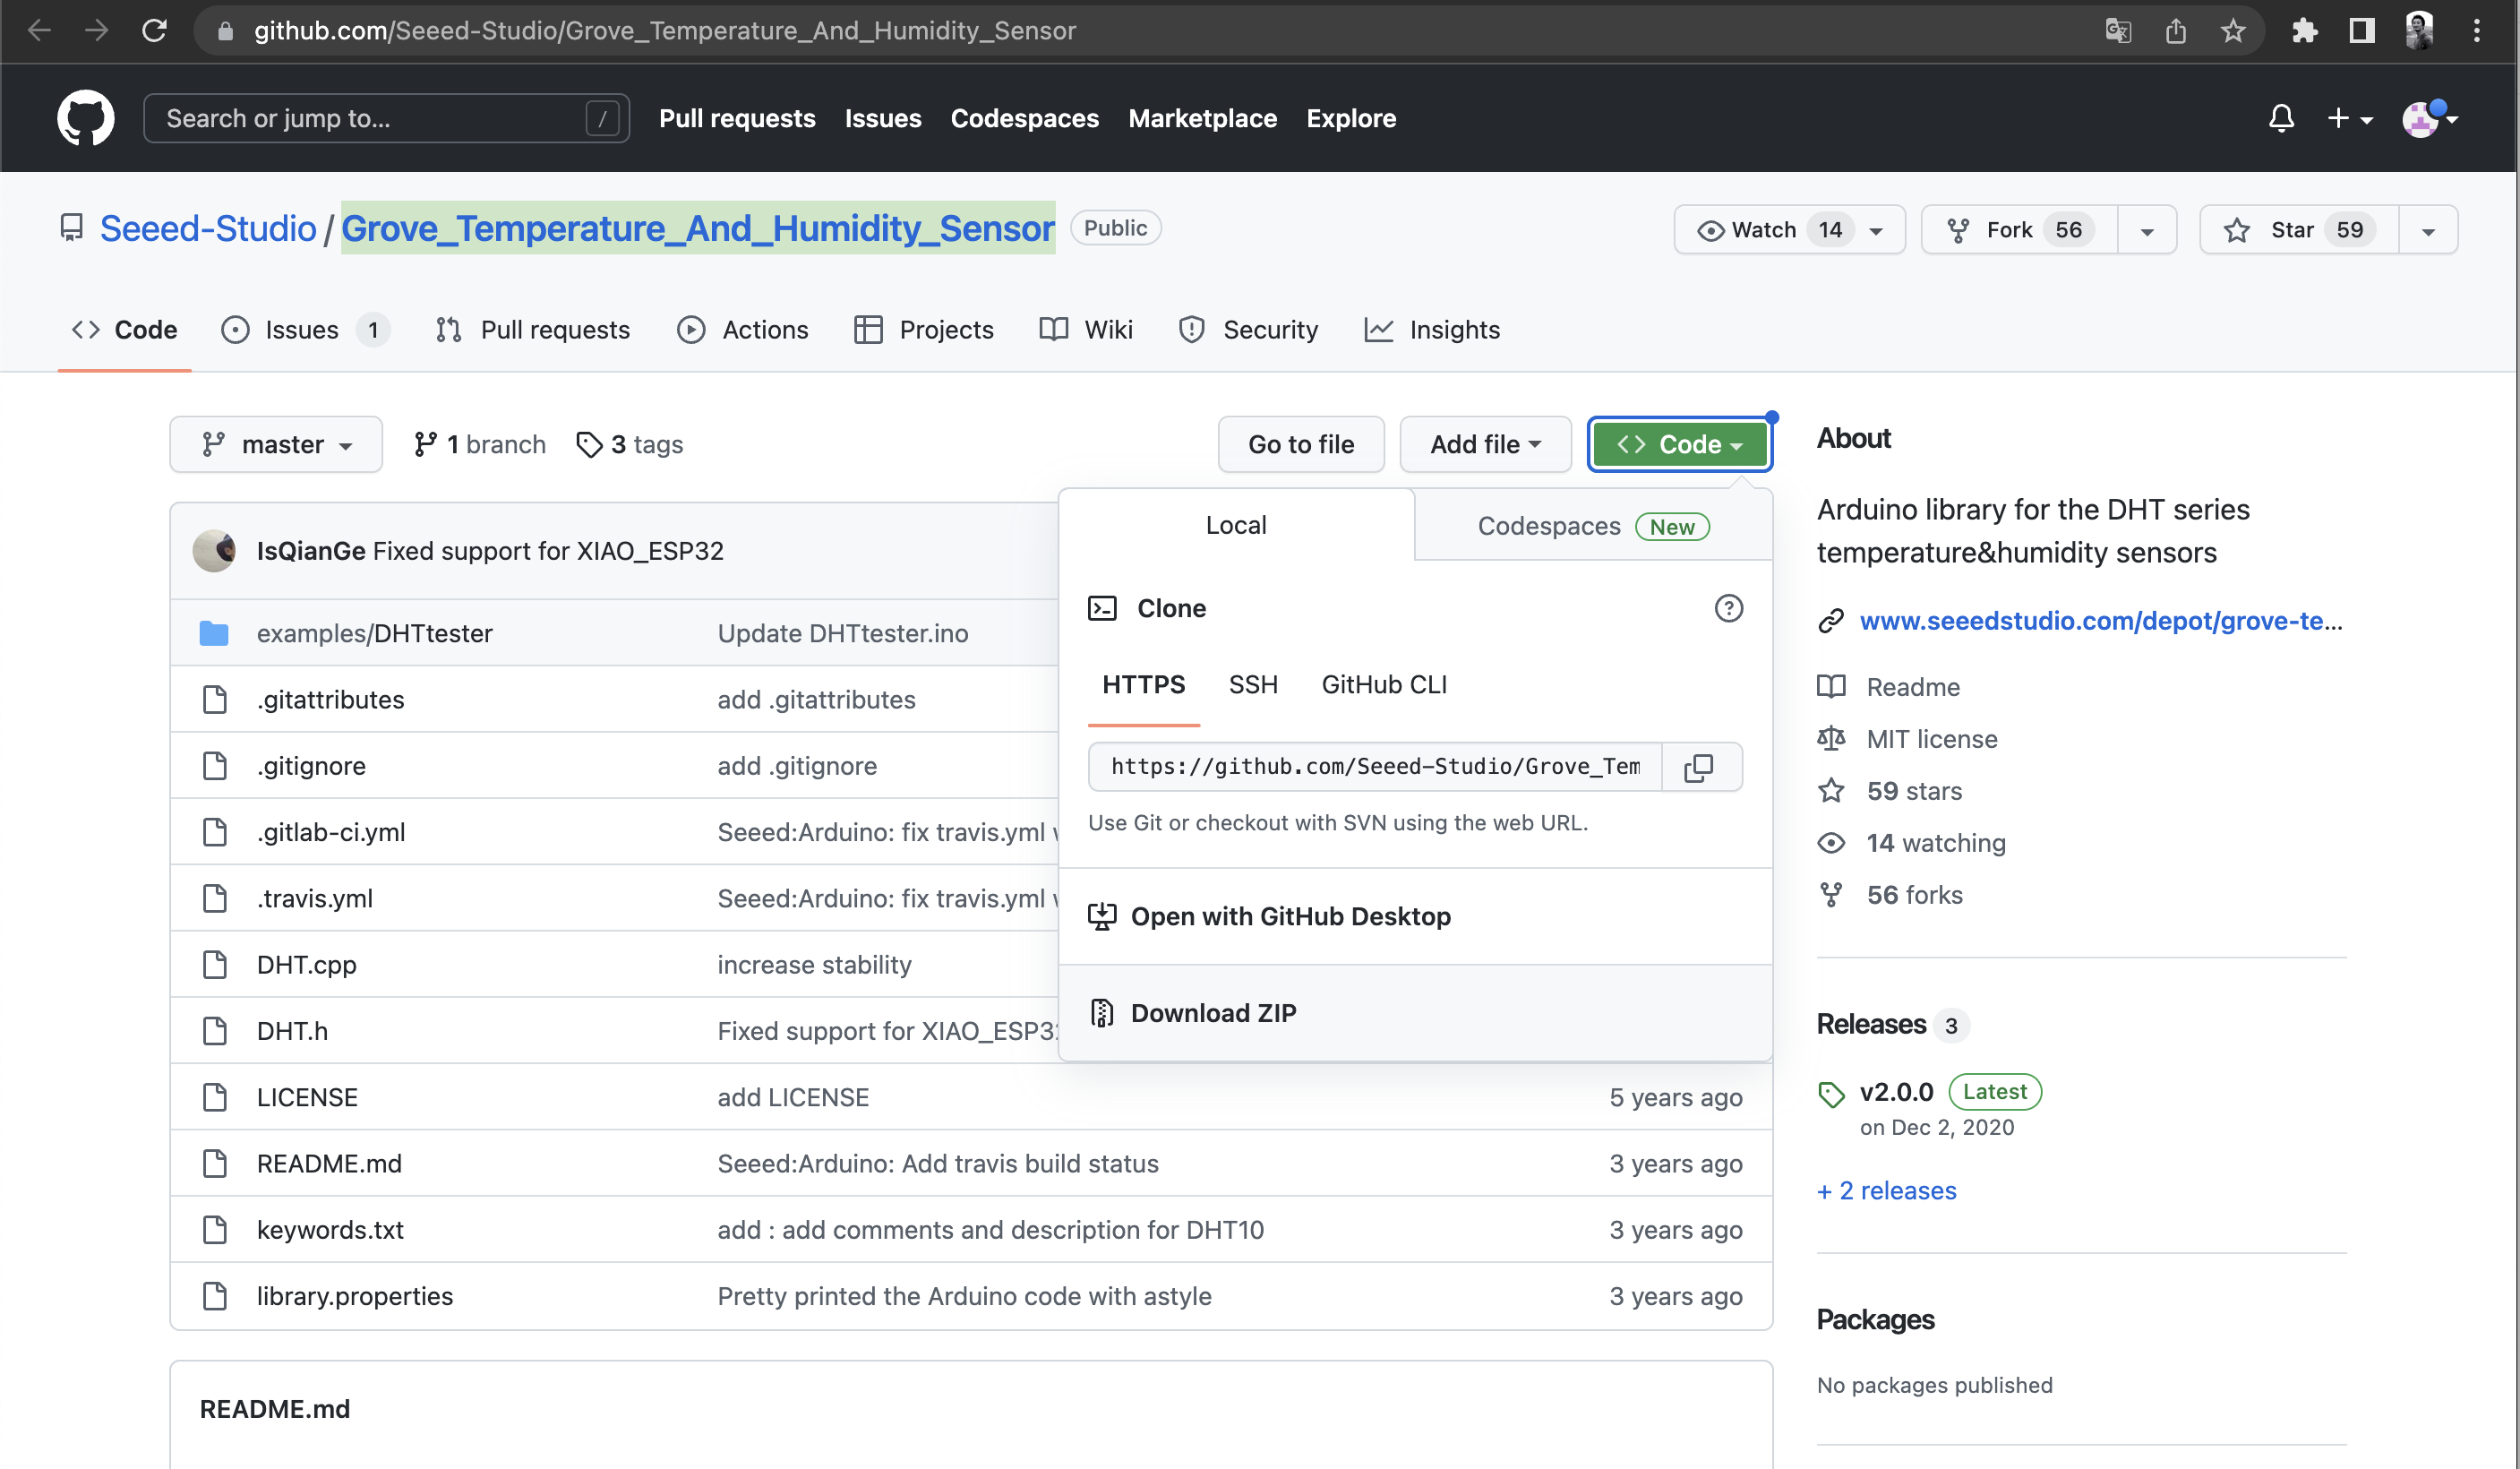
Before starting to program the Grove Temperature and Humidity Sensor with the Arduino IDE, it is necessary to add the necessary library files for the sensor. Type the library file address in the browser address bar: 🔗 https://github.com/Seeed-Studio/Grove_Temperature_And_Humidity_Sensor, enter the GitHub page, and click `Code→Download ZIP` to download the resource package `Grove_Temperature_And_Humidity_Sensor-master.zip` to your local machine, as shown in the image below.
<!--  -->
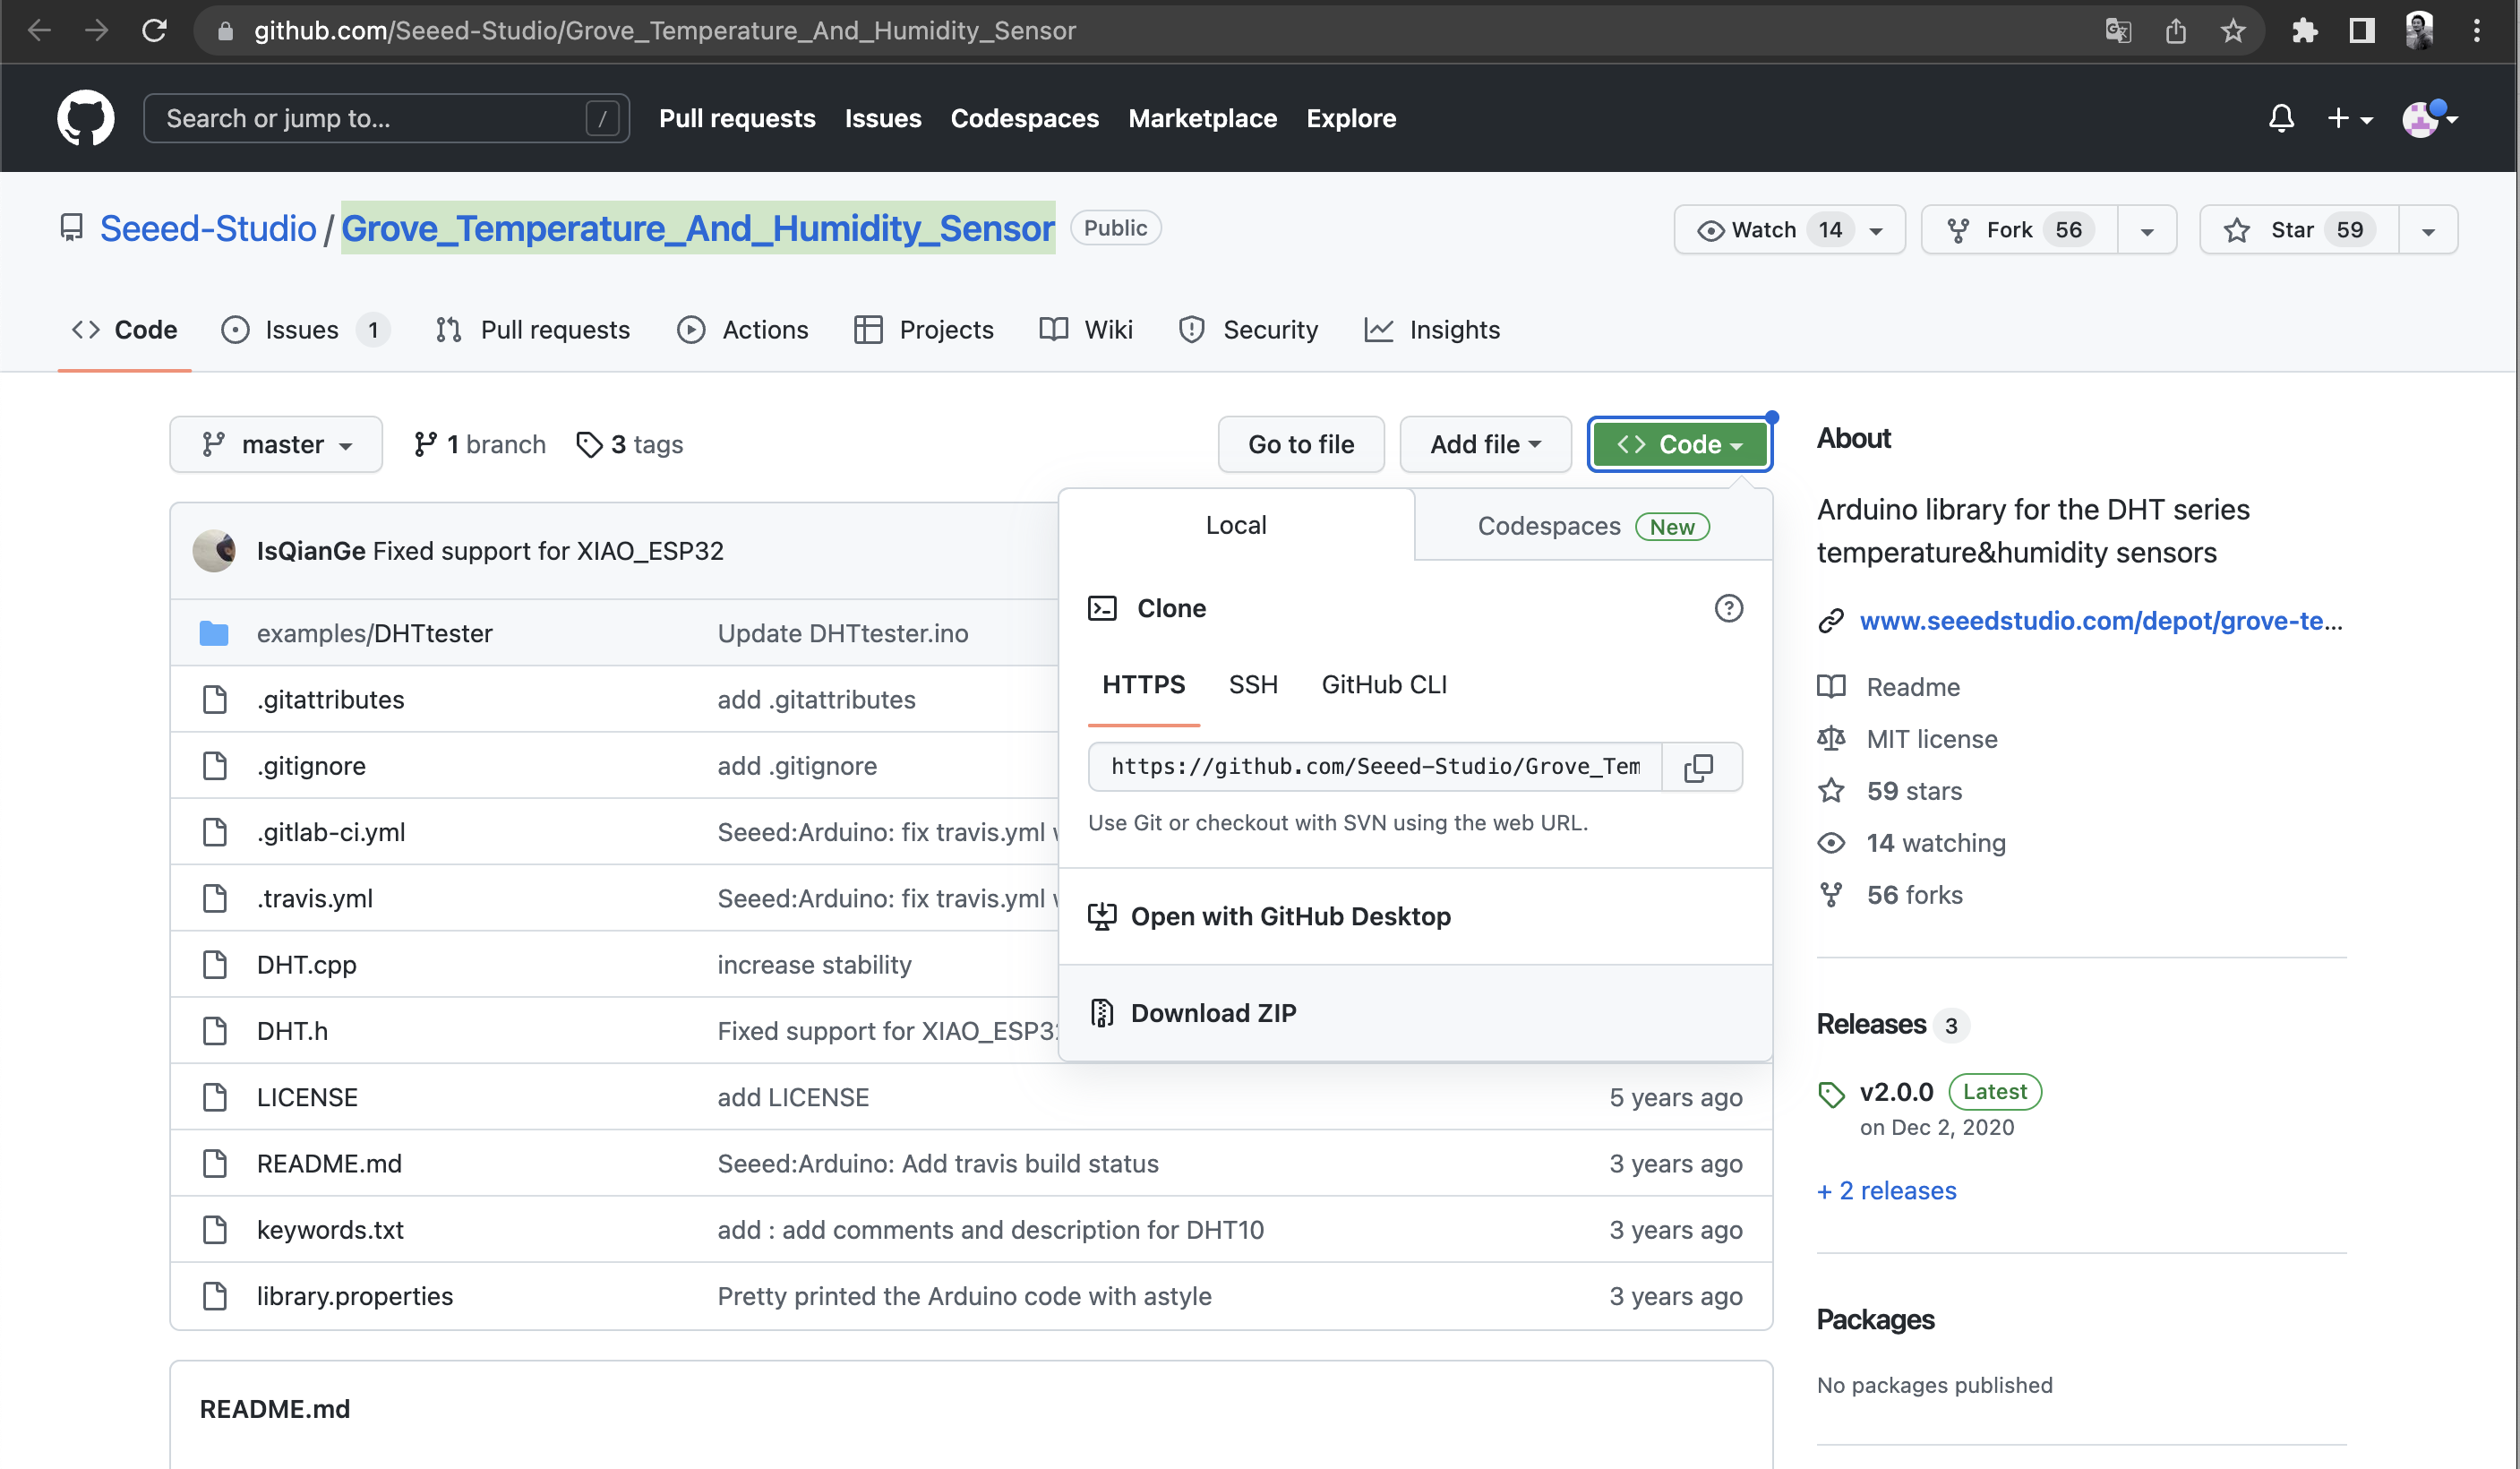
Add the resource package `Grove_Temperature_And_Humidity_Sensor-master.zip` downloaded in the previous step in the menu bar's `Sketch→Include Library→Add .ZIP Library`, until you see a prompt indicating the successful loading of the library.
#### **Opening the "DHTtester" Example**
Once the library file has been successfully added, the DHT library can be used. The "DHTtester" example can be opened through the following path: `File→Examples→Grove Temperature And Humidity Sensor→DHTtester`.
> ⚠️ Note
> If the DHTtester example is not found in the menu after installing the library files, it can be viewed by closing and reopening the Arduino IDE.
After opening the example program, we can see a program like the one shown below. This program reads the temperature and relative humidity in the environment and displays real-time data in the serial monitor. Part of the example program's code needs to be modified.
``` cpp
// Example testing sketch for various DHT humidity/temperature sensors
// Written by ladyada, public domain
#include "DHT.h"
// Uncomment whatever type you're using!
//#define DHTTYPE DHT11 // DHT 11
#define DHTTYPE DHT22 // DHT 22 (AM2302)
//#define DHTTYPE DHT21 // DHT 21 (AM2301)
//#define DHTTYPE DHT10 // DHT 10
//#define DHTTYPE DHT20 // DHT 20
/*Notice: The DHT10 and DHT20 is different from other DHT* sensor ,it uses i2c interface rather than one wire*/
/*So it doesn't require a pin.*/
#define DHTPIN 2 // what pin we're connected to(DHT10 and DHT20 don't need define it)
DHT dht(DHTPIN, DHTTYPE); // DHT11 DHT21 DHT22
//DHT dht(DHTTYPE); // DHT10 DHT20 don't need to define Pin
// Connect pin 1 (on the left) of the sensor to +5V
// Connect pin 2 of the sensor to whatever your DHTPIN is
// Connect pin 4 (on the right) of the sensor to GROUND
// Connect a 10K resistor from pin 2 (data) to pin 1 (power) of the sensor
#if defined(ARDUINO_ARCH_AVR)
#define debug Serial
#elif defined(ARDUINO_ARCH_SAMD) || defined(ARDUINO_ARCH_SAM)
#define debug SerialUSB
#else
#define debug Serial
#endif
void setup() {
debug.begin(115200);
debug.println("DHTxx test!");
Wire.begin();
/*if using WIO link,must pull up the power pin.*/
// pinMode(PIN_GROVE_POWER, OUTPUT);
// digitalWrite(PIN_GROVE_POWER, 1);
dht.begin();
}
void loop() {
float temp_hum_val[2] = {0};
// Reading temperature or humidity takes about 250 milliseconds!
// Sensor readings may also be up to 2 seconds 'old' (its a very slow sensor)
if (!dht.readTempAndHumidity(temp_hum_val)) {
debug.print("Humidity: ");
debug.print(temp_hum_val[0]);
debug.print(" %\t");
debug.print("Temperature: ");
debug.print(temp_hum_val[1]);
debug.println(" *C");
} else {
debug.println("Failed to get temprature and humidity value.");
}
delay(1500);
}
```
Pay attention to the document's comments. The program above provides several types of temperature and humidity sensor models (DHT22 is set as default), but we need the DHT20. So, uncomment the part for DHT20 and delete the definitions for other unneeded sensor models. DHT10 and DHT20 do not require pin definitions, so the revised code after modification is as follows:
``` cpp
#include "DHT.h"
#define DHTTYPE DHT20 // DHT 20
DHT dht(DHTTYPE);
#if defined(ARDUINO_ARCH_AVR)
#define debug Serial
#elif defined(ARDUINO_ARCH_SAMD) || defined(ARDUINO_ARCH_SAM)
#define debug Serial
#else
#define debug Serial
#endif
void setup() {
debug.begin(115200);
debug.println("DHTxx test!");
Wire.begin();
dht.begin();
}
void loop() {
float temp_hum_val[2] = {0};
if (!dht.readTempAndHumidity(temp_hum_val)) {
debug.print("Humidity: ");
debug.print(temp_hum_val[0]);
debug.print(" %\t");
debug.print("Temperature: ");
debug.print(temp_hum_val[1]);
debug.println(" *C");
} else {
debug.println("Failed to get temprature and humidity value.");
}
delay(1500);
}
```
> Get this program from Github
> <https://github.com/mouseart/XIAO-Mastering-Arduino-and-TinyML/tree/main/code/L8_DHTtester_DHT20_XIAO_en>
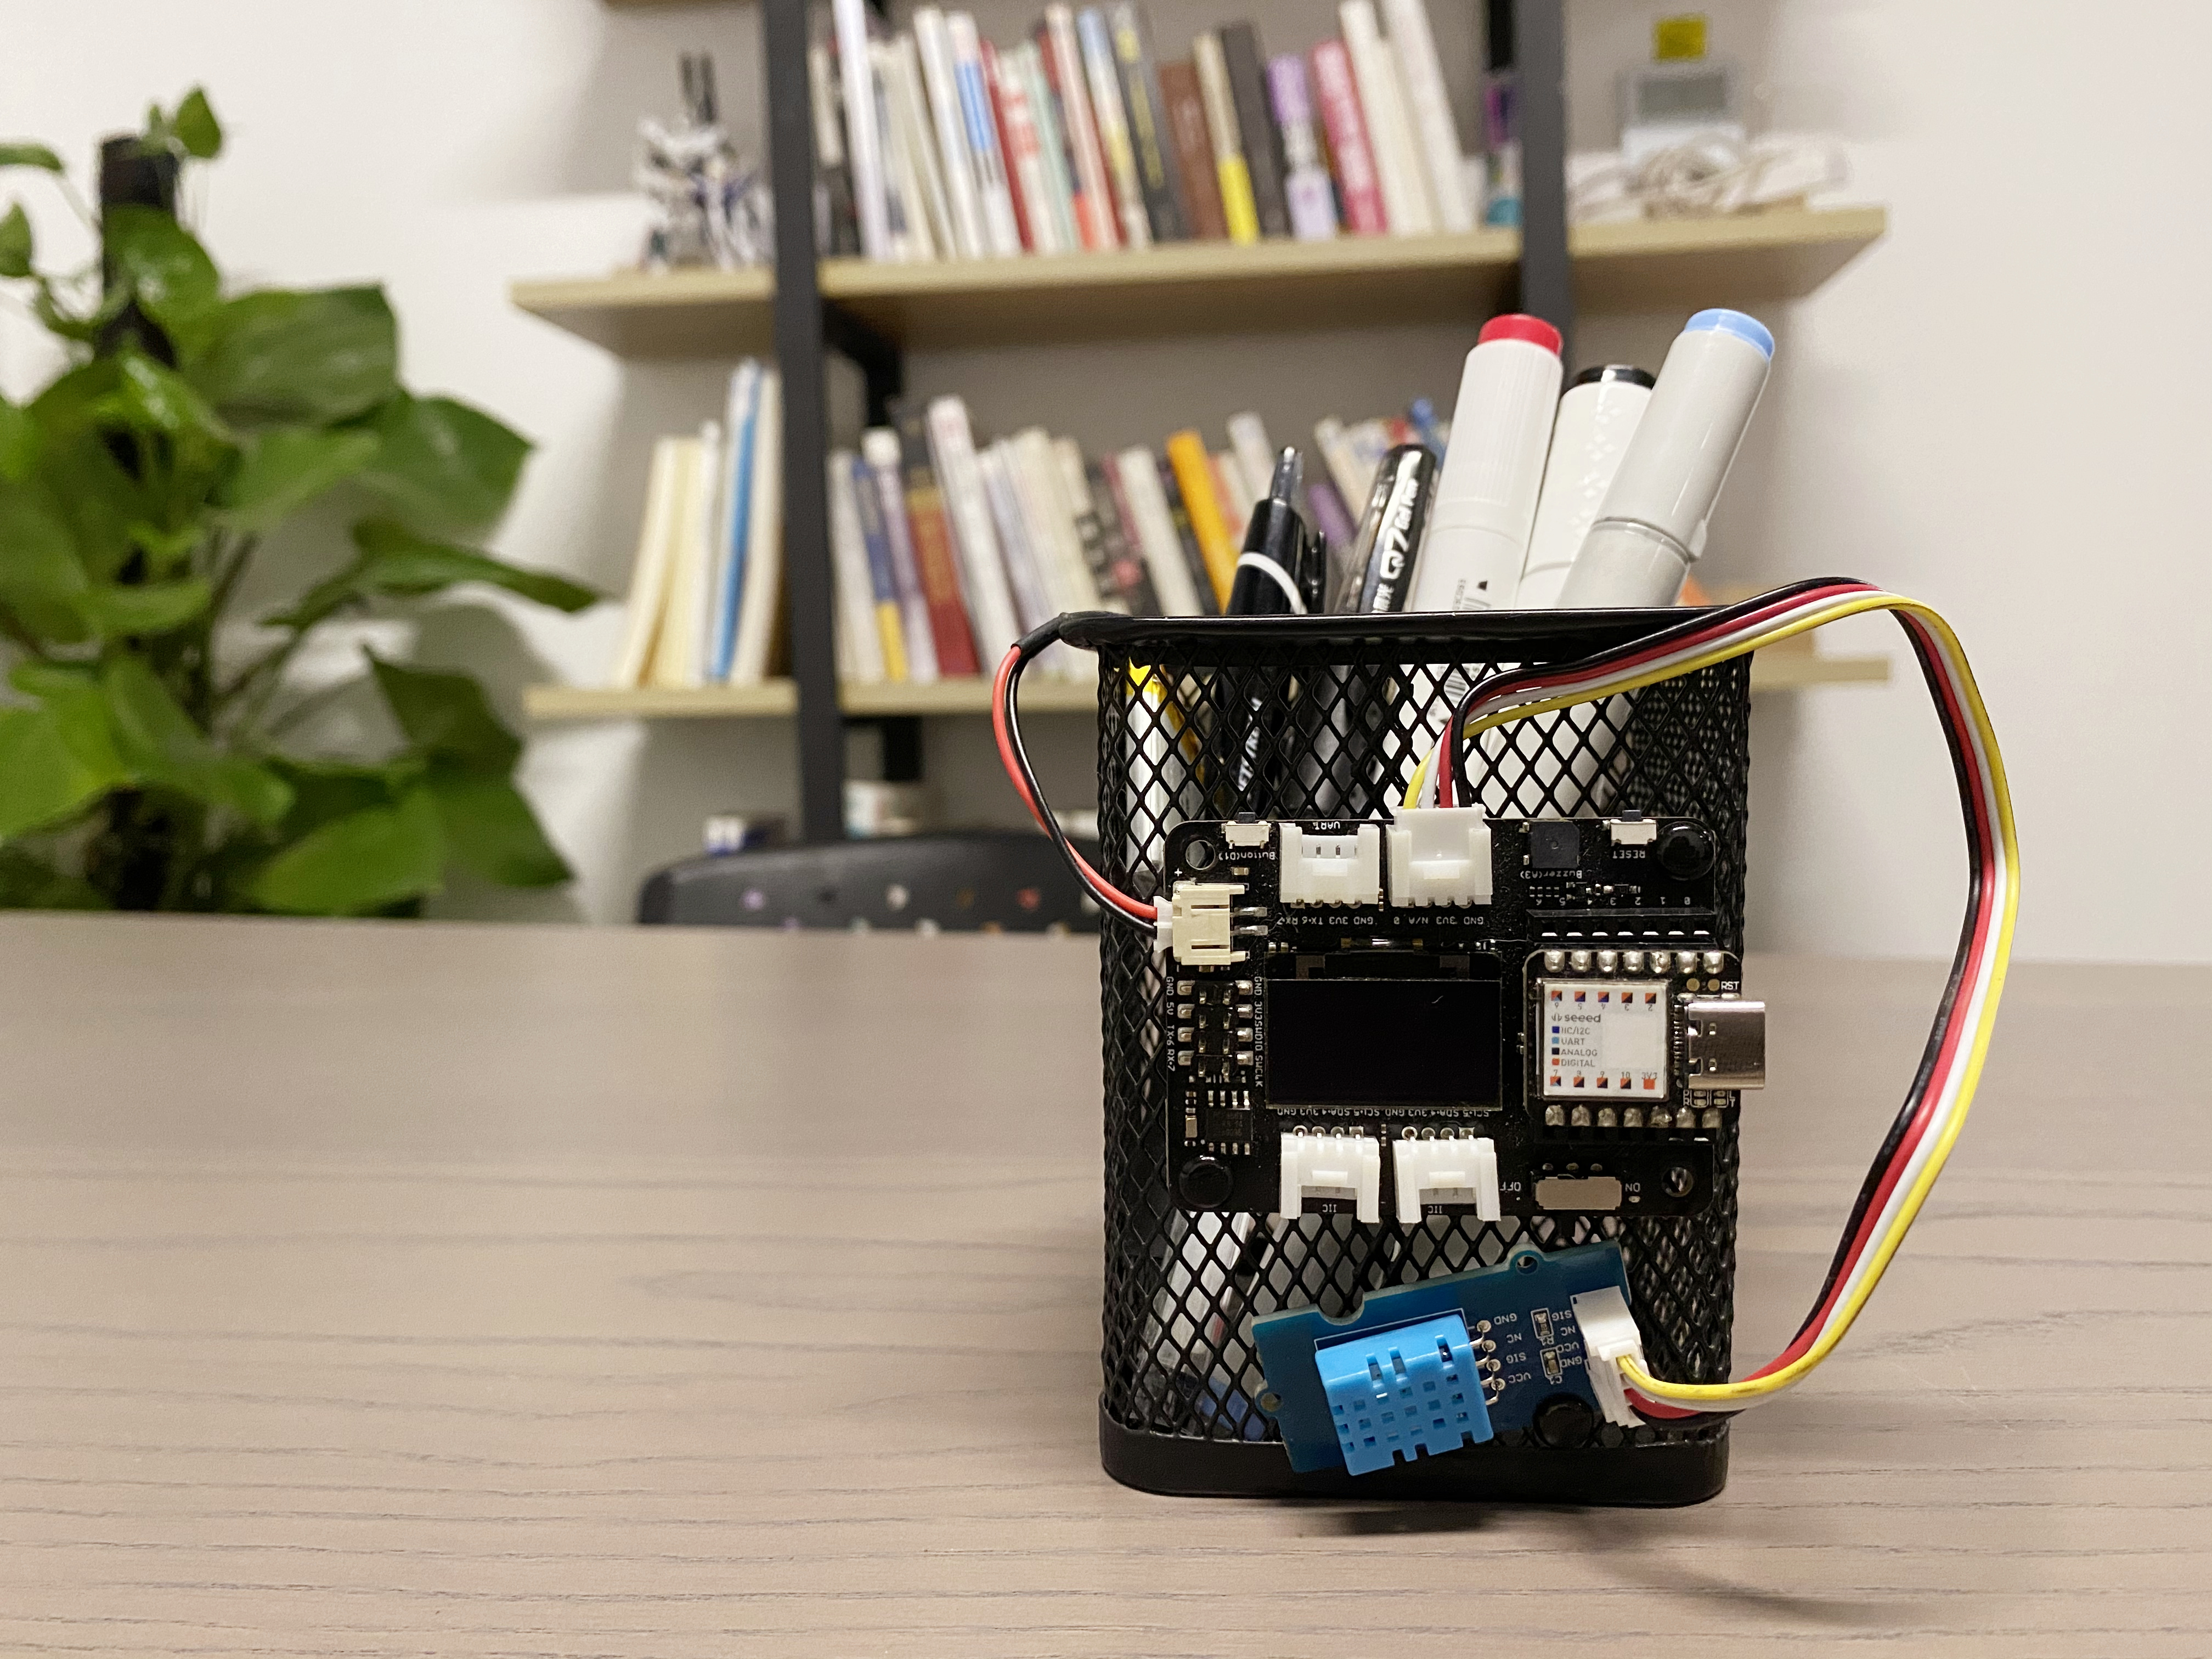
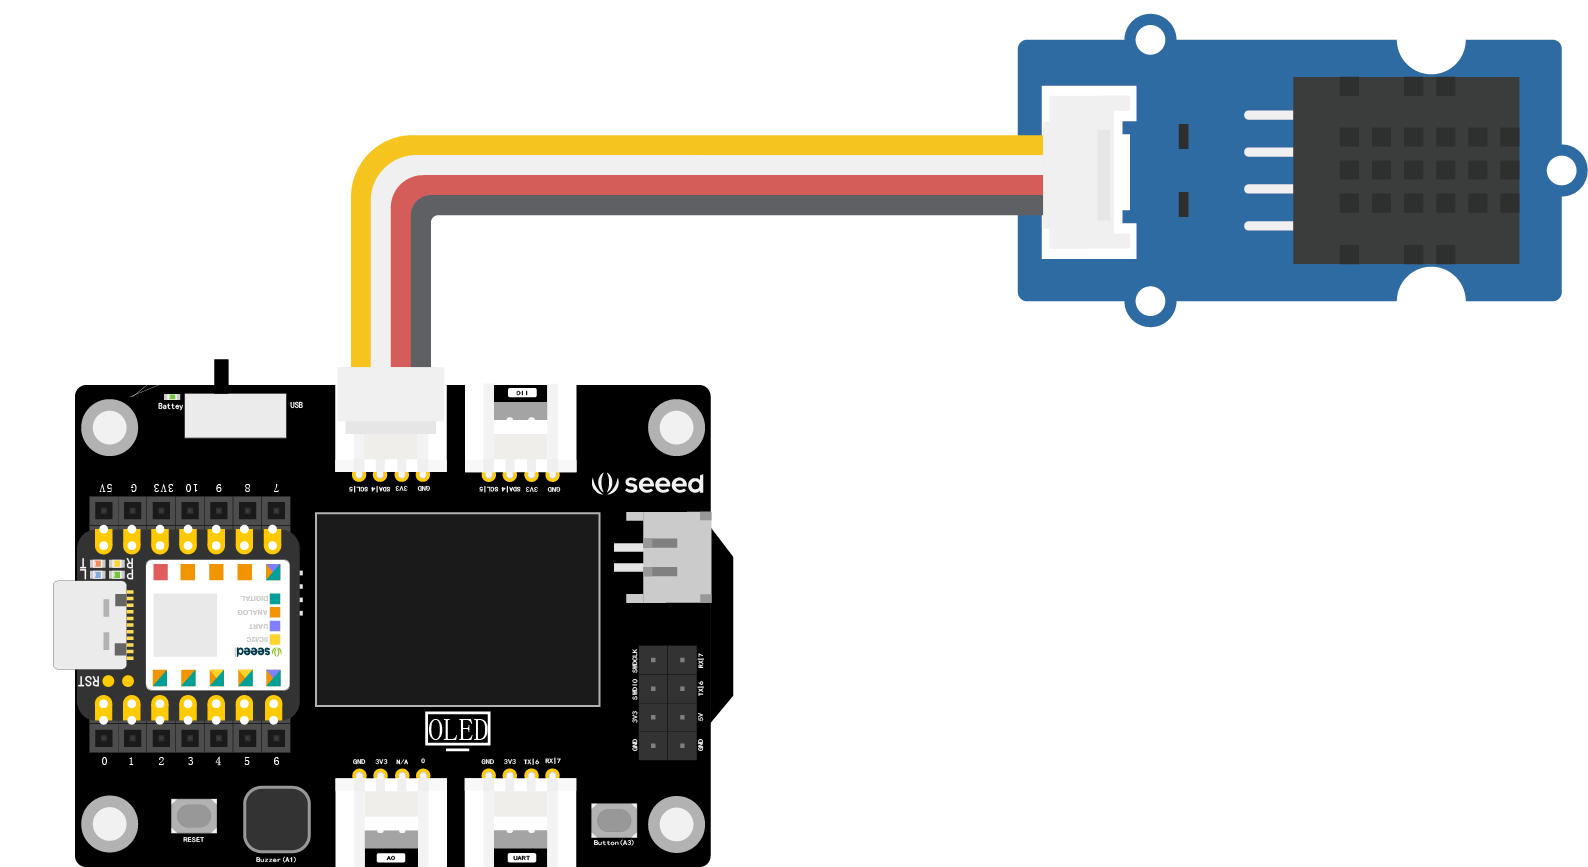
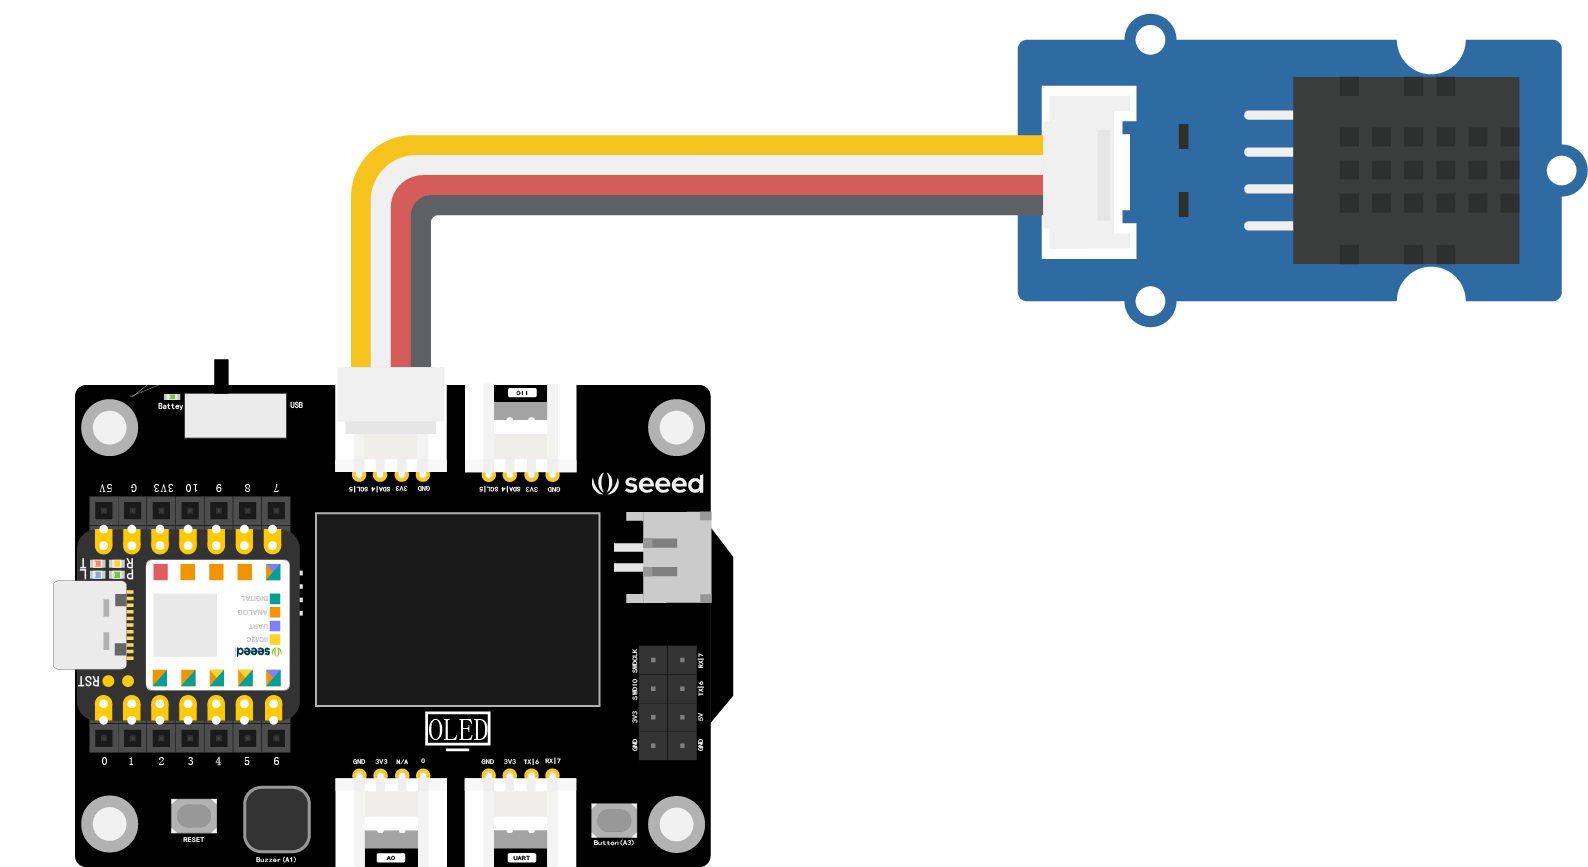
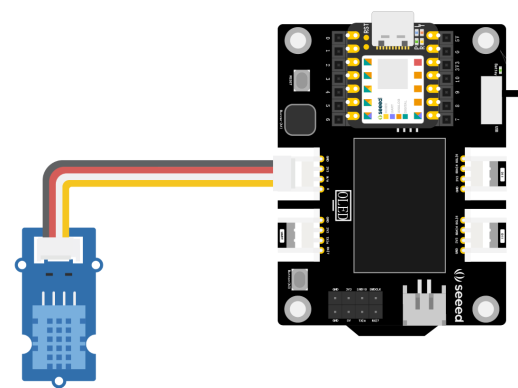
After modifying the code, first connect the temperature and humidity sensor to the I2C interface of the XIAO expansion board, as shown below. Then connect the XIAO development board to your computer, upload the modified example program to XIAO in the Arduino IDE, and open the serial monitor in Arduino IDE. You will now be able to see the values of temperature and humidity. Try placing the sensor in different environments to observe if the temperature and humidity values change.
<!--  -->
>
<!-- 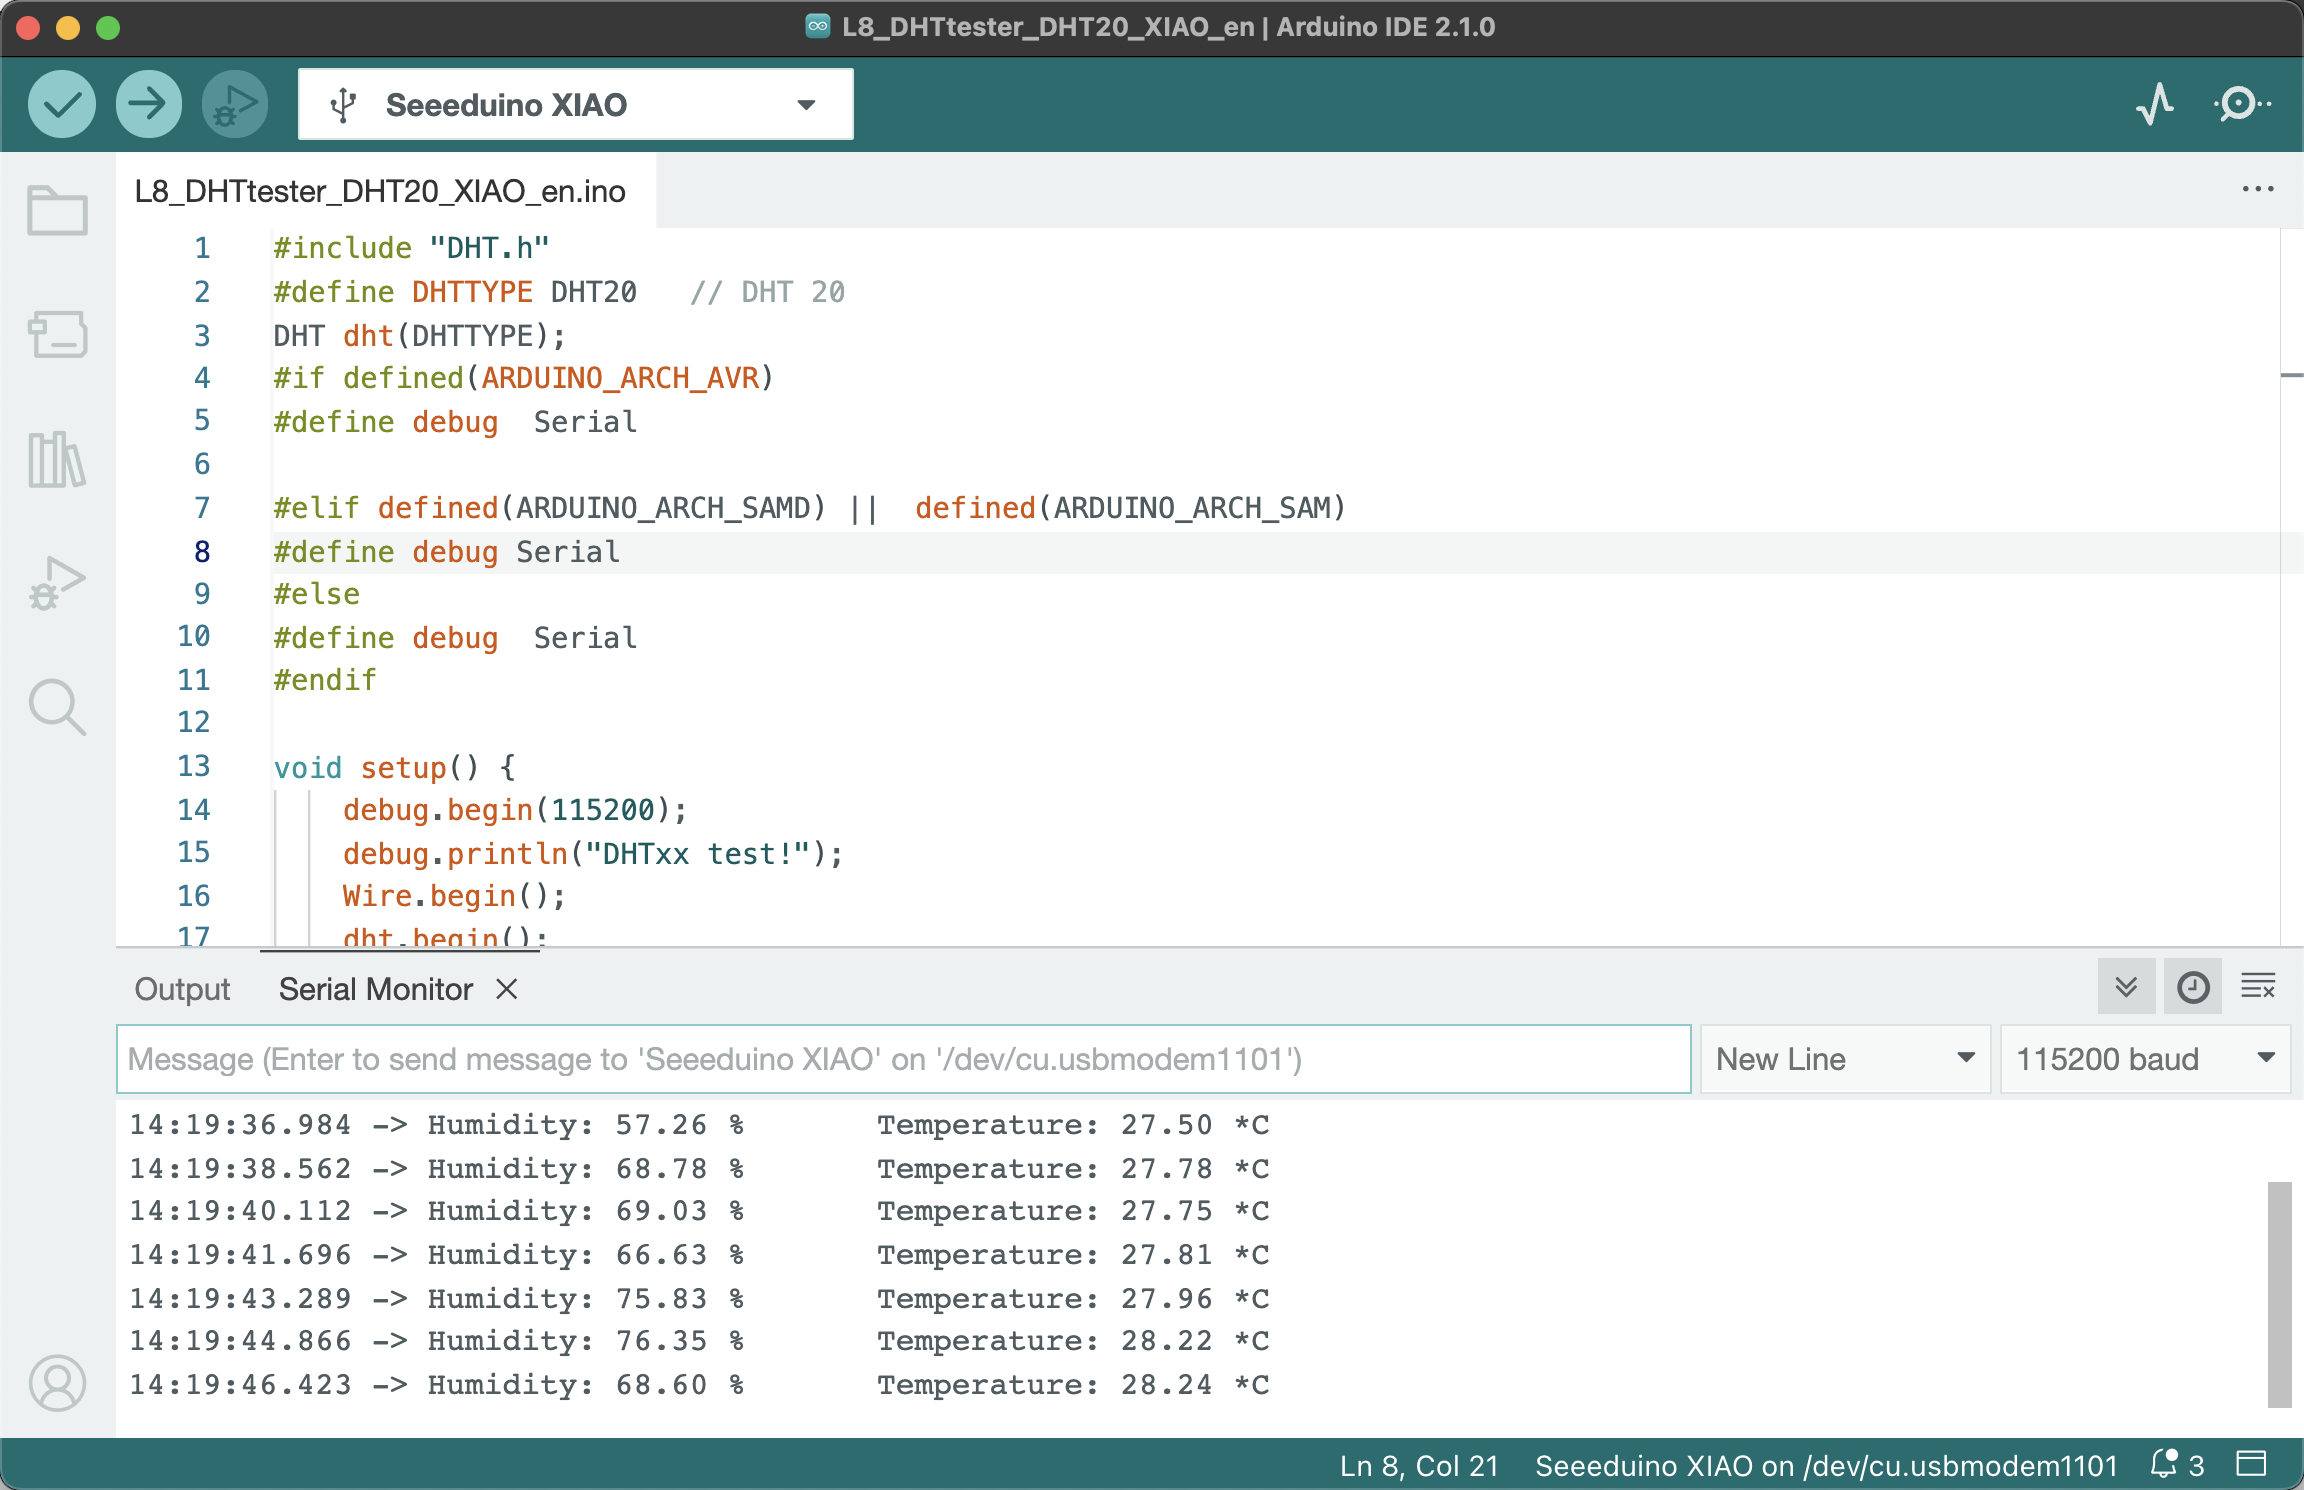 -->
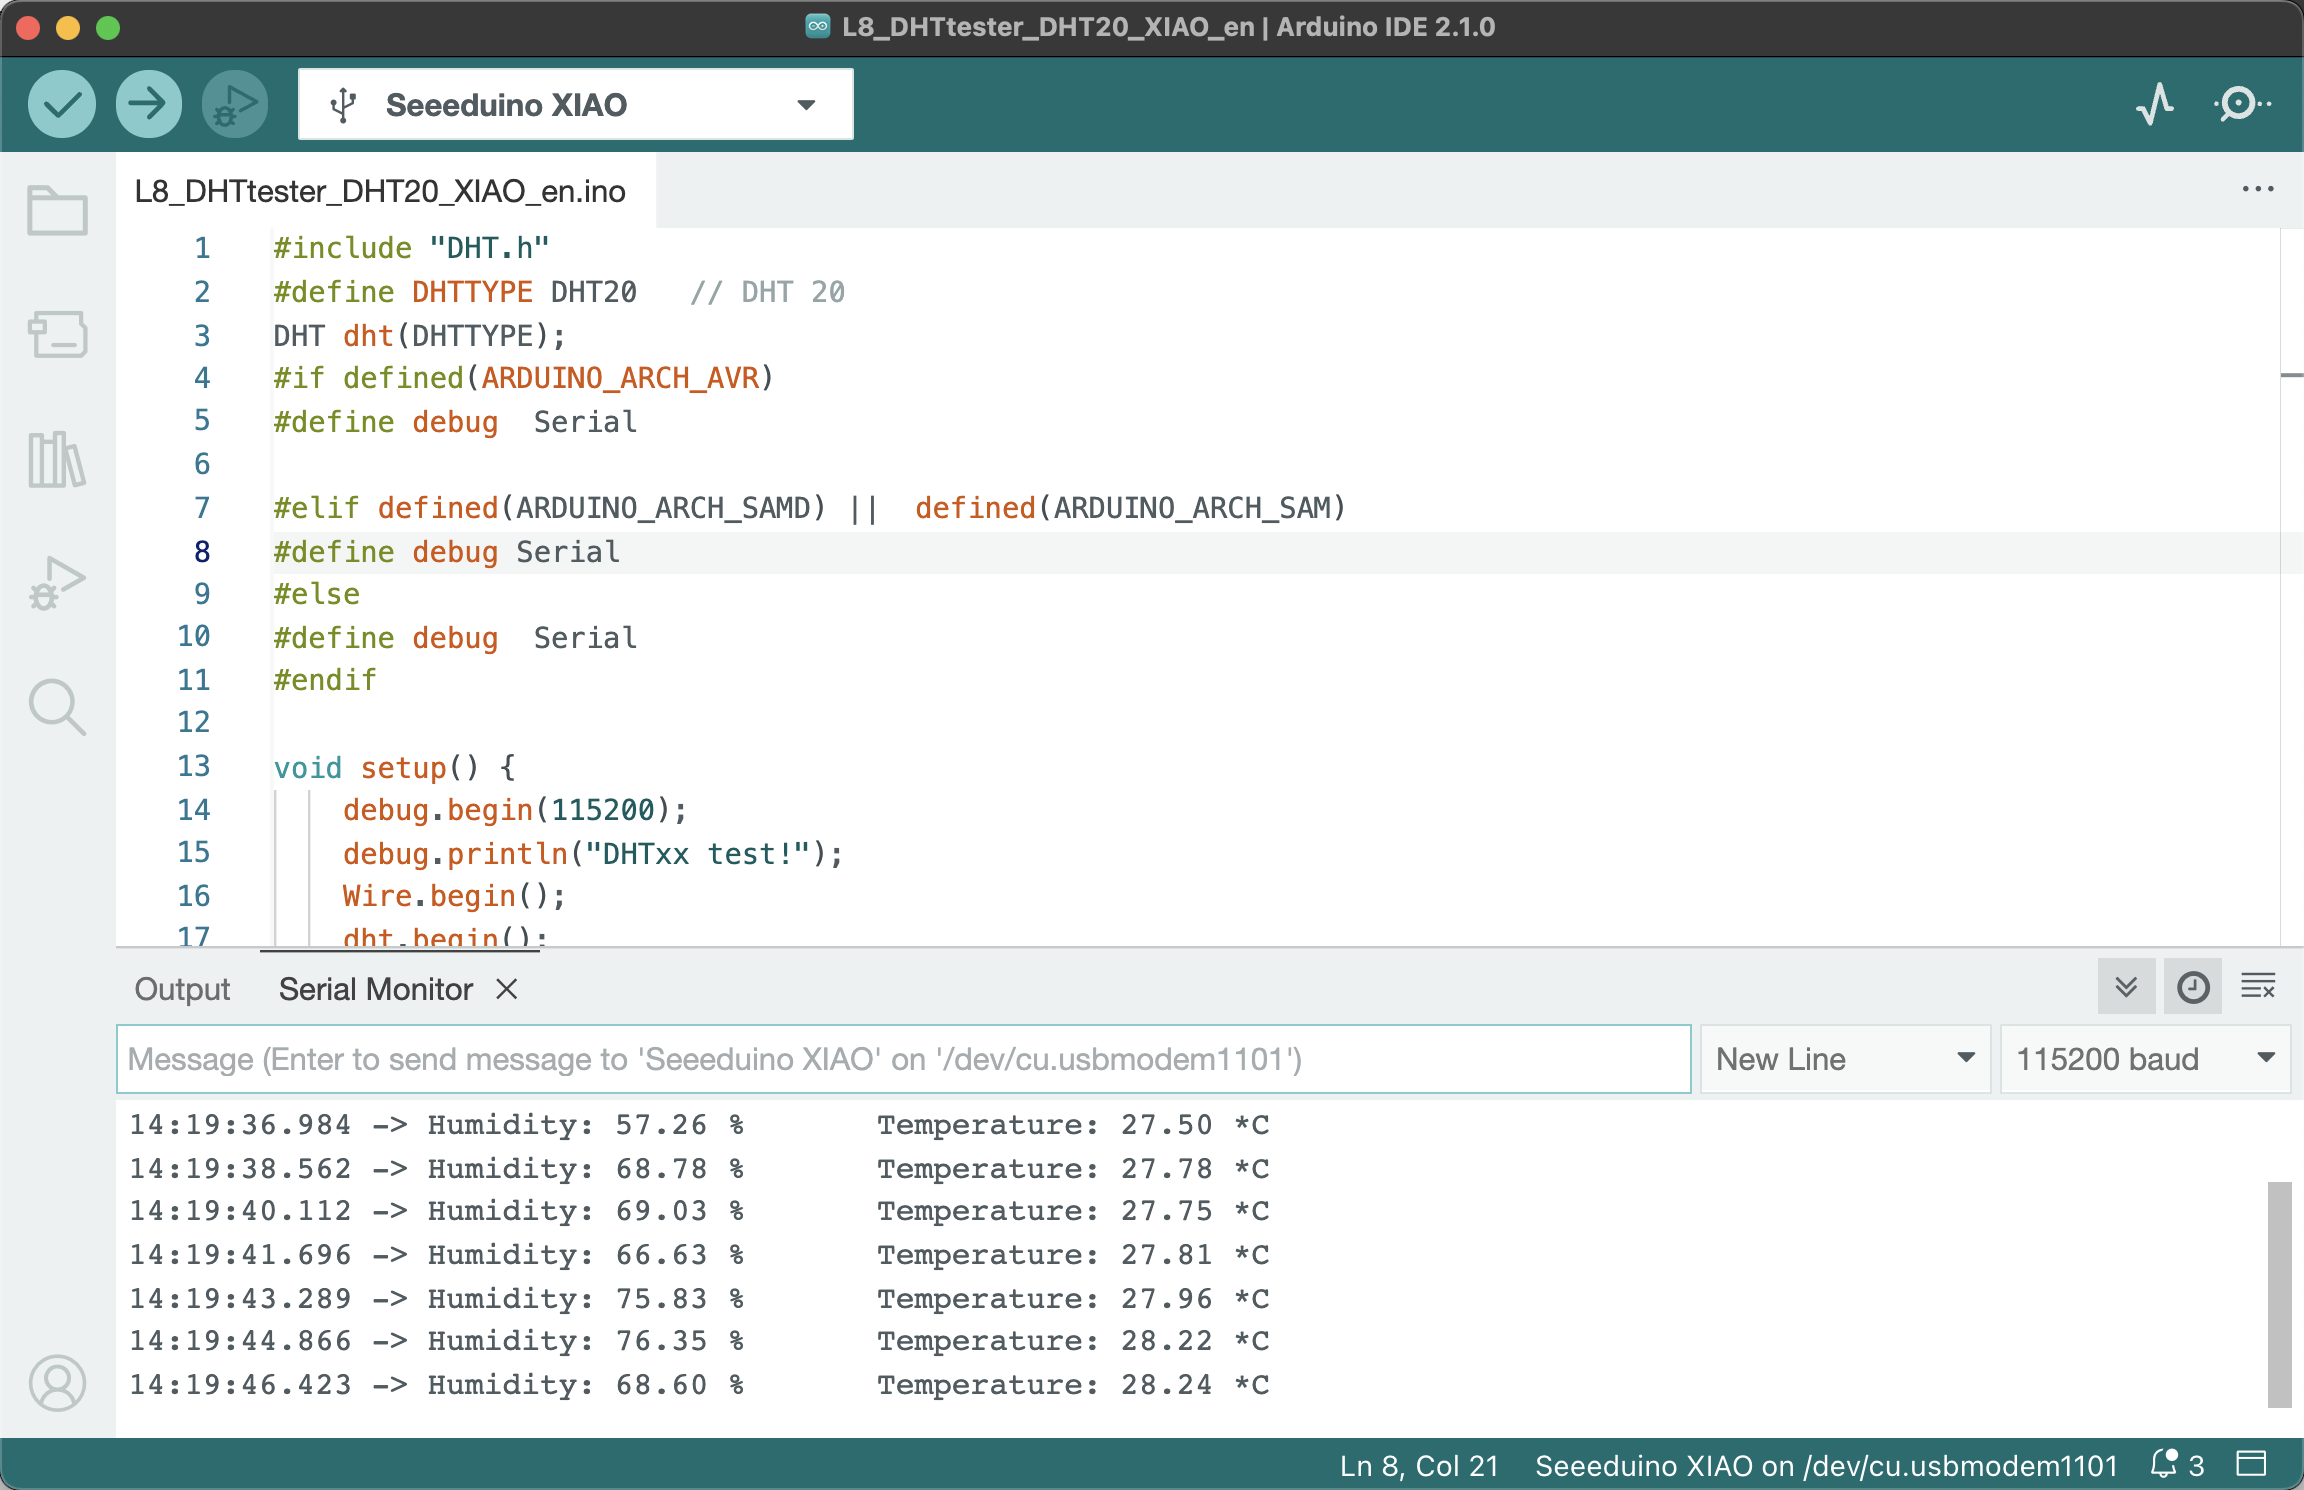
It appears the temperature and humidity sensor is functioning correctly.
#### **Reading Temperature and Humidity Values in the Serial Monitor (Based on the DHT11 Sensor) **
If you are using the Grove DHT11 Temperature and Humidity Sensor with a blue casing, parts of the program code need to be modified as follows: <br />
`#define DHTPIN 0` needs to be modified according to the actual pin number the sensor is connected to. <br />
`#define DHTTYPE DHT11` should be set because there are different models of temperature and humidity sensors, and you need to choose the correct one, i.e., DHT11. <br />
The example code after modification is shown below:
``` cpp
#include "DHT.h"
#define DHTTYPE DHT11 // DHT 11
#define DHTPIN 0
DHT dht(DHTPIN, DHTTYPE);
#if defined(ARDUINO_ARCH_AVR)
#define debug Serial
#elif defined(ARDUINO_ARCH_SAMD) || defined(ARDUINO_ARCH_SAM)
#define debug SerialUSB
#else
#define debug Serial
#endif
void setup() {
debug.begin(115200);
debug.println("DHTxx test!");
Wire.begin();
dht.begin();
}
void loop() {
float temp_hum_val[2] = {0};
if (!dht.readTempAndHumidity(temp_hum_val)) {
debug.print("Humidity: ");
debug.print(temp_hum_val[0]);
debug.print(" %\t");
debug.print("Temperature: ");
debug.print(temp_hum_val[1]);
debug.println(" *C");
} else {
debug.println("Failed to get temprature and humidity value.");
}
delay(1500);
}
```
> Get this program from Github <br />
> <https://github.com/mouseart/XIAO-Mastering-Arduino-and-TinyML/tree/main/code/L8_DHTtrster_DHT11_XIAO_en>
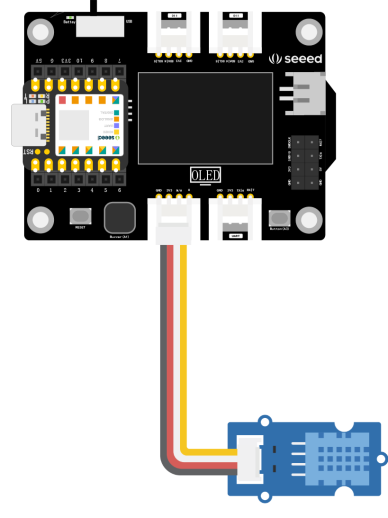
After modifying the code, first connect the temperature and humidity sensor to the A0 port of the XIAO expansion board, as shown in the figure below. Then, connect the XIAO development board to the computer, upload the modified example program to XIAO in the Arduino IDE, and open the serial monitor in the Arduino IDE to see the values of temperature and humidity. You can place the temperature and humidity sensor in different environments to see if the temperature and humidity values will change.
<!--  -->
## 2.2.3 Project Creation: Smart Temperature and Humidity Meter
### Project Description
We are going to make a portable mini temperature and humidity detector that detects temperature and humidity values through a temperature and humidity sensor and displays the values on the OLED display of the XIAO expansion board. However, it is not rich enough to have only the display function. We can add a buzzer alarm function. When the detected temperature and humidity exceed a certain range, an alarm will be sounded as a reminder. The value range can be adjusted according to different application scenarios. For example, in a home life scenario, set a comfortable temperature and humidity range based on human feelings; or use it in plant planting places, set the temperature and humidity value range based on suitable plant growth, exceed the alarm, and remind people to adjust.
### Program Writing
Referencing the example program above, one of the effects we want to achieve is to display the temperature and humidity values on the OLED display of the XIAO expansion board. The code for reading the temperature and humidity sensor detection values can be reused by just changing the display medium. In combination with Section 1.6, we have learned how to display characters on the OLED, so we just need to add an if...else condition judgment statement to judge the temperature and humidity values. The program writing idea is as follows:
- Declare the DHT.h library, U8x8 library, etc., and connect the buzzer pin as a reminder to sound the device.
- Initialize the library file, define the buzzer pin state.
- Define temperature and humidity variables to store readings and display them on the OLED screen, add logical judgment, and implement buzzer alarm.
To facilitate understanding and implementation, we divide the program implementation into two tasks:
1. Detect temperature and humidity and display them on the OLED screen of the XIAO expansion board.
2. Add alarm function.
#### **Task 1: Use the Grove DHT20 sensor to detect temperature and humidity and display them on the OLED screen of the XIAO expansion board **
**Step 1:** Headers, declare the library files to be called.
``` cpp
#include "DHT.h" //Use DHT library
#include <Arduino.h>
#include <U8x8lib.h> //Use u8x8 library
#define DHTTYPE DHT20
DHT dht(DHTTYPE); //DHT20 does not need to define pins
U8X8_SSD1306_128X64_NONAME_HW_I2C u8x8(/* reset=*/ U8X8_PIN_NONE); //Setup constructor to connect to OLED screen
```
**Step 2:** Initialize the DHT library and the u8x8 library.
``` cpp
void setup() {
Wire.begin(); //Initialize wire library, and join I2C network
dht.begin(); //DHT starts working
u8x8.begin(); //u8x8 starts working
u8x8.setPowerSave(0); //Turn off power saving mode, 1 is on, and nothing can be seen on the screen after power saving mode is on
u8x8.setFlipMode(1);
}
```
**Step 3:** Define temperature and humidity variables to store readings, read temperature and humidity values and display them on the OLED screen. Pay attention to the coordinate positions of temperature and humidity display.
``` cpp
void loop() {
float temp, humi; //Set the variables temp and humi to floating point type, representing temperature and humidity respectively
temp = dht.readTemperature(); //Read temperature value and store it in temp
humi = dht.readHumidity(); //Read humidity value and store it in humi
u8x8.setFont(u8x8_font_chroma48medium8_r); //Set display font
u8x8.setCursor(0, 33); //Set the position of the drawing cursor (0,33)
u8x8.print("Temp:"); //Display Temp at the position (0,33)
u8x8.print(temp); //Display real-time temperature value
u8x8.print("C"); //Display the unit "C" of temperature
u8x8.setCursor(0,50);
u8x8.print("Humidity:");
u8x8.print(humi);
u8x8.print("%");
u8x8.refreshDisplay();
delay(200);
}
```
> Get this program from Github
> <https://github.com/mouseart/XIAO-Mastering-Arduino-and-TinyML/tree/main/code/L8_dht20_tem_humi_XIAO_en>
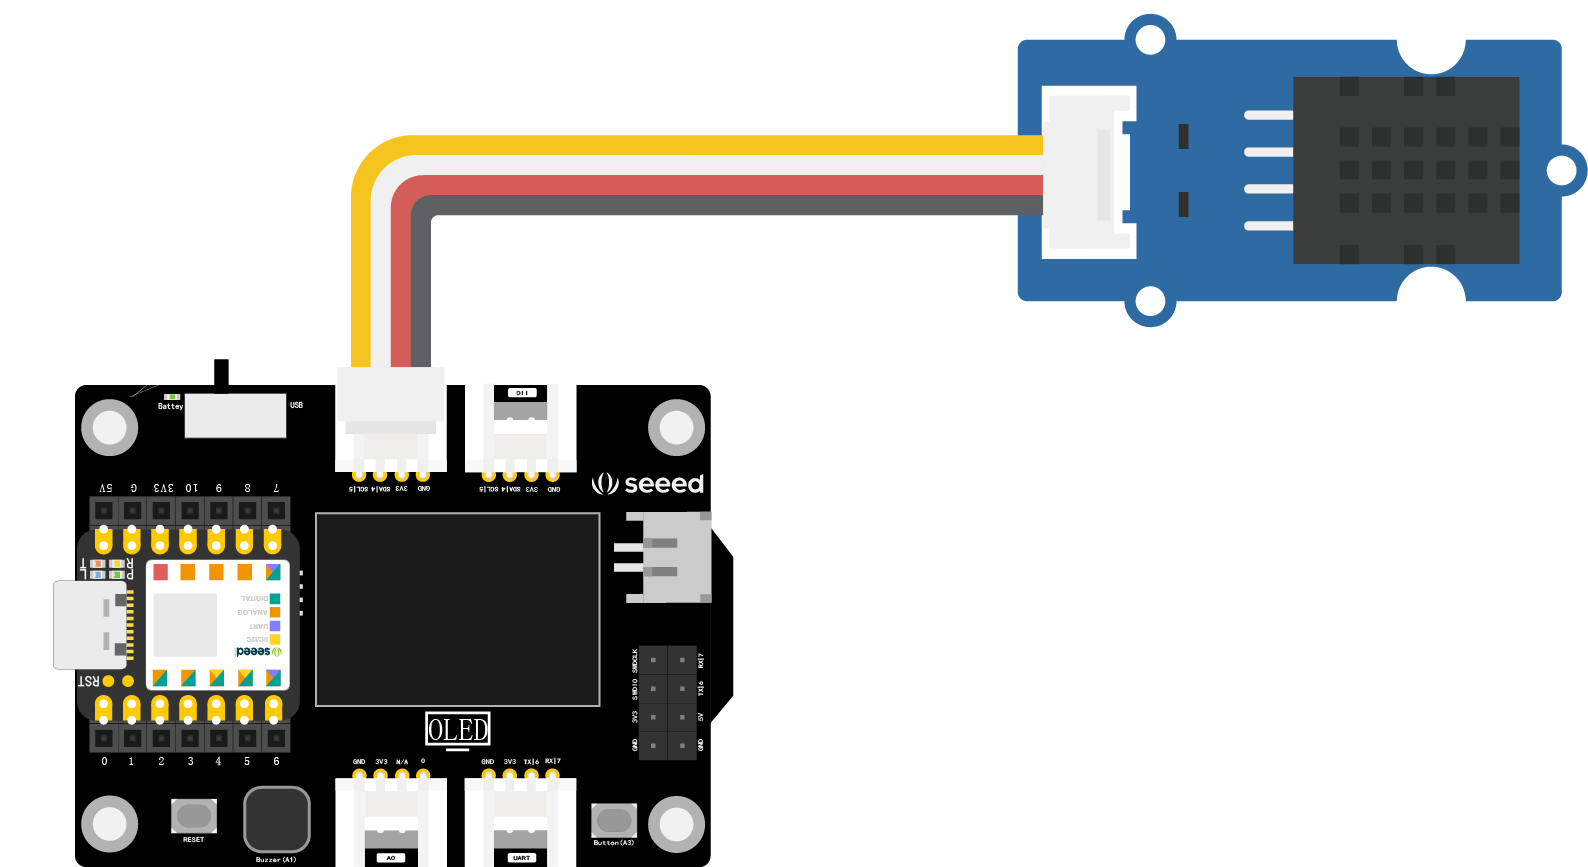
**Step 4:** Connect the hardware, upload the program Connect the temperature and humidity sensor to the I2C interface of the XIAO expansion board, as shown in the figure:
<!--  -->
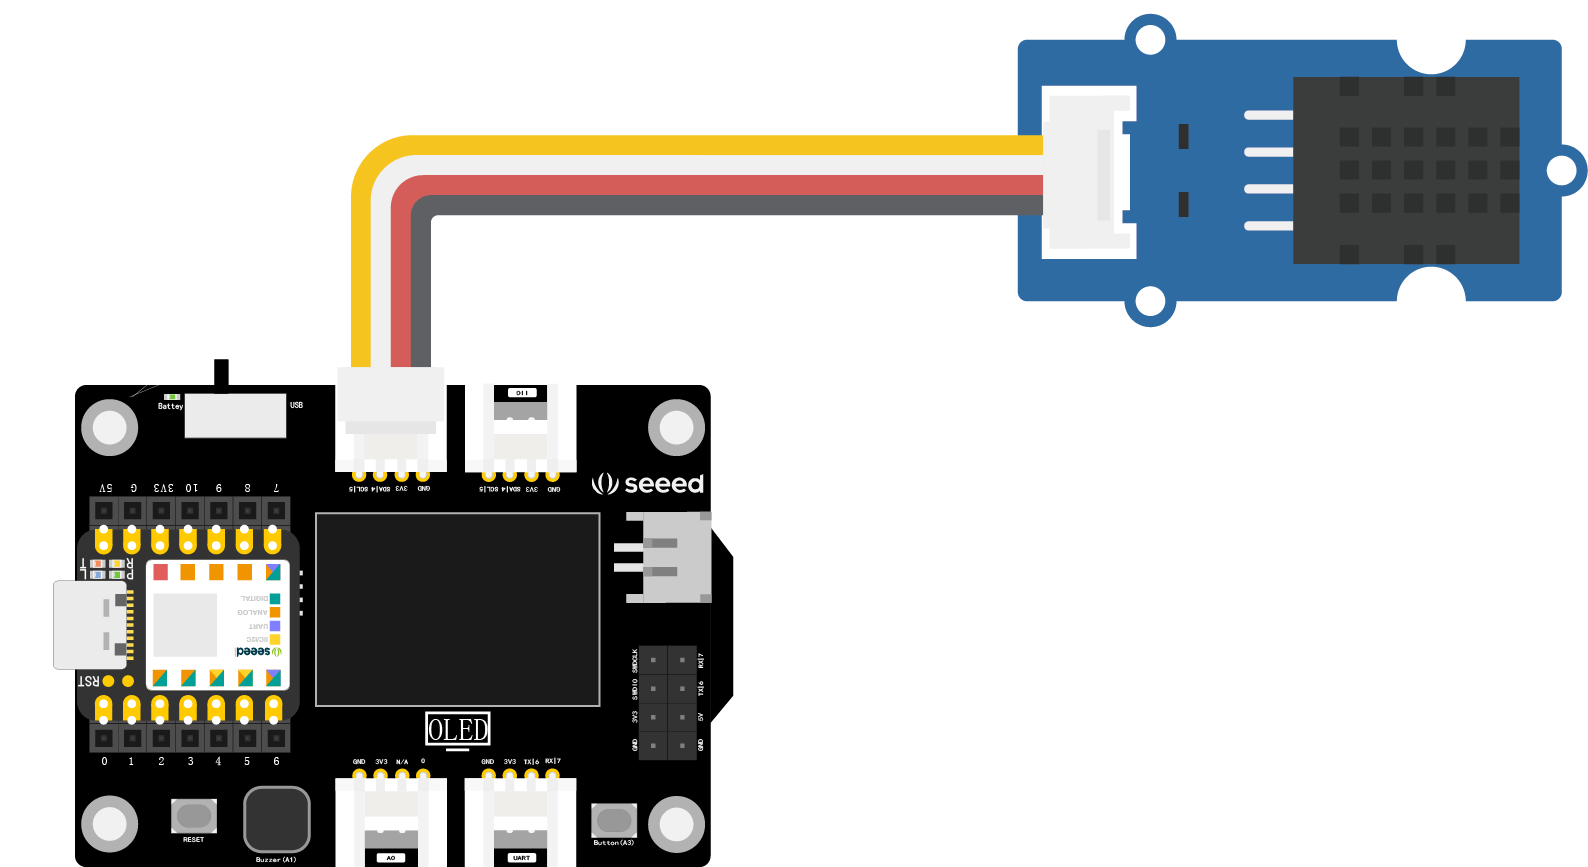
Use the data cable to connect XIAO to the computer, click the "upload" button in the Arduino IDE, and upload the program to the hardware. When the debugging area shows "upload successful", you can observe whether the temperature and humidity values are displayed on the OLED screen, and you can hold the black part of the sensor with your palm to observe whether the values change.
#### **Task 2: Add an alarm function**
**Step 1:** Add alarm function code. The alarm function requires a buzzer to be integrated into the circuit, which can be facilitated using the on-board buzzer of the XIAO expansion board. The program needs to set the buzzer pin state, add a part for condition judgment - when the temperature exceeds a certain value or the humidity falls below a certain value, the buzzer will sound an alarm. Here, a logical expression needs to be written using the "&&" logical operator "and".
>### Boolean Operators
>
> - `&&`: Logical AND, represents "and",`if (expression1 && expression2)`, only when all expressions in the parentheses are `true` will it execute the statements in `if {}`. <br />
> - `||`: Logical OR, represents "or",`if (expression1 || expression2)`, if either of the expressions are satisfied, the entire expression is `true`, and the statements in `if {}` are executed. <br />
> - `!`: Logical NOT, represents "not", `if (!expression1)`, only when the value of expression1 in the parentheses is `false` will it execute the statements in `if {}`. <br />
>
> **Usage example:** <br />
> When the temperature exceeds 30 or the humidity falls below 40, satisfying either condition will make the buzzer sound an alarm.
``` cpp
if (temp > 30 || humi < 40) {
tone(buzzerPin, 200, 200);
}
```
The added part of the program mainly sets the buzzer and makes decisions based on temperature and humidity, controlling the buzzer to make a sound.
``` cpp
// Part of the program, will not run
int buzzerPin = A3; // Connects the buzzer to pin A3
void setup() {
pinMode(buzzerPin , OUTPUT); // Sets the buzzer pin as output
}
void loop() {
float temp, humi;
temp = dht.readTemperature();
humi = dht.readHumidity();
if (temp > 30 || humi < 40) { // When the temperature exceeds 30 or the humidity falls below 40, satisfying either condition will make the buzzer sound an alarm.
tone(buzzerPin, 200, 200);
}
```
Add the above code to the corresponding location of the Task 1 program to realize all functions. The complete program is shown below:
``` cpp
#include "DHT.h" // Use DHT library
#include <Arduino.h>
#include <U8x8lib.h> // Use u8x8 library
#define DHTTYPE DHT20
DHT dht(DHTTYPE); // DHT20 does not require pin definition
int buzzerPin = A3;
U8X8_SSD1306_128X64_NONAME_HW_I2C u8x8(/* reset=*/ U8X8_PIN_NONE); // Set constructor to connect OLED display
void setup() {
pinMode(buzzerPin , OUTPUT); // Set buzzer pin to output mode
Wire.begin(); // Initialize Wire library and join to I2C network
dht.begin(); // DHT begins operation
u8x8.begin(); // u8x8 begins operation
u8x8.setPowerSave(0); // Disable power save mode, 1 is enable. After enabling power save mode, nothing will be seen on the screen
u8x8.setFlipMode(1);
}
void loop() {
float temp, humi; // Set variables temp and humi to floating point type, representing temperature and humidity respectively
temp = dht.readTemperature(); // Read temperature value and store it in temp
humi = dht.readHumidity(); // Read humidity value and store it in humi
if (temp > 30 || humi < 40) { // When the temperature is above 30 or the humidity is below 40, if either condition is met, the buzzer will sound an alarm
tone(buzzerPin, 200, 200);
}
u8x8.setFont(u8x8_font_chroma48medium8_r); // Set display font
u8x8.setCursor(0, 33); // Set the position of the drawing cursor (0,33)
u8x8.print("Temp:"); // Display "Temp:" at the position (0,33)
u8x8.print(temp); // Then display the real-time temperature value
u8x8.print("C"); // Then display the unit of temperature "C"
u8x8.setCursor(0,50);
u8x8.print("Humidity:");
u8x8.print(humi);
u8x8.print("%");
u8x8.refreshDisplay();
delay(200);
}
```
> Get this program from Github <br />
> <https://github.com/mouseart/XIAO-Mastering-Arduino-and-TinyML/tree/main/code/L8_dht20_alarm_XIAO_en>
**Step 2:** Upload the program.
After writing the program, connect the XIAO main control board to the computer using a data cable, as shown in the image below:
<!-- 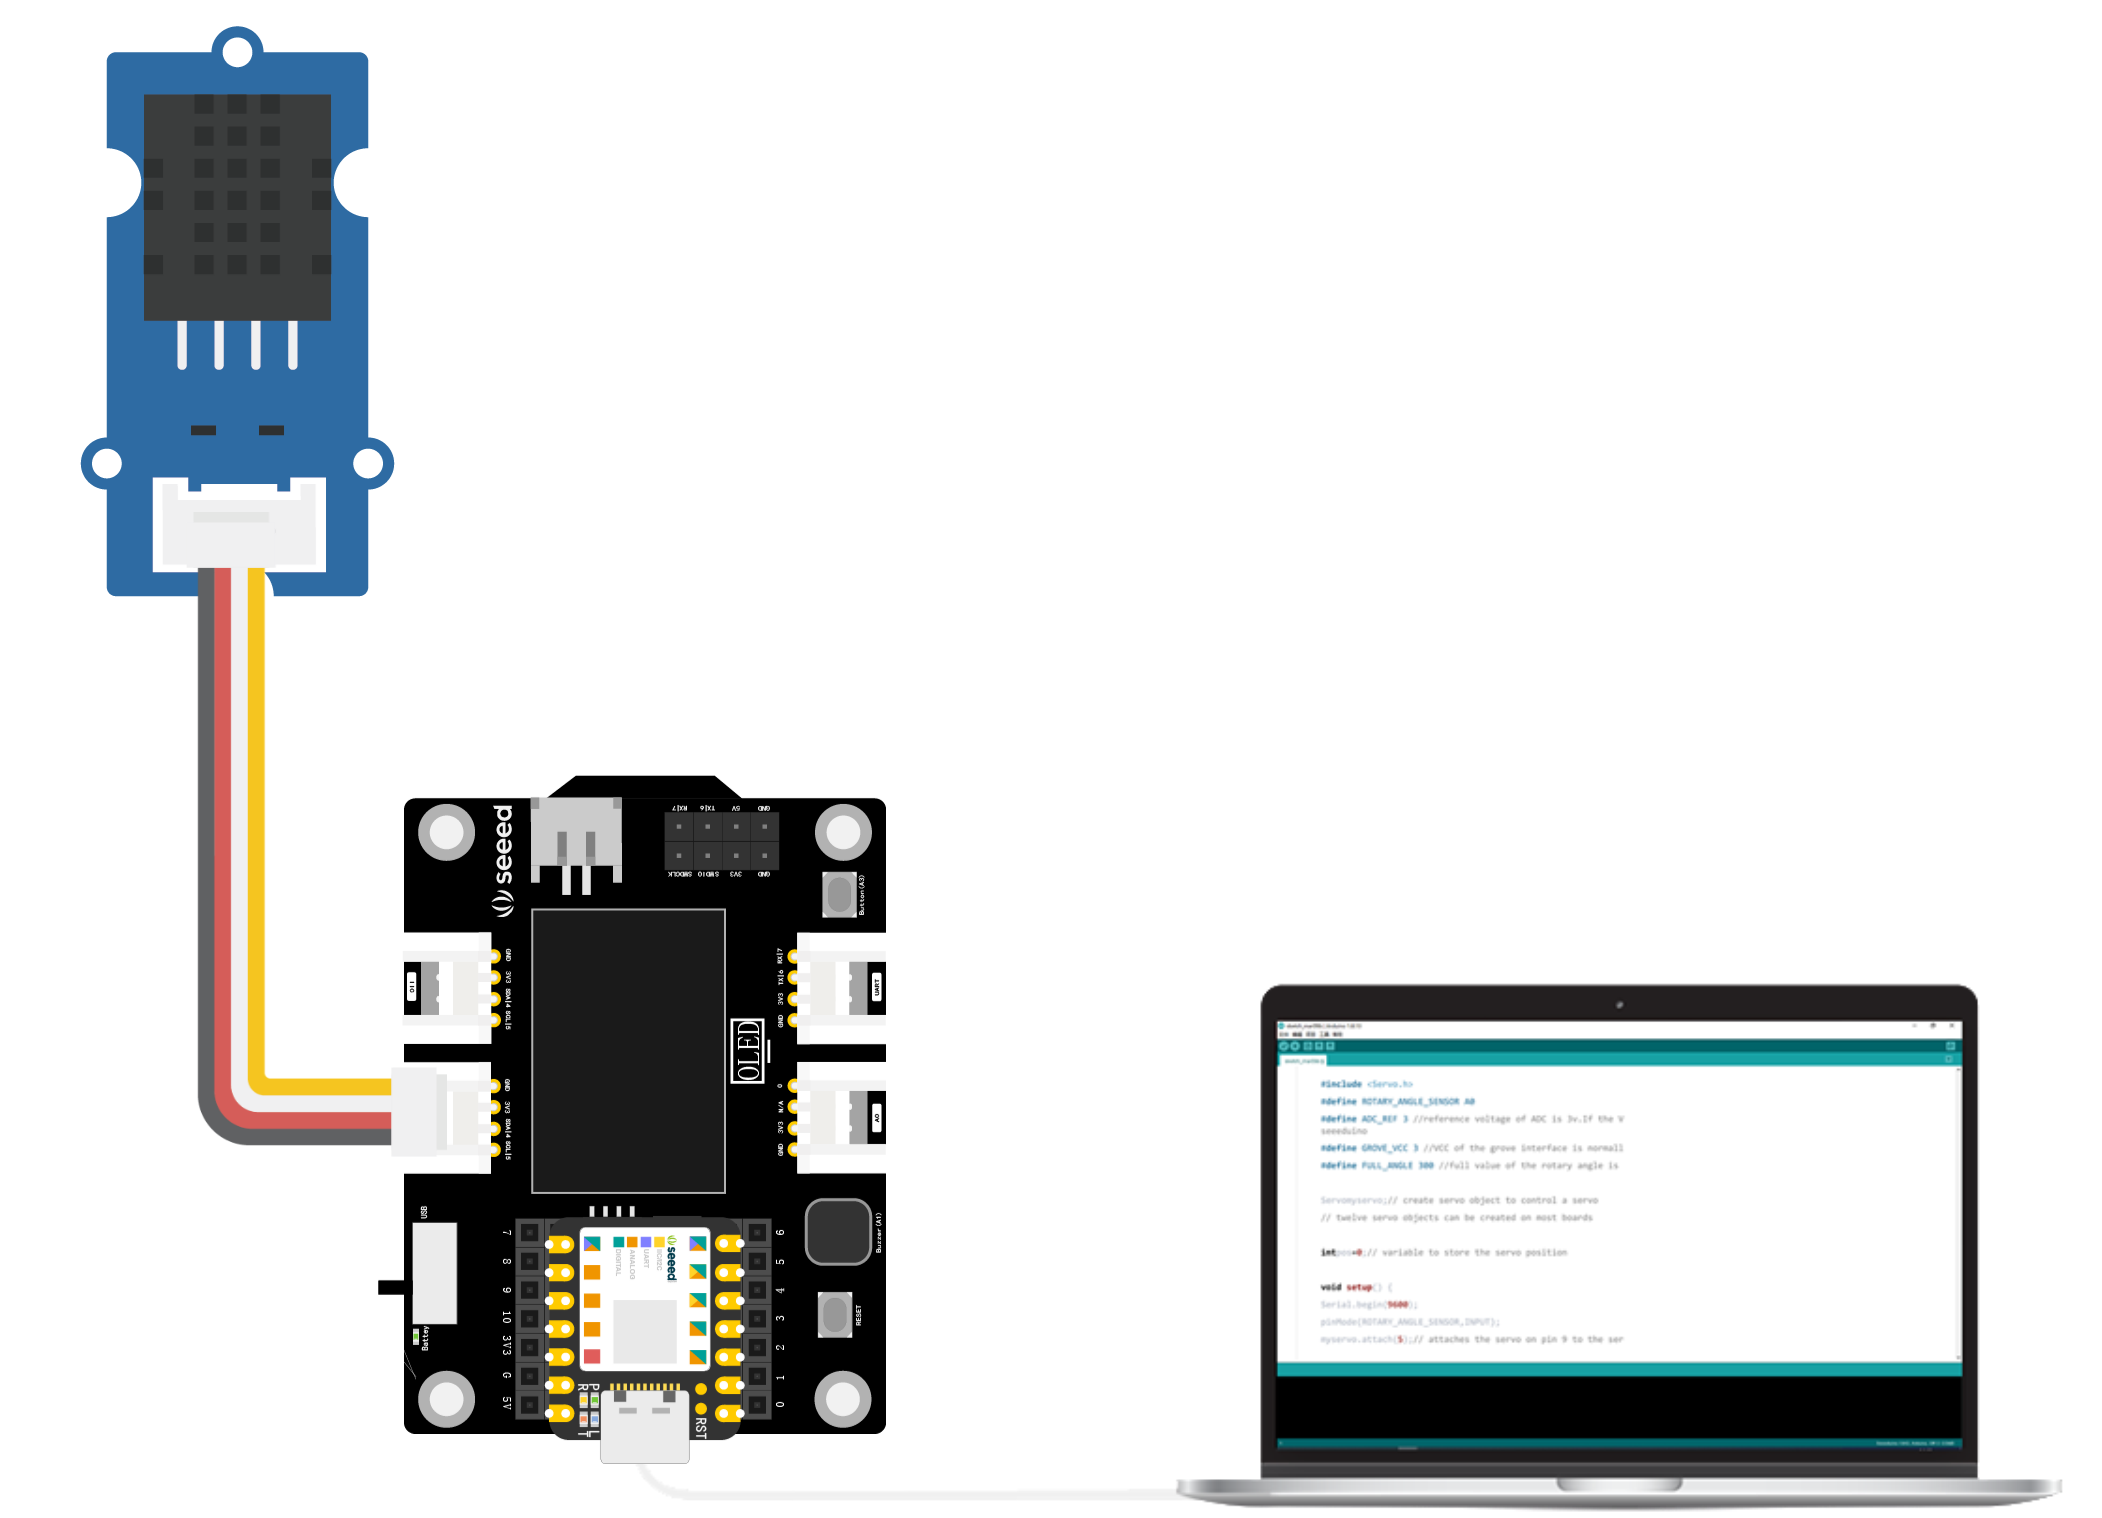 -->
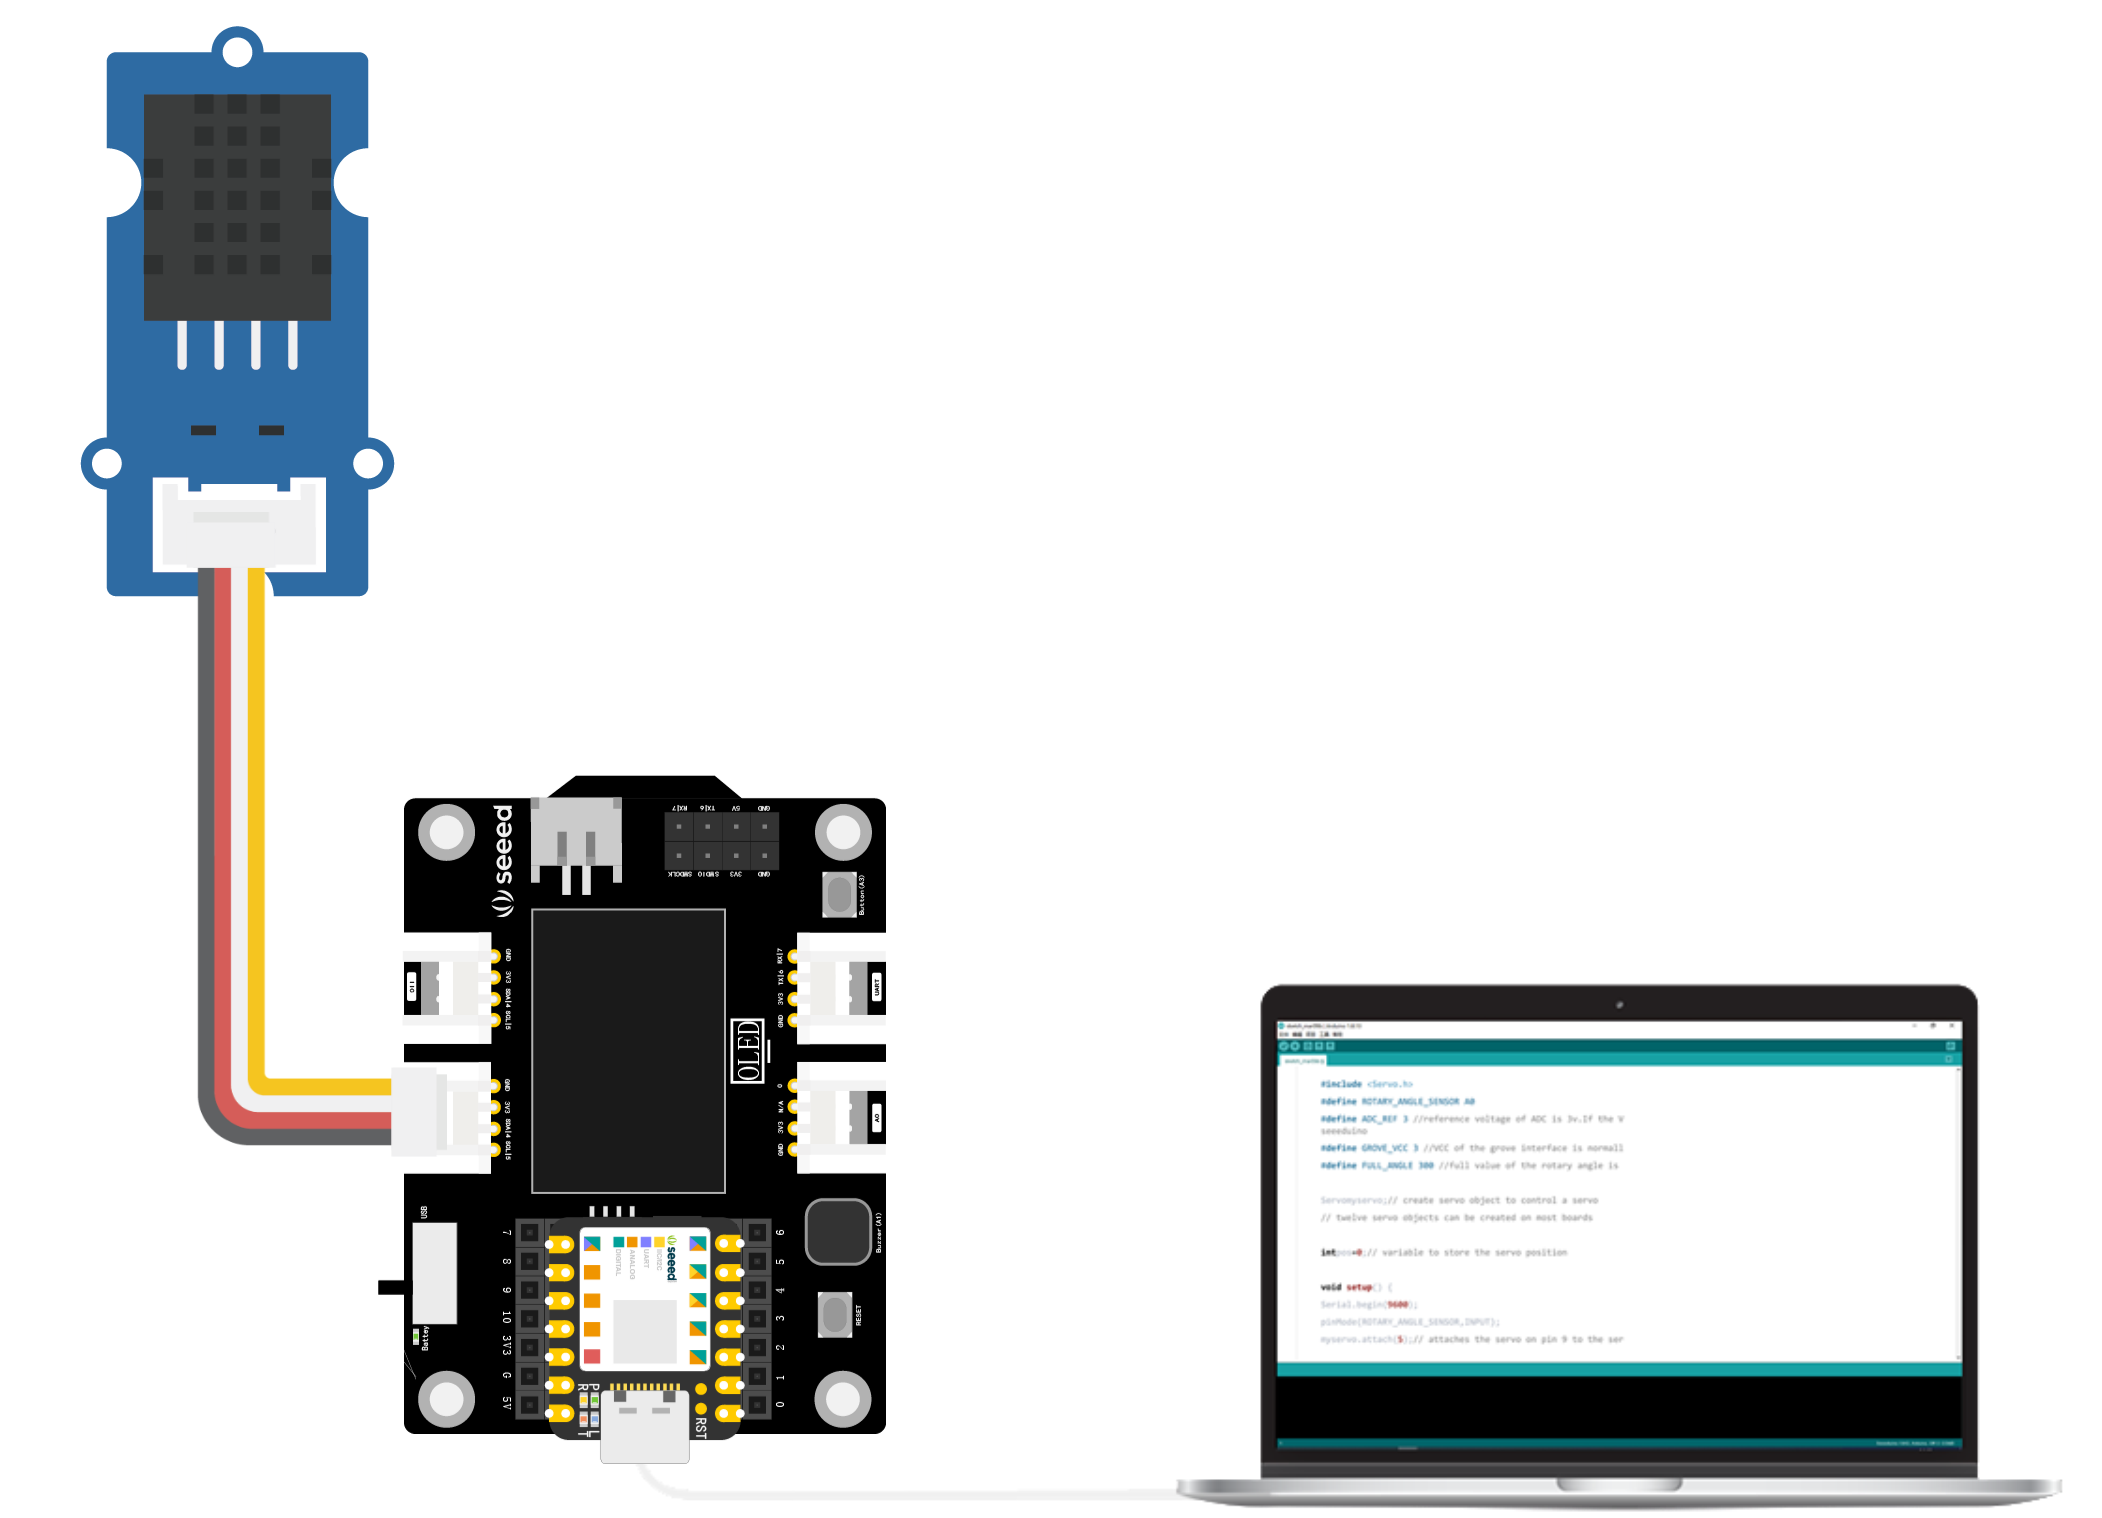
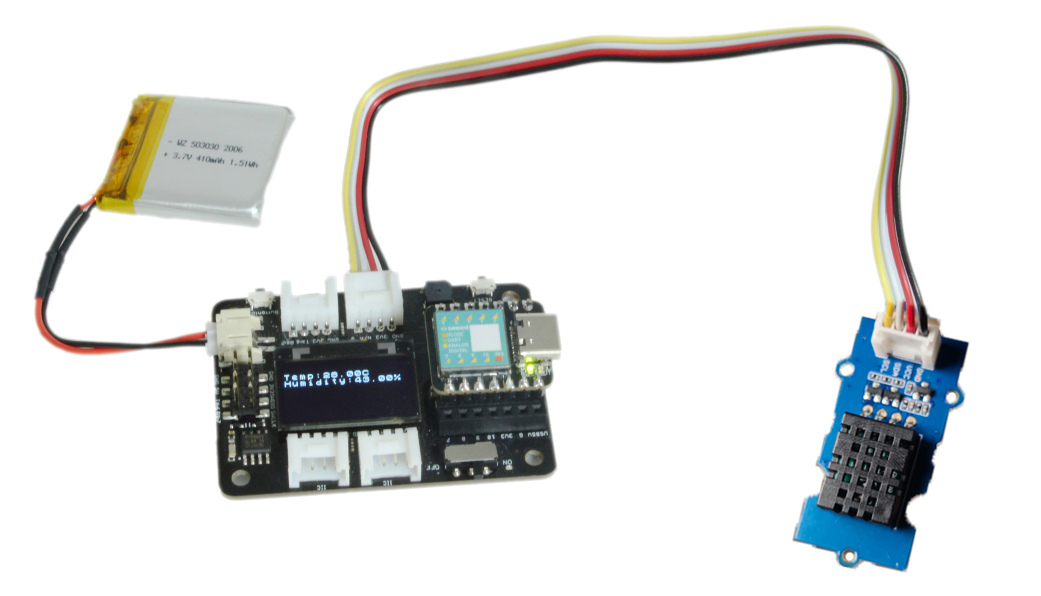
After connection, click the "Verify" button to check the program. If the verification is successful, click the "Upload" button to upload the program to the hardware. When the debugging area shows "Upload Successful", it is complete. To verify whether the alarm function runs smoothly, tightly grip the temperature and humidity sensor with your hand, observe the value change on the OLED display, and listen for the buzzer alarm when the temperature exceeds 30℃.
<!--  -->
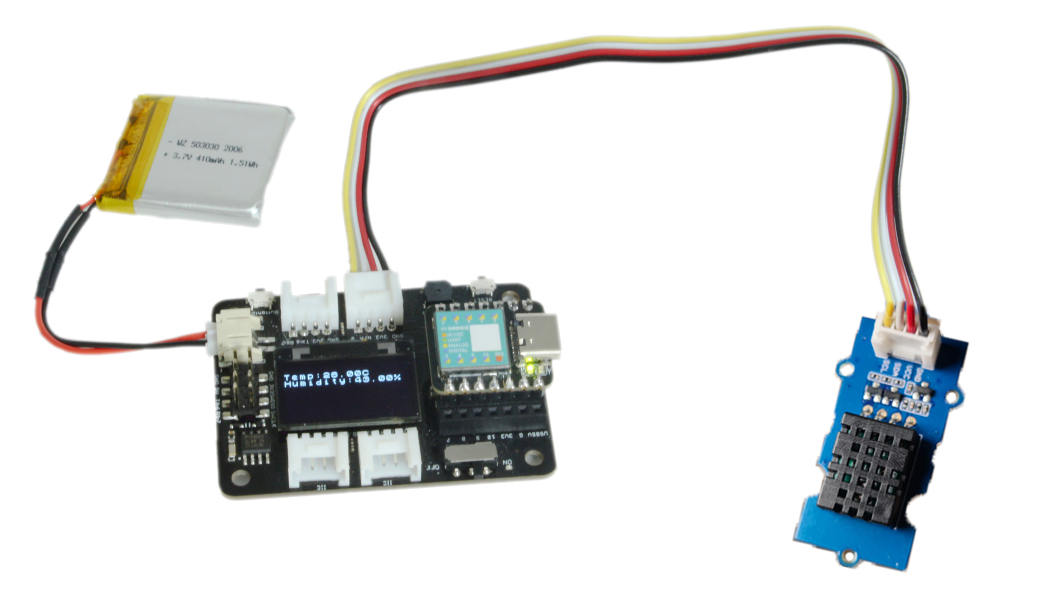
#### **Task 2-2: Use Grove DHT11 sensor to display temperature and humidity on the XIAO extension board's OLED and add an alarm function.**
For the Grove DHT11 sensor with a blue casing, the program is shown below:
``` cpp
#include "DHT.h"//Use DHT library
#include <Arduino.h>
#include <U8x8lib.h>//Use u8x8 library
#define DHTPIN 0
#define DHTTYPE DHT11//Specify using DHT11
DHT dht(DHTPIN, DHTTYPE);
int buzzerPin = A3;
U8X8_SSD1306_128X64_NONAME_HW_I2C u8x8(/* reset=*/ U8X8_PIN_NONE);//Set constructor to connect OLED display
void setup() {
pinMode(buzzerPin , OUTPUT);//Set buzzer pin to output mode
Wire.begin();//Initialize wire library and join to I2C network
dht.begin();//DHT begins operation
u8x8.begin();//u8x8 begins operation
u8x8.setPowerSave(0); //Disable power save mode, 1 is enable. After enabling power save mode, nothing will be seen on the screen
u8x8.setFlipMode(1);
}
void loop() {
float temp, humi;//Set variables temp and humi to floating point type, representing temperature and humidity respectively
temp = dht.readTemperature();//Read temperature value and store it in temp
humi = dht.readHumidity();//Read humidity value and store it in humi
if (temp > 30 || humi < 40) { //When the temperature is above 30 or the humidity is below 40, if either condition is met, the buzzer will sound an alarm
tone(buzzerPin, 200, 200);
}
u8x8.setFont(u8x8_font_chroma48medium8_r);//Set display font
u8x8.setCursor(0, 33);//Set the position of the drawing cursor (0,33)
u8x8.print("Temp:");//Display "Temp:" at the position (0,33)
u8x8.print(temp);//Then display the real-time temperature value
u8x8.print("C");//Then display the unit of temperature "C"
u8x8.setCursor(0,50);
u8x8.print("Humidity:");
u8x8.print(humi);
u8x8.print("%");
u8x8.refreshDisplay();
delay(200);
}
```
> Get this program from Github
> <https://github.com/mouseart/XIAO-Mastering-Arduino-and-TinyML/tree/main/code/L8_dht11_alarm_XIAO_en>
## 2.2.4 Appearance Design
Starting from this section, we will add the part of appearance design, beginning to explore the complete prototype product manufacturing. Initially, we can try to draw design sketches and make a simple modification with the materials at hand. Returning to the smart temperature and humidity meter in this section, please design the appearance of the prototype work based on the product characteristics and functions.
| **Product Name** | **Smart Temperature and Humidity Meter** |
|------------------------------------|------------------------------------|
| Product Features | Small, portable, high sensitivity. |
| Product Functions | Real-time display of temperature and humidity values, and emits an alarm when temperature and humidity values exceed the comfortable range. |
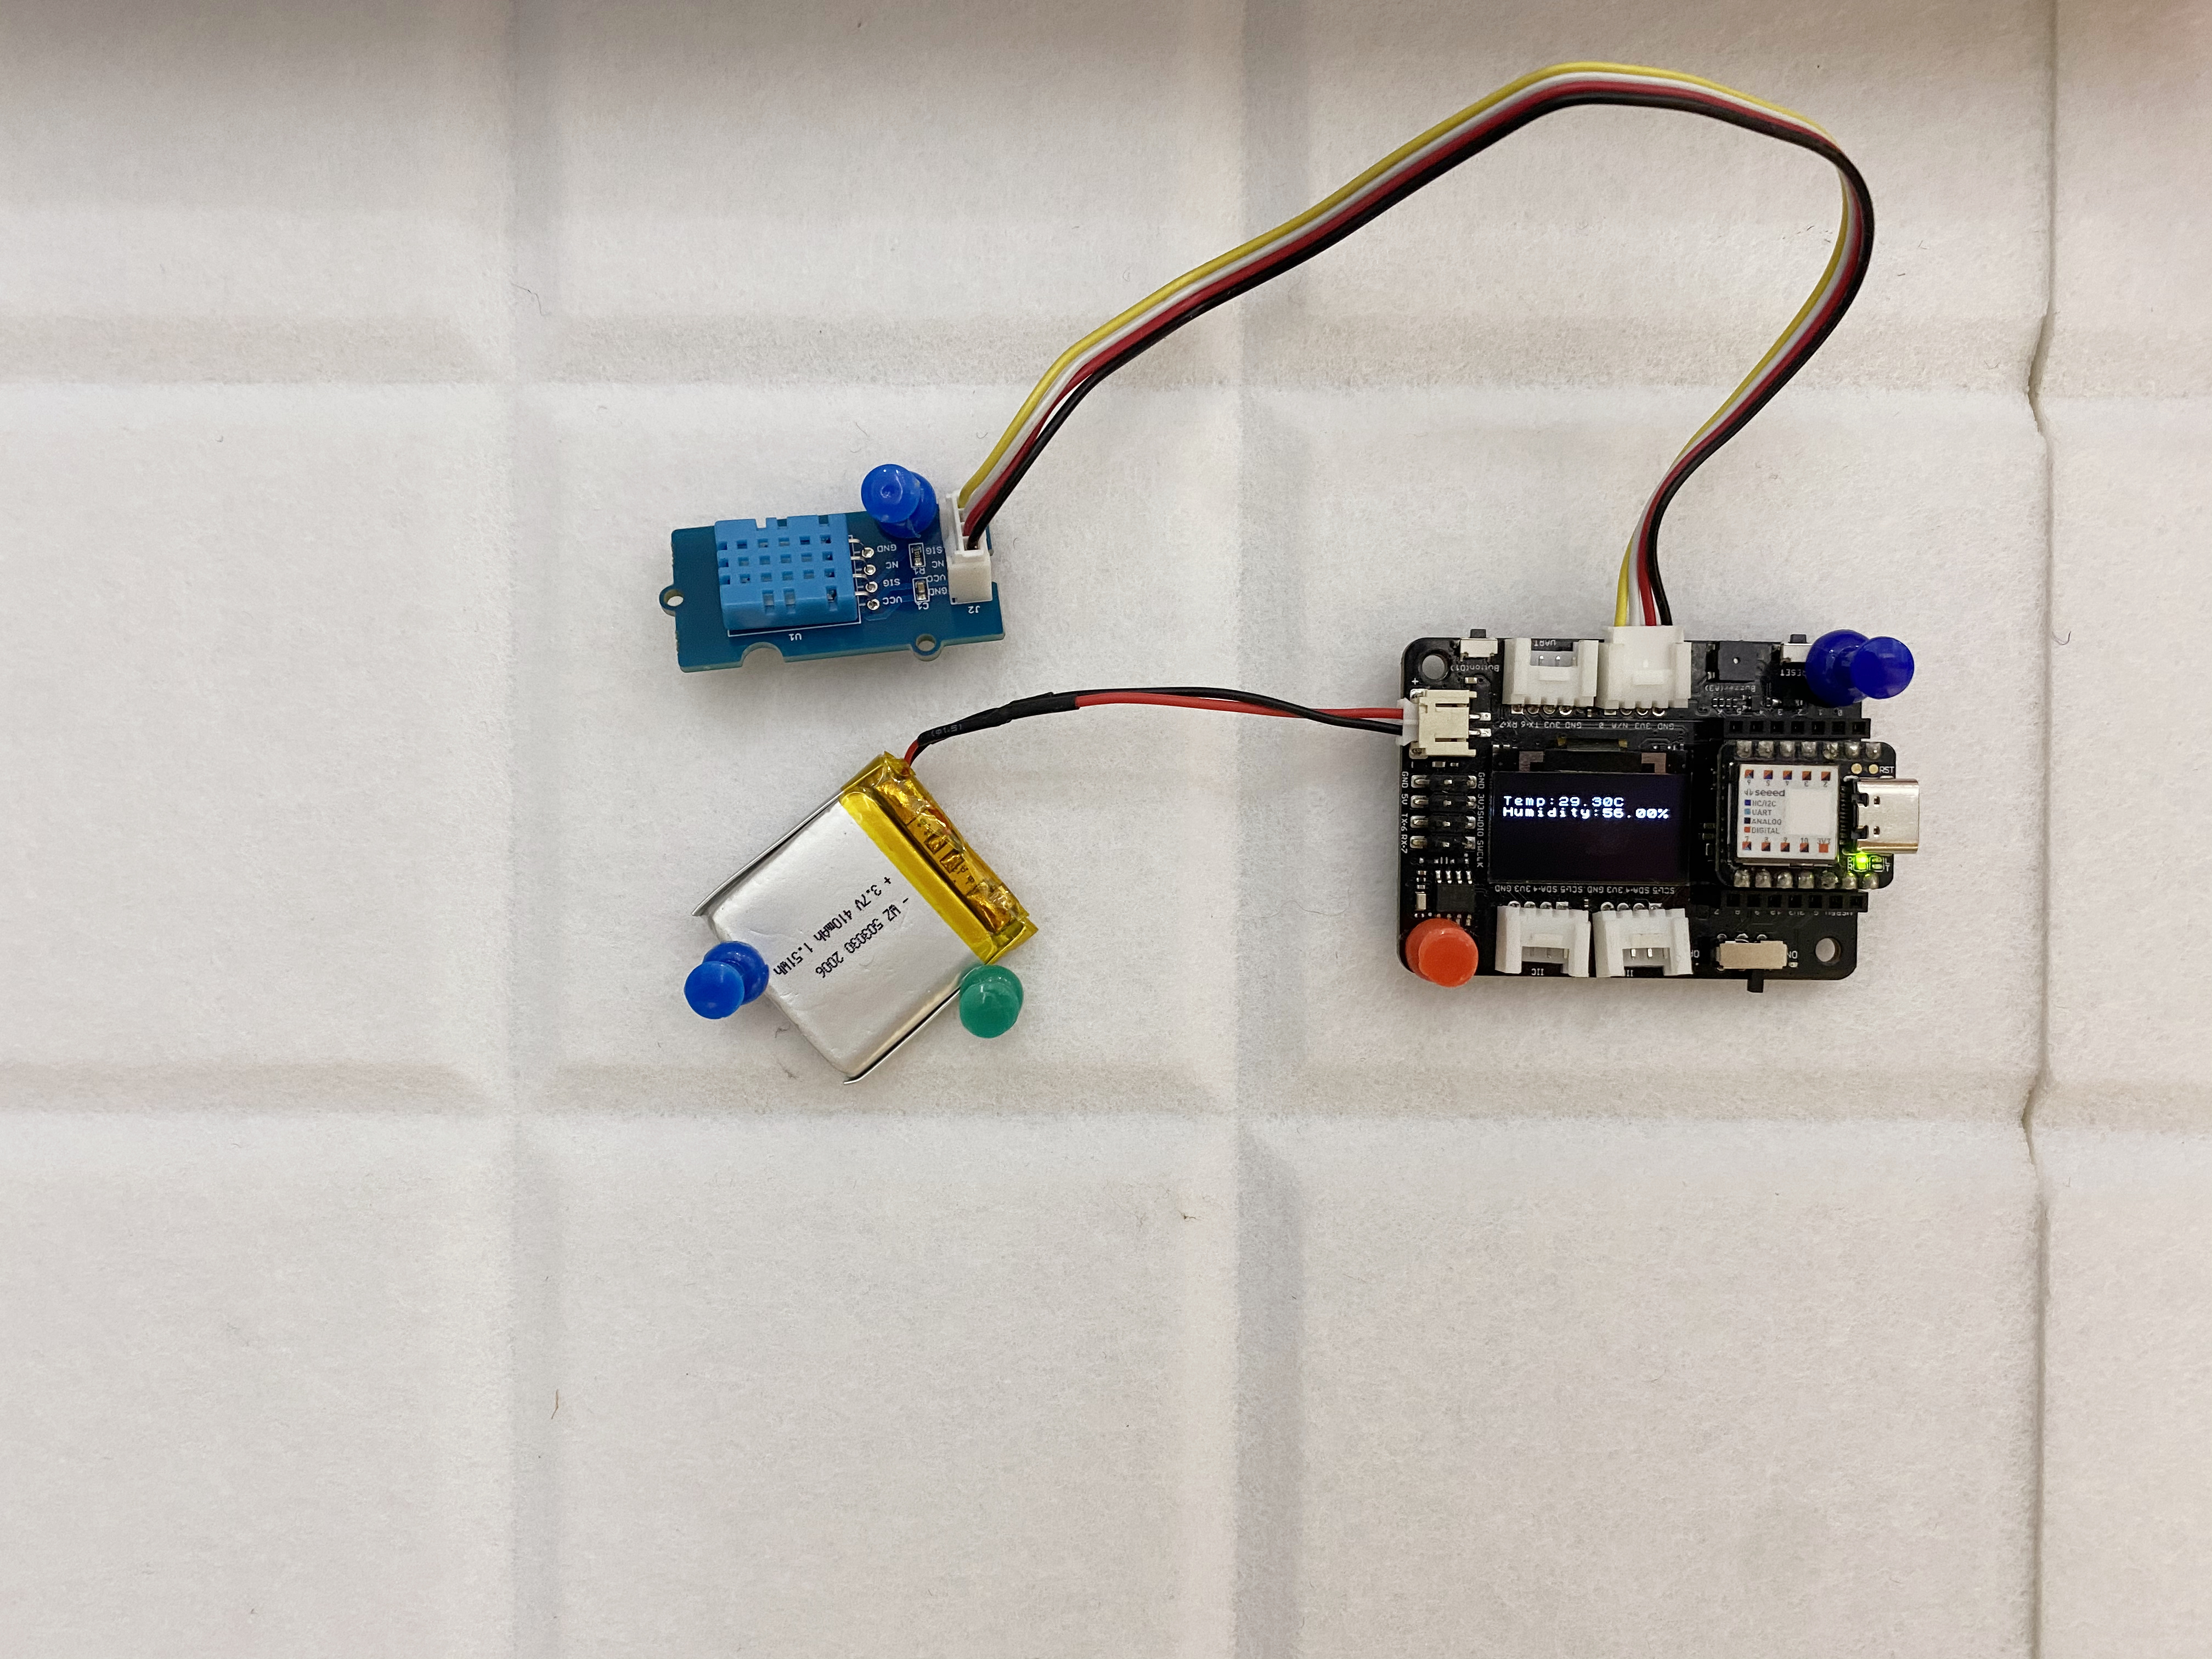
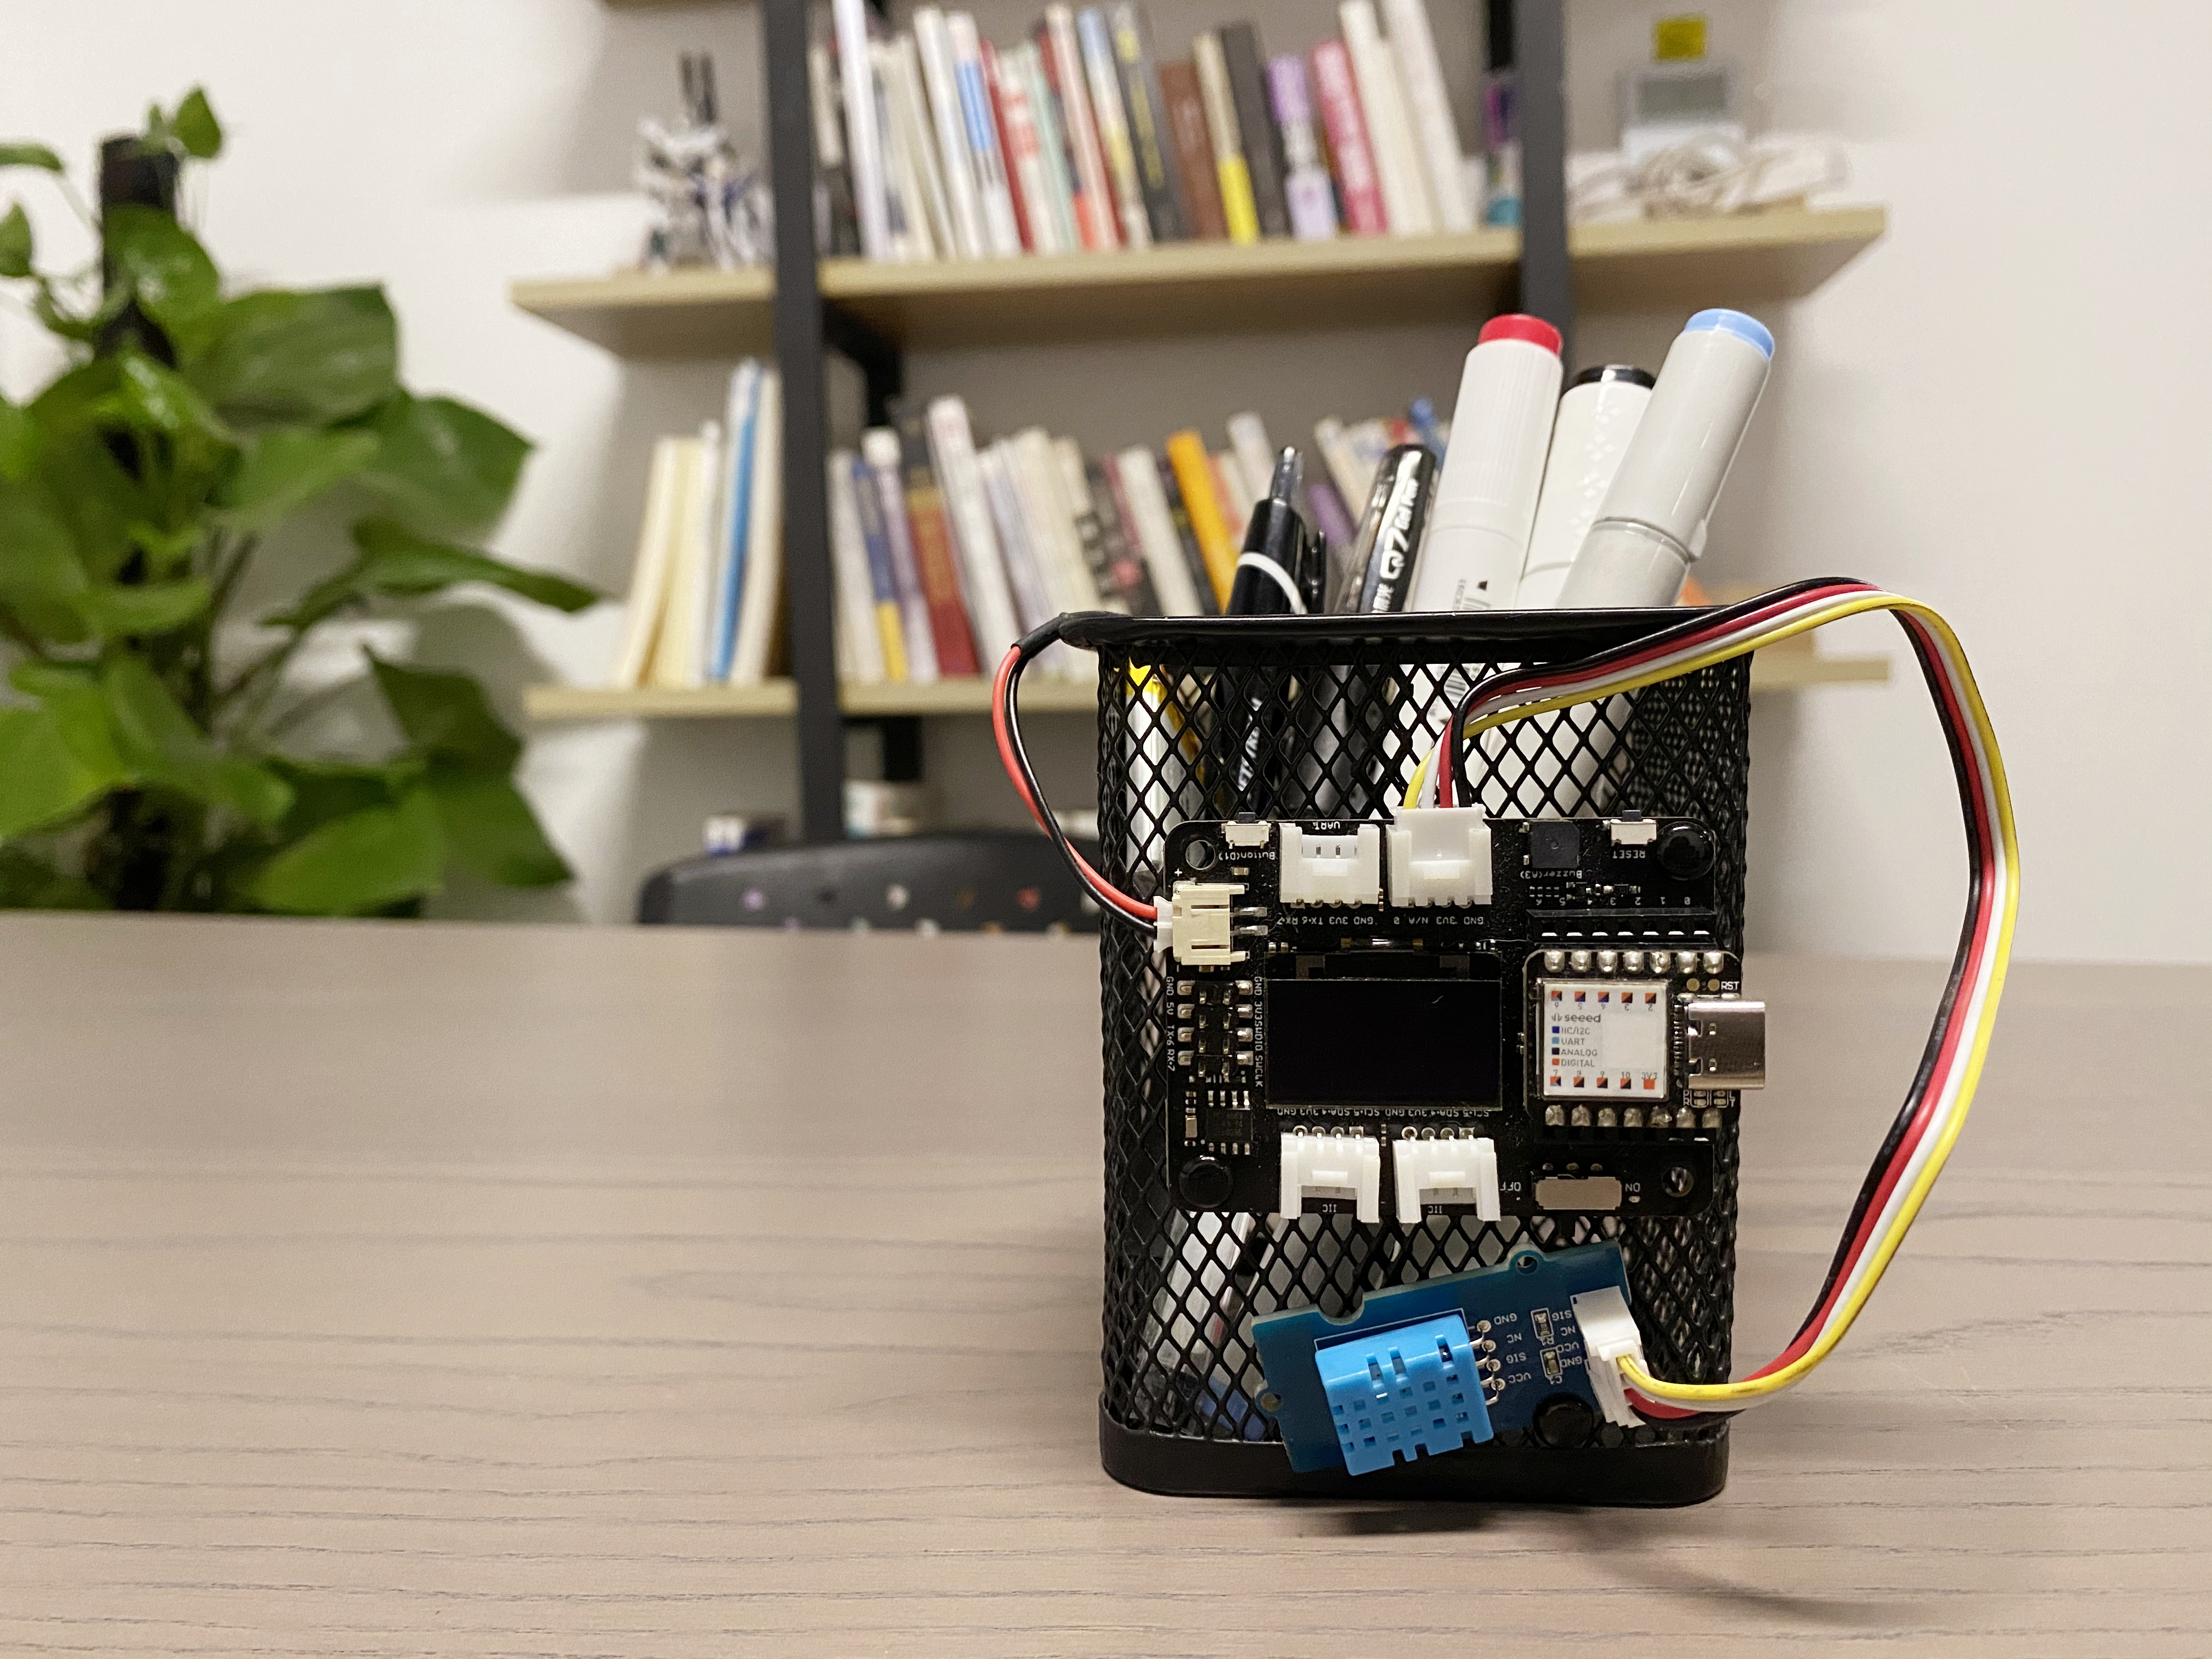
| Product Appearance | (For example, made into a pendant to hang on the backpack that is carried around, stick on the tissue storage box in the bedroom, etc.) |
### **Case reference**
<!--  -->
<!--  -->
