The purpose of this guide is to inform ResDiary on how to take the project forward if they wish to. It serves as handover documentation which explains how to install, run and test the app. On top of this, it includes a detailed description of the code base if the customer is unfamiliar with the Xamarin environment.
The project requires some prerequisites which will need to be downloaded/setup before the project can be utilised from your machine. These are outlined below.
The project uses Xamarin as its core technology. Xamarin is an open-source platform for building modern and performant applications for iOS, Android, and Windows with .NET. Xamarin is an abstraction layer that manages communication of shared code with underlying platform code. Xamarin runs in a managed environment that provides conveniences such as memory allocation and garbage collection.
Xamarin applications can be written on PC or Mac and compile into native application packages, such as an .apk file on Android, or an .ipa file on iOS. Xamarin applications are written using the Visual Studio software suite.
Visual Studio and Xamarin can be installed by following this guide - https://docs.microsoft.com/en-us/xamarin/get-started/installation/?pivots=windows.
Git has been used for version control and the repository is stored on the University of Glasgow's private GitLab server. You will need to install Git in order to retrieve the project files. Git can be installed using this tutorial - https://git-scm.com/book/en/v2/Getting-Started-Installing-Git.
Once Git has been installed, you will be able to clone the repository using the command below:
git clone https://stgit.dcs.gla.ac.uk/tp3-2019-se06/se06-main.git
The project has a credentials.json.secret file within the project which stores all the sensitive information required by the application. On top of this, the AndroidManifest file has been encrypt as it contains the Google Maps API Key - AndroidManifest.xml.secret. We have used Git-Secret (https://git-secret.io/) in order to encrypt this data and keep it secure. Before you can run the app from Visual Studio, you will need to decrypt these files:
- Install Git-Secret by following the installation tutorial (https://git-secret.io/installation)
- In order to decrypt the files, you must ensure that your public key has been added to the project - please ask one of the contributors to do this for you. To generate a key then follow the tutorial in 1.3.2
- Run the command
git secret revealfrom your terminal which will decrypt the files for you - You will now be presented with the
credentials.jsonandAndroidManifest.xmlfiles in the directoriesLogoScanner/LogoScannerandLogoScanner/LogoScanner.Android/Propertiesrespectively - In Visual Studio, right-click the
credentials.jsonfile and make sure theBuild Actionis set toEmbeddedResource
The crendentials.json file containing sensitive API keys can be changed at your leisure. They are documented below.
Private and public keys are generated using GPG (https://gnupg.org/). GPG is free encryption software that's compliant with the OpenPGP standard. To generate a RSA key-pair, run:
gpg --gen-key
To export your public key, run:
gpg --export your.email@address.com --armor > public-key.gpg
To import the public key of someone else (to share the secret with them for instance), run:
gpg --import public-key.gpg
The ResDiary consumer API began as an internal API supporting the resdiary.com portal. Everything (and more) that you see on resdiary.com can be replicated via this API. The primary purpose of the consumer API is to supply everything required for a ‘consumer facing’ restaurant discovery search and book user experience. The core features provided are:
- Location Availability Searches
- Restaurant Online Profiles
- Restaurant Availability Searches
- Create-update-cancel Bookings
- Create-update Customer Profiles
The API docs can be found here - https://login.rdbranch.com/Admin/ApiAccount/Documentation.
In the credentials.json file, you will be able to change the username and password for the API. These details were handed to us by the customer.
Custom vision is an image recognition and training model platform which we are using to store the restaurant logos on. We are unable to give you access to the account which we have been using as it is linked to a contributor's university account. This account contains all of the restaurants that we had access to during the project. Each logo has a 'tag' which is linked to the microsite name of the restaurant. If you would like to set up your own, create an account on https://www.customvision.ai/. Remember to change the API key and iteration URL within the credentials.json file after each training interation.
The tag provided to each logo on the Custom Vision API is the micrositename of that restaurant. For cases in which several restaurants share the same logo. The tag of those restaurants would be the restaurants micrositename's separated by an underscore character "_", for example the tag "restaurant1_restaurant2", would be for two restaurants "restaurant1" and "restaurant2" - when passed into the application, the closer restaurant will be returned.
Custom Vision also allows you to write your own Python script which will allow you to automatically upload images to Custom Vision if you desire. For instance, this could be used for automatically uploading an image whenever a new restaurant is added the ResDiary API. We have not implemented this feature within the project purely due to the customer stating that it wasn't necessary at this time.
This example uses the images from the Cognitive Services Python SDK Samples repository on GitHub. https://github.com/Azure-Samples/cognitive-services-python-sdk-samples/tree/master/samples/vision/images
Add the following code to your script to create a new Custom Vision service project. Insert your subscription keys in the appropriate definitions. Also, get your Endpoint URL from the Settings page of the Custom Vision website.
from azure.cognitiveservices.vision.customvision.training.models import ImageFileCreateEntry
ENDPOINT = "<your API endpoint>"
# Replace with a valid key
training_key = "<your training key>"
prediction_key = "<your prediction key>"
prediction_resource_id = "<your prediction resource id>"
publish_iteration_name = "classifyModel"
trainer = CustomVisionTrainingClient(training_key, endpoint=ENDPOINT)
# Create a new project
print ("Creating project...")
project = trainer.create_project("My New Project")
# Make two tags in the new project
hemlock_tag = trainer.create_tag(project.id, "Hemlock")
cherry_tag = trainer.create_tag(project.id, "Japanese Cherry")
To add the sample images to the project, insert the following code after the tag creation. This code uploads each image with its corresponding tag. You can upload up to 64 images in a single batch. Note: You'll need to change the path to the images based on where you downloaded the Cognitive Services Python SDK Samples repo earlier.
base_image_url = "<path to repo directory>/cognitive-services-python-sdk-samples/samples/vision/"
print("Adding images...")
image_list = []
for image_num in range(1, 11):
file_name = "hemlock_{}.jpg".format(image_num)
with open(base_image_url + "images/Hemlock/" + file_name, "rb") as image_contents:
image_list.append(ImageFileCreateEntry(name=file_name, contents=image_contents.read(), tag_ids=[hemlock_tag.id]))
for image_num in range(1, 11):
file_name = "japanese_cherry_{}.jpg".format(image_num)
with open(base_image_url + "images/Japanese Cherry/" + file_name, "rb") as image_contents:
image_list.append(ImageFileCreateEntry(name=file_name, contents=image_contents.read(), tag_ids=[cherry_tag.id]))
upload_result = trainer.create_images_from_files(project.id, images=image_list)
if not upload_result.is_batch_successful:
print("Image batch upload failed.")
for image in upload_result.images:
print("Image status: ", image.status)
exit(-1)
This code creates the first iteration of the prediction model and then publishes that iteration to the prediction endpoint. The name given to the published iteration can be used to send prediction requests. An iteration is not available in the prediction endpoint until it is published.
import time
print ("Training...")
iteration = trainer.train_project(project.id)
while (iteration.status != "Completed"):
iteration = trainer.get_iteration(project.id, iteration.id)
print ("Training status: " + iteration.status)
time.sleep(1)
# The iteration is now trained. Publish it to the project endpoint
trainer.publish_iteration(project.id, iteration.id, publish_iteration_name, prediction_resource_id)
print ("Done!")
Note: already in our code
from azure.cognitiveservices.vision.customvision.prediction import CustomVisionPredictionClient
# Now there is a trained endpoint that can be used to make a prediction
predictor = CustomVisionPredictionClient(prediction_key, endpoint=ENDPOINT)
with open(base_image_url + "images/Test/test_image.jpg", "rb") as image_contents:
results = predictor.classify_image(
project.id, publish_iteration_name, image_contents.read())
# Display the results.
for prediction in results.predictions:
print("\t" + prediction.tag_name +
": {0:.2f}%".format(prediction.probability * 100))
As part of the NuGet plugin Xamarin.Forms.Maps, a Google Maps API key must be included in order to render the map on Android. The API key that we have included is a free API key and has $300 worth of credit loaded on to it. This Google account was created solely for this project, if you would like access to it then please contact a contributor who will pass the details on to you.
However, if you would like to use your own account then follow this tutorial in order to generate a new API key - https://docs.microsoft.com/en-us/xamarin/android/platform/maps-and-location/maps/obtaining-a-google-maps-api-key?tabs=windows.
Remember to place the API key inside the AndroidManifest.xml file. Specifically, within this meta-data tag:
<meta-data android:name="com.google.android.maps.v2.API_KEY" android:value="YOUR_API_KEY" />
Syncfusion is suite of Xamarin UI controls (https://www.syncfusion.com/xamarin-ui-controls). In this project, we have used the SfPdfViewer, SfRating and SfListView plugins in order to improve the overall UI design of our application. The SfPdfViewer plugin requires an API key and handles the display of the restaurant's menu(s). The API key that we have included is free for you to use but if you would like to generate a new one this can be done here - https://help.syncfusion.com/common/essential-studio/licensing/licensing-faq/where-can-i-get-a-license-key. If you decide to generate a new one, then remember to change this within the credentials.json file.
Xamarin facilitates the development of Android and iOS applications by providing the Xamarin.iOS and Mono.Android libraries. These libraries are built on top of the Mono .NET framework and bridge the gap between the application and the platform specific APIs.
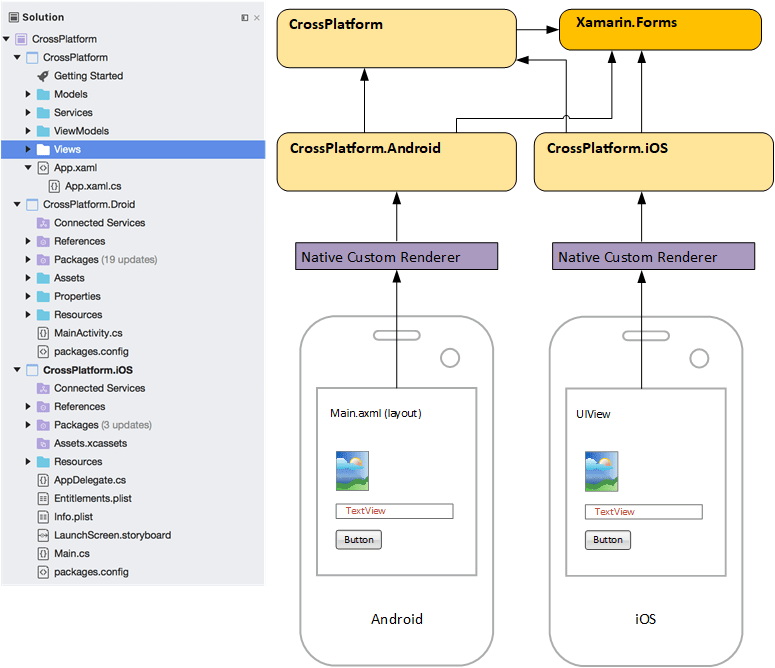
Xamarin provides an approach for sharing the UI components across platforms. Xamarin.Forms takes advantage of the commonality between the architectures of native Android and iOS applications. The image below shows the project structure of a Xamarin.Forms project in Visual Studio and the relation between the components involved.
An Android and iOS project is created, along with an additional third project which contains the common UI components. A Xamarin.Forms project uses XAML mark-up for creating views and accompanying code behind pages for handling behaviour. Xamarin.Forms also provides view controls that can be referenced both in the XAML and the code behind for creating the user experience. The application class, App.xaml.cs, is the entry point that loads the initial page for the application and contains delegates for handling application level events.
The entry points of the Android and iOS projects, MainActivity.cs and AppDelgate.cs, are configured to load the common Xamarin.Forms app class. Once the app is initialised, platform specific renderers translate the pages into activities or view controllers, and the views and view controls into their Android, or iOS, counterparts at runtime, thus providing the native application experience.
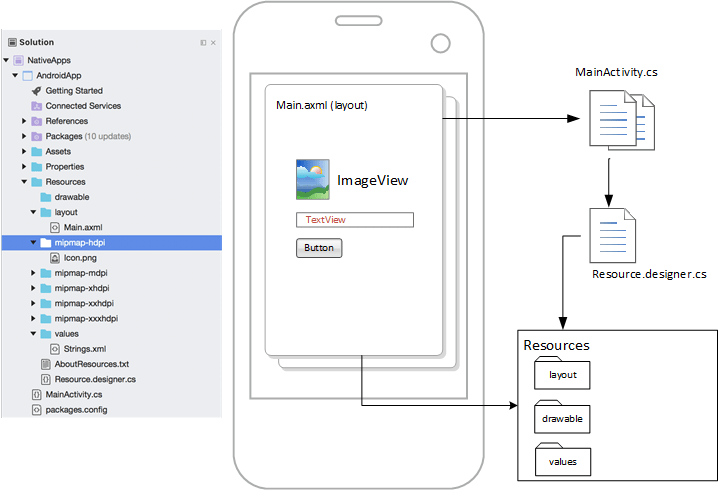
An Android application is a group of activities, navigable using intents, that provide the code that runs the application. The entry point of the application is the activity whose MainLauncher property is set to true, which is the MainActivity.cs by default. Activities that provide a view have an associated layout template that is made up of view controls. Activities and view controls reference the following resources:
- layouts – view templates loaded by activities
- drawables – icons, images etc
- values – centralised location for string values
- menus – templates for menu structures
The Resource.designer.cs class provides an index of identifiers for all the resources in the application. This class is referenced by activities and view controls to create an instance for use in the given context.
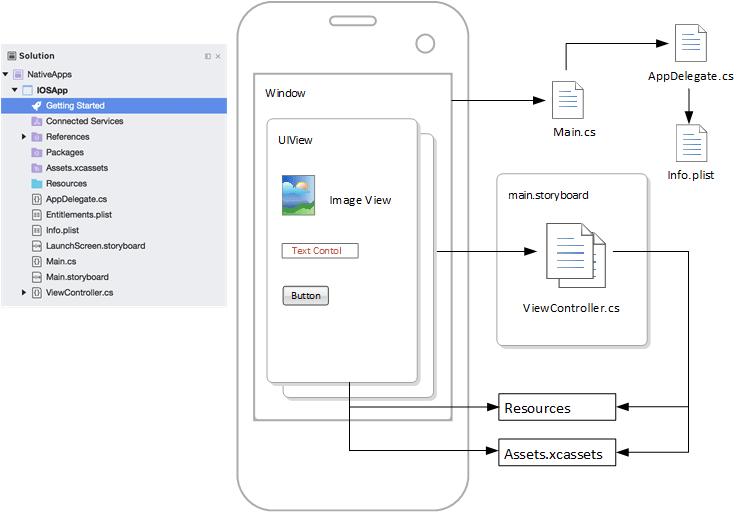
The application is made up of several view controller classes and associated views, collectively known as scenes, that are loaded into the main application window. View controllers are grouped into storyboards with each storyboard having an initial view controller. Views are made up of a view controls used for display or user interaction.
The entry point for the application is the Main.cs class that instantiates the specified AppDelegate.cs class, which loads the initial view controller of the default storyboard set in the Info.plist configuration file. Resources such as images, videos etc are referenced from the Resources and Assets.xcassets folders by view controllers and view controls. The AppDelegate.cs class includes delegates that handle application events and the view controllers handle the lifecycle for a given view.
To run the app from Visual Studio, make sure that you first have developer settings enabled on your phone. Connect your phone to your computer. If your phone is connected then it will show up in the run menu within Visual Studio. Click on the connected phone that displays and the app will start running on your device.
The build can have 2 modes - the release or debug mode. When we run the app on the phone in debug mode, Visual Studio will track the app when running on the phone and it will print out all of the user's actions in the output shell. When the app runs in release mode, it will be deployed on the phone without Visual Studio tracking the user's actions.
On top of running the app straight from Visual Studio, it can also be compiled and distributed as an Android Application Package (APK). We will send this file over to you via Slack before the project deadline date (20/3/20). This file can then be downloaded from Slack and installed directly on to your Android device.
If you have made changes to the project or would simply like to compile the app yourself then please follow this guide - https://docs.microsoft.com/en-us/xamarin/android/deploy-test/release-prep/?tabs=windows.
The iOS version of the application can be installed using TestFlight. TestFlight is an online service for over-the-air installation and testing of mobile applications. LogoScanner has been uploaded to TestFlight using ResDiary's Apple Developer Account. If you wish for your Apple ID to be added to the TestFlight project so that you can download the app then please ask a contributor to do this for you. To upload a new version of the app to TestFlight, follow this tutorial - https://docs.microsoft.com/en-us/xamarin/ios/deploy-test/testflight?tabs=macos.
The project makes use of the NUnit (https://github.com/nunit/nunit.xamarin) framework for our unit testing. The test cases can be found in the file Tests.cs inside the CrossPlatformTest directory. Our unit tests have been designed so that they test various aspects of the application. There are tests which range from testing that the app connects to Custom Vision successfully to checking whether the booking slots are displaying the correct number to the user. This tutorial - https://www.c-sharpcorner.com/article/unit-test-in-c-sharp-with-xamarin-forms/ - can be followed if you wish to add more unit tests to the project. The tutorial also explains how to run the test cases.
Unfortunately, Xamarin was not compatible with GitLab's Continuous Integration (CI) environment as it reqruies a Windows runner. Instead, we used Azure DevOps to create our pipeline which stored on a contributor's account. Please ask for the login details if you wish to continue using this test suite. Azure pipelines does not support UI testing so we were unable to test any of the clickable features like you can see in the Tests.cs file. There is a badge in the README which tell you whether the latest commit on the master branch has passed the tests or not. These tests will run automatically.
Within the repository there is a folder called logos. This folder contains the restaurant logos that we had access to throughout the project. You can use this folder to easily access the logos without any hassle.
We made use of Postman (https://www.postman.com/) when we were testing and adding new API calls to the project. Postman is a powerful tool for performing integration testing with your API. It allows for repeatable, reliable tests that can be automated and used in a variety of environments and includes useful tools for persisting data and simulating how a user might actually be interacting with the system. We would highly recommend that you make use of Postman if you would like to add a new API call to the project. A handy Postman tutorial can be found here - https://www.guru99.com/postman-tutorial.html.
Every file within the source code provided does provide adequate commentary about how the code operates. However, the section below is also provided as a reference point as how a user is able to navigate through the application.
Upon first entering the app, the user is greeted with a Camera Page. If permissions haven't already been granted to the application then the user will be asked to allow the application access to the systems Camera and also Location - if needed -. From this page the user is able to click the camera button in order to take a photo. This photo, will then be sent to the Custom Vision API and a micrositename, corresponding with that logo, will be returned. In cases where more than one restaurant share the same logo then the API will return both microsite names split by a "_". In this case the mobile application will show the details for the restaurant closest to the users current posisition.
Following the application returning the correct restaurant to the user. They are then navigated to another page, the Restaurant Page. Which will show all the relevant information to them.
The user will first be greeted by the Home Tab. Within this tab lies the main information regarding the restaurant, including the name, cuisine types and price point. It also includes links to Social Media pages, Website, Email and the Phone Number. This page also includes a map at the top of the screen centered around the restaurants location. The user is able to click on this and recieve directions, provided to them by their phones native map application. The next tab along, is the Booking tab. Within this tab, the next 3 available time slots are initially shown to the user for group sizes of the specified restuarant default. The user is able to change party size and the number of slots shown to them via buttons at the top of the page. Next along is the Menu Tab. this tab shows the user all the availble menus for the restaurant, these are displayed using the SyncFusion plugin. Finally, the reviews tab. Within this tab, all the relevant reviews are shown to the user, whereby the user is able to interact with each review and find out more information.
Finally, the floating action camera button, at the bottom right of each tabbed page. Will navigate the user back to the camera page where they can continue to scan other logos.
SE06


