


介绍:
Youtube: https://youtu.be/3MOBCtIfRFA
Bilibili: https://www.bilibili.com/video/BV1Kh411J7vJ
交流:
Telegram: https://t.me/swift_puyopuyo
QQ: 830599565
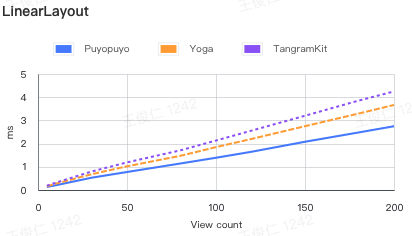
LinearLayout
| - | 5 | 10 | 30 | 50 | 80 | 100 | 120 | 150 | 180 | 200 |
|---|---|---|---|---|---|---|---|---|---|---|
| Puyopuyo | 0.133 | 0.2081 | 0.5259 | 0.7739 | 1.141 | 1.3921 | 1.6517 | 2.0799 | 2.4759 | 2.7499 |
| Yoga | 0.1549 | 0.272 | 0.678 | 1.0211 | 1.4729 | 1.8479 | 2.202 | 2.7499 | 3.2939 | 3.664 |
| TangramKit | 0.1859 | 0.3151 | 0.7939 | 1.1901 | 1.7089 | 2.1331 | 2.5599 | 3.201 | 3.8499 | 4.2488 |
| UIStackView | 0.5679 | 0.699 | 1.7571 | 2.7871 | 5.0063 | 6.901 | 9.392 | 13.741 | 19.3428 | 23.3399 |
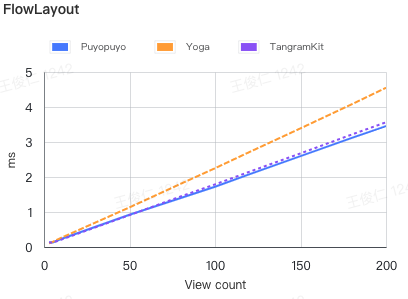
FlowLayout
| - | 3 | 5 | 10 | 50 | 80 | 100 | 120 | 150 | 180 | 200 |
|---|---|---|---|---|---|---|---|---|---|---|
| Puyopuyo | 0.1299 | 0.1292 | 0.2298 | 0.9217 | 1.398 | 1.7228 | 2.0749 | 2.5968 | 3.1189 | 3.4549 |
| Yoga | 0.1039 | 0.1449 | 0.262 | 1.132 | 1.8072 | 2.2501 | 2.7101 | 3.39 | 4.0788 | 4.549 |
| TangramKit | 0.1339 | 0.123 | 0.209 | 0.9109 | 1.4457 | 1.7881 | 2.1469 | 2.675 | 3.2138 | 3.5629 |
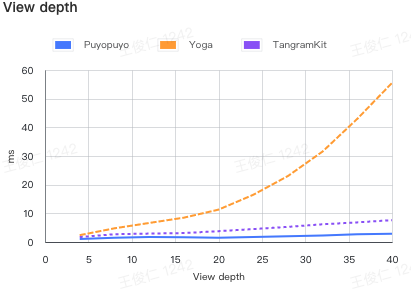
View depth
| - | 4 | 8 | 12 | 16 | 20 | 24 | 28 | 32 | 36 | 40 |
|---|---|---|---|---|---|---|---|---|---|---|
| Puyopuyo | 1.0719 | 1.5108 | 1.7547 | 1.6169 | 1.4448 | 1.739 | 2.0349 | 2.2962 | 2.671 | 2.8882 |
| Yoga | 2.3851 | 4.7698 | 6.6361 | 8.4819 | 11.2879 | 16.4551 | 23.0069 | 31.568 | 42.9677 | 55.4869 |
| TangramKit | 1.7189 | 2.711 | 2.932 | 3.117 | 3.7751 | 4.508 | 5.2759 | 6.1821 | 6.8421 | 7.6298 |
基于数据驱动的声明式UIKit
Puyopuyo是基于Frame进行布局,并且提供了一套响应式的数据驱动开发模型的UI框架。
swift 5.1
pod 'Puyopuyo'一个简单的菜单Cell,可以如下实现,根据不同的布局规则,子节点将根据规则自动布局。内建的布局Box遵循FlexBox规则。
/**
 VBox            HBox
 |-----------|   |-------------------|
 |Title      |   |Title   Description|
 |           |   |-------------------|
 |Description|
 |-----------|
 */

VBox().attach {
    UILabel().attach($0)
        .text("Title")
        .fontSize(20, weight: .bold)

    UILabel().attach($0)
        .text("Description")
}
.space(20)

// or
/**
VFlow       HFlow
|-------|   |-------|
|0  1  2|   |0  3  6|
|3  4  5|   |1  4  7|
|6  7   |   |2  5   |
|-------|   |-------|
 */
VFlow(count: 3).attach {
    for i in 0..<8 {
        UILabel().attach($0)
            .text(i.description)
    }
}
.space(20)LinearBox, FlowBox, ZBox. 继承关系如下:
BoxView
    |-- ZBox
    |-- LinearBox
        |-- HBox
        |-- VBox
    |-- FlowBox
        |-- HFlow
        |-- VFlow
布局的核心是UI节点描述 Measure Regulator
| 属性 | 描述 | 值 |
|---|---|---|
| margin | 描述本节点的外边距 | UIEdgeInset, default: .zero |
| alignment | 描述本节在父布局的偏移位置 | .none, .left, .top, .bottom, .vertCenter, .horzCenter, default: .none |
| size | 描述本节点尺寸 | SizeDescription.fixed 固定尺寸.wrap 包裹所有子节点的尺寸.ratio 占剩余空间的比例.aspectRatio: width / heightdefault: .wrap, 详情查看Demo:Size Properties |
| flowEnding | 当前节点在 FlowBox 中,并且arrangeCount = 0才会生效,标记当前节点是否为当前行最后一个节点 |
Bool, default: false |
| activated | 描述本节点是否参与计算 | Bool, default: true |
ZBox 继承于 Regulator
| 属性 | 描述 | 值 |
|---|---|---|
| justifyContent | 控制所有子节点在Box内的偏移位置,当子节点设置了 alignment 时,则优先使用 alignment |
.left, .top, .bottom, .vertCenter, .horzCenter, default: .none |
| padding | 控制当前布局的内边距 | UIEdgeInset, default: .zero |
LinearRegulator 继承于 Regulator
| 属性 | 描述 | 值 |
|---|---|---|
| space | 控制布局内子节点之间的间距 | CGFloat, default: 0 |
| format | 控制子节点在主轴上的分布方式 | .leading, .center, .between, .round, .trailing, default: .leading |
| reverse | 控制子节点的排列方式是否于添加顺序相反 | Bool default: false |
FlowRegulator 继承于 LinearRegulator
| 属性 | 描述 | 值 |
|---|---|---|
| arrange | 控制布局内每一列的数量,当 arrange = 0 时,则根据内容来自动决定是否换行 |
Int, default: 0 |
| itemSpace | 控制布局单列内的节点间距 | CGFloat, default: 0 |
| runSpace | 控制布局内每列之间的间距 | CGFloat, default: 0 |
| format | 控制子节点在单列上的分布方式 | .leading, .center, .between, .round, .trailing, default: .leading |
| runFormat | 控制布局内列的分布方式 | .leading, .center, .between, .round, .trailing, default: .leading |
| runRowSize | 控制布局内列的分布方式 | (Int) -> SizeDescription, default: .wrap(shrink: 1) |
声明式的UI进行布局之后,当数据变化后,UI将自动根据需要重新布局。
let text = State("")

VBox().attach {
    UILabel().attach($0)
        .text("Title")

    UILabel().attach($0)
        .text(text)
}

// do when some data come back
text.value = "My Description"

// if you are using RxSwift that would be another good choise
// make `Observable` implements Outputing protocol
extension Observable: Outputing {
    public typealias OutputType = Element
    /// .... some code
}

func getDescription() -> Observable<String> {
    // get some description by network or other async works
}

// use in view declare
UILabel().attach($0)
    .text(getDescription())
注意:数据驱动的所有逻辑遵循RxSwift的使用逻辑,请注意内存泄露
View提供一个扩展属性 view.py_animator. 类型为 protocol Animator {}
在BoxView进行布局后,给子view进行位置进行赋值时,会调用该对象的animate方法,并且会给对应的view创建独立的动画。
当子view没有设置动画,会沿用其父布局(BoxView)的动画
public struct ExpandAnimator: Animator {
    public init(duration: TimeInterval = 0.3) {
        self.duration = duration
    }

    public var duration: TimeInterval
    public func animate(_ view: UIView, size: CGSize, center: CGPoint, animations: @escaping () -> Void) {
        let realSize = view.bounds.size
        let realCenter = view.center
        if realSize != size || realCenter != center {
            if realSize == .zero, realCenter == .zero {
                runAsNoneAnimation {
                    view.center = center
                    let scale: CGFloat = 0.5
                    view.bounds.size = CGSize(width: size.width * scale, height: size.height * scale)
                    view.layer.transform = CATransform3DMakeRotation(.pi / 8 + .pi, 0, 0, 1)
                }
            }

            UIView.animate(withDuration: duration, delay: 0, usingSpringWithDamping: 2, initialSpringVelocity: 5, options: [.curveEaseOut, .overrideInheritedOptions, .overrideInheritedDuration], animations: {
                animations()
                if realSize == .zero, realCenter == .zero {
                    view.layer.transform = CATransform3DIdentity
                }
            }, completion: nil)
        } else {
            animations()
        }
    }
}
具体查看 Demo: Animation
因为布局自身也是一个view,所以在自定义view时,可以直接继承相应的Box。降低view层级。
class MyView: VBox {
    override func buildBody() {
        // do your view declare here
    }
}一个复杂的View通常以输入数据进行展示,通过抛出事件进行交互。在UIKit里面通常体现为 DataSource, Delegate.
在系统里,提供了一个交互模式,进行定义。
class MyView: VBox, Stateful, Eventable {
    // declare your dataSource you need
    struct ViewState {
        var name: String?
        var title: String?
    }
    // declare event that will occured
    enum Event {
        case onConfirmed
    }
    /// declare in Stateful implement by this class
    let state = State(ViewState())
    /// declare in Eventable implement by this class
    let emitter = SimpleIO<Event>()

    override func buildBody() {
        attach {
            UILabel().attach($0)
                .text(state.map(\.name)) // use map to transform value

            UILabel().attach($0)
                .text(binder.title) // use binder dynamic member lookup to find value

            UIButton().attach($0)
                .text("Confirm")
                .bind(event: .touchUpInside, input: emitter.asInput { _ in .onConfirmed })
        }
    }
}

// Use view

let state = State(MyView.ViewState())

MyView().attach($0)
    .state(state) // bind your data source
    .onEvent(Inputs { event in
        // do your logic when event occured
    })
系统提供 Decorable, Style 两个接口,进行定义样式。并给UIView提供属性 py_styleSheet 进行样式的设置。
详情见Demo: Style
// declare style
let styles: [Style] = [
    (\UIView.backgroundColor).getStyle(with: .white),
    TapRippleStyle(),
    (\UILabel.text).getStyle(with: "Click"),
    (\UIView.isUserInteractionEnabled).getStyle(with: true)
]
// Use style
UILabel().attach()
.styles(styles)根据常用操作,系统已经提供了声明式中常用的API,详情见 Puyo+xxxx.swift.
若有更多需求,可自行扩展Puyo,期待您的贡献
Jrwong, jr-wong@qq.com
Puyopuyo is available under the MIT license. See the LICENSE file for more info.