-
Notifications
You must be signed in to change notification settings - Fork 8
Tutorial
This tutorial will walk you briefly through the interface and you will build your first RPA bot using Ark-Automate.
To follow this tutorial, you can set up a local instance of Ark.
If you use a local installation, go to http://localhost:3000/ to open the web interface of Ark.
Also, make sure that the local client is installed and running and is successfully connected to the server (You have connected to the user room [...] shown in the console).
At the start page, click the orange "Go to my Robots" button to open the overview page. Here, you will later see all available bots, but for now the overview should be empty.
- Click on "Create new Robot". A new tile titled "New Robot" will appear in the list.
- Hover over the new tile and click the edit button that appears right next to "New Robot" and give your new bot an expressive name and press enter to save.
It should now look something like this (click me):

- Now, still while hovering over the tile, click the big edit button located between the play and delete button. Now, the modeler interface should open.
Using this modeler interface, you can now model the newly created bot. In this case, a BPMN-like modeler is provided.
- Start modeling by adding a new task to the workflow, either by dragging the task icon from the left bar and connecting it to the start event, or by first clicking on the start event and then on the appearing task icon.
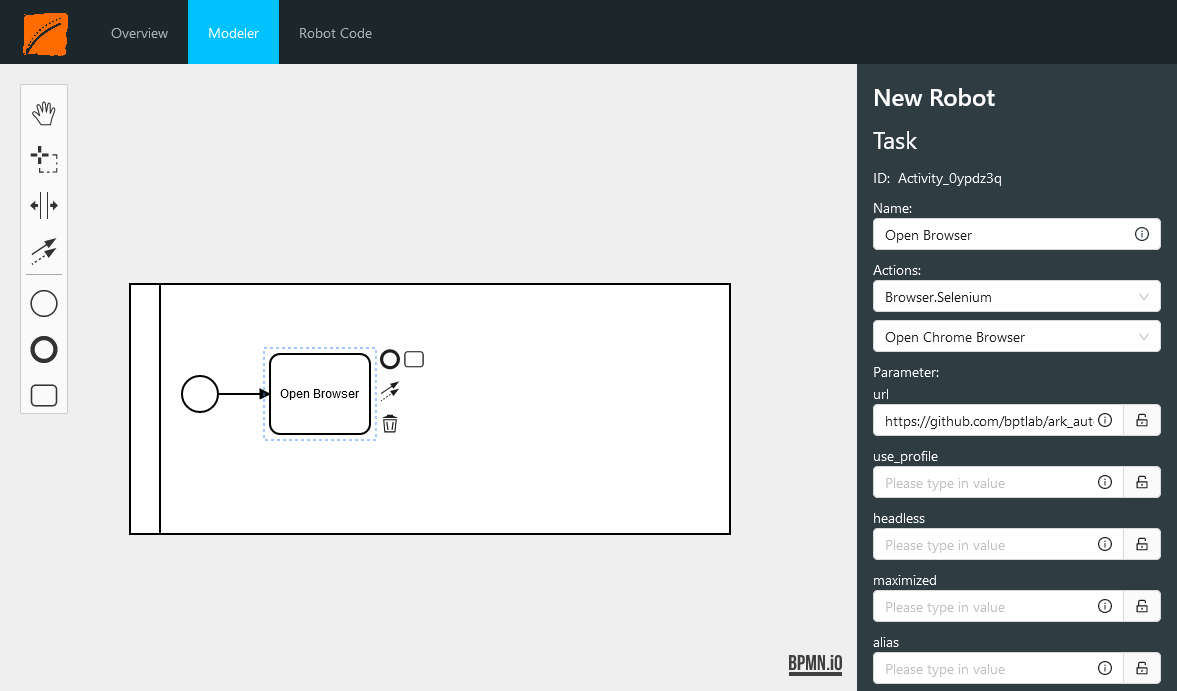
- Click on the newly created task and a configuration panel will appear on the right hand side.
- Enter an activity name in the upper text field, e.g., "Open Browser". As you type you will see the name also appear as a label in the BPMN diagram.
- Now, the actual RPA functionality must be configured for this task. For this, click on the dropdown "Actions"→"Please select application" below the text field and choose "Browser.Selenium".
- As soon as the application to automate was selected, the lower dropdown "Please select task" becomes enabled. Click it and select "Open Chrome Browser".
- After the task to automate in the chosen application was selected, all available configuration parameters are displayed. For now, it is sufficient to enter a value for "url", such as
https://github.com/bptlab/ark_automate.It should now look something like this (click me):

- Now, click on some empty space in the model and click on the "Save changes to cloud" button on the right hand side.
- To view the so far modeled bot in Robot Framework program code, click on "Robot Code" in the navigation bar at the top. Here, you can see that currently one task is configured (E.g., "Open Browser") and you can see the command to open the browser as well as the url you just configured. If you want, you can also edit the url here, click on "Save changes to cloud".
- Go back to the "Modeler" view. If you have changed the url in the previous step, you should see the updated value if you click on the task.
- Add another task and give it a name, such as "Make Screenshot".
- Configure the task with "Browser.Selenium" and "Screenshot". Set the value for "locator" to
//bodyand click on the small lock symbol next to the input field for "filename".
The lock symbol indicates that a value is not hard coded into the robot, but has to be specified by the user each time the bot is started.
- Click on "Save changes to cloud".
If you are using the online test instance, i.e., no installed local client for bot execution, you can follow this part until step 3.
- In the top navigation bar, click on "Overview". Here you can see all available bots again, including the one you created in part one.
- Hover over your bot and click on the play button that appears. The "Robot Interaction Cockpit" will open.
- As we have configured the last task to have a value that must be specified at start, an input field for the filename of the screenshot task appears. Enter a path including filename to store the taken screenshot in. Make sure that you code backslashes on windows with another backslash (see also screenshot below).
It should now look something like this (click me):

- Now, click "Execute Robot". The cockpit will now show the progress of the tasks contained in the bot and signals as soon as all steps have been completed. You might briefly see a new instance of your browser popping up and opening the configured web page.
It should now look something like this (click me):

- Check the filepath you have provided at the start of the robot!
Now you have seen the major parts of Ark Automate. Feel free to create more complex automations, file issues for problems and ideas, or contribute to the project!
Back to the Wiki Home
-
About Ark Automate
- Pitch
- Architecture
- Interaction with our Software until the summer of 2021
-
Documentation