This is a sample project to demonstrate how to run a Slack bot on AWS using coldbrew-cli.
coldbrew-cli deploys your applicaiton in Docker containers. So the first step is to install Docker in your system if you don't have it yet.
Download the package for your system at here. It makes things easier if you copy the downloaded binary coldbrew (or coldbrew.exe on Windows) in your $PATH, so you can run coldbrew from anywhere. But it's also okay to keep coldbrew executable in your application directory if you want.
As you will be deploying your application on AWS, you will need AWS account for sure. Sign up if you haven't yet, and, get your AWS access keys. You can pass AWS access keys to coldbrew-cli either in environment variables or using CLI flags, but, we will assume that you set the follow environment variables through out the turorial:
$AWS_ACCESS_KEY_ID: AWS Access Key ID$AWS_SECRET_ACCESS_KEY: AWS Secret Access Key$AWS_REGION: AWS region name$AWS_VPC: AWS VPC ID (this is completely optional. If you don't specify or don't know your VPC ID, coldbrew-cli will automatically use the default VPC of your AWS account.)
You will need a Slack bot account for this tutorial. You can create a Slack bot account if you don't have one. Just save he API token of the bot account because that will be used later in this tutorial.
This tutorial project contains the bare minimum (but fully functional) sample resources so you can get started right away.
- A sample Slack bot (written in Go): the bot simply echos what the calling user said
- A sample Dockerfile
- A sample coldbrew-cli app configuration file, coldbrew.conf
Clone this repo:
git clone https://github.com/coldbrewcloud/tutorial-echo-slack-bot.git
cd tutorial-echo-slack-botcoldbrew-cli has very simple concepts: clusters and applications (apps). An app is the minimum deployment unit and typically it correponds to a project (like this tutorial project). And a cluster is simply a collection of apps who will share some AWS resources. Most importantly they share the Docker hosts (which is ECS Container Instances in the AWS context).
Let's create your first cluster tutorial using cluster-create command:
coldbrew cluster-create tutorial --disable-keypair
*In this tutorial, we used --disable-keypair flag to skip assigning EC2 key pairs to the container instances. If you will need a direct access to the instances (e.g. via SSH), you can use --key flag to specify your key pair name.
If you want to check the current running status of your first cluster, you can use cluster-status command:
coldbrew cluster-status tutorialIt can take several minutes until the initial ECS Container Instances (EC2 Instances) become fully available, but, you can continue on to start deploying your applicaiton.

Now it's time to deploy your app for the first time. To deploy the applicaiton, you need a configuration file to define your app's deployment settings. You can easily create it on your own, or, you can use init command to generate a proper default configuration for your app. In this tutorial, we provide a sample coldbrew.conf file.
The sample Bot application takes the Slack API token via an environment variable $SLACK_API_TOKEN. So you can set and pass the variable using .env attributes in coldbrew.conf file. Just replace
env:
  SLACK_API_TOKEN: your_slack_api_token
with your actual API token.
Now you can deploy your bot using deploy command:
coldbrew deploy
You just ran a single command line, but, what's realy happening here is:
- coldbrew-cli builds local Docker image using Dockerfile. (You can skip this if you provide the local image name using
--docker-imageflag directly.) - It pushes the Docker image to ECR Repository that's created for your application.
- It creates, updates, or, configures ECS Task Definition and ECS Service to apply your configurations.
Now let's check the application status using status command:
coldbrew status
It gives you much more details about your application and its related AWS resources.
*Again, it will take several minutes until all AWS resources get fully provisioned and become active. But, the next deploys will be much faster, typically within a minute.
After the first deploy, whenever you have changes in your code or configurations, you can re-deploy them again using the same deploy command. In this example, I made a simple change in .cpu attributes in the configuration file: from 0.1 tom 0.2.
coldbrew deploy
You will notice that coldbrew-cli did not create a new AWS resources this time because they were already created during the first deploy run. coldbrew-cli always tries to minimize the actual AWS changes by analyzing and comparing the current status and the desired status.
*Note that not all configuration changes will be applied immediately. See this for more details.
Let's run status command again:
coldbrew status
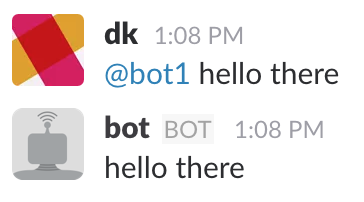
Once your bot application is up and running, you will see the bot user become online on Slack channels. You can test the bot by mentioning him and saying something.
When you no long need to run your application in AWS, you can use delete command to clean up all AWS resources that were used to run your application.
coldbrew delete
*Note that cleanining up can take several minutes to finish to make sure all AWS resources are properly deleted or updated.
And, if you need to delete the cluster too, you can cluster-delete command.
coldbrew cluster-delete tutorial
*For the same reason, cluster delete can take long to finish.
That's it for the tutorial.
See Documentations for more details on coldbrew-cli, or, check out other tutorials: