Developer Docs builder. Write guides in Markdown and references in API Blueprint. Comes with a built-in search engine.
Chappe is a Developer Docs builder, that produces static assets. No runtime, just lightweight static files. It was built to address SaaS companies needs, and can serve as a first-class modern alternative to hosted services such as ReadMe.
The reason behind why we made Chappe is the following: while looking for a Developer Docs builder at Crisp, all that we could find were either outdated open-source projects, or commercial documentation builders. We wanted a modern Developer Docs website hosted on our premises, as pure-static assets. The latter is especially important, as we do not want to rely on a plethora of external services that can go down anytime.
Using Chappe is as easy as:
- Writing all your docs in Markdown;
- Building your docs in a single command;
- Finally, deploying static build assets to your Web servers (or GitHub Pages, Cloudflare Pages, etc. — this can be automated via GitHub Actions);
😘 Maintainer: @valeriansaliou
👉 See a live demo of Chappe on the Crisp Developer Hub.
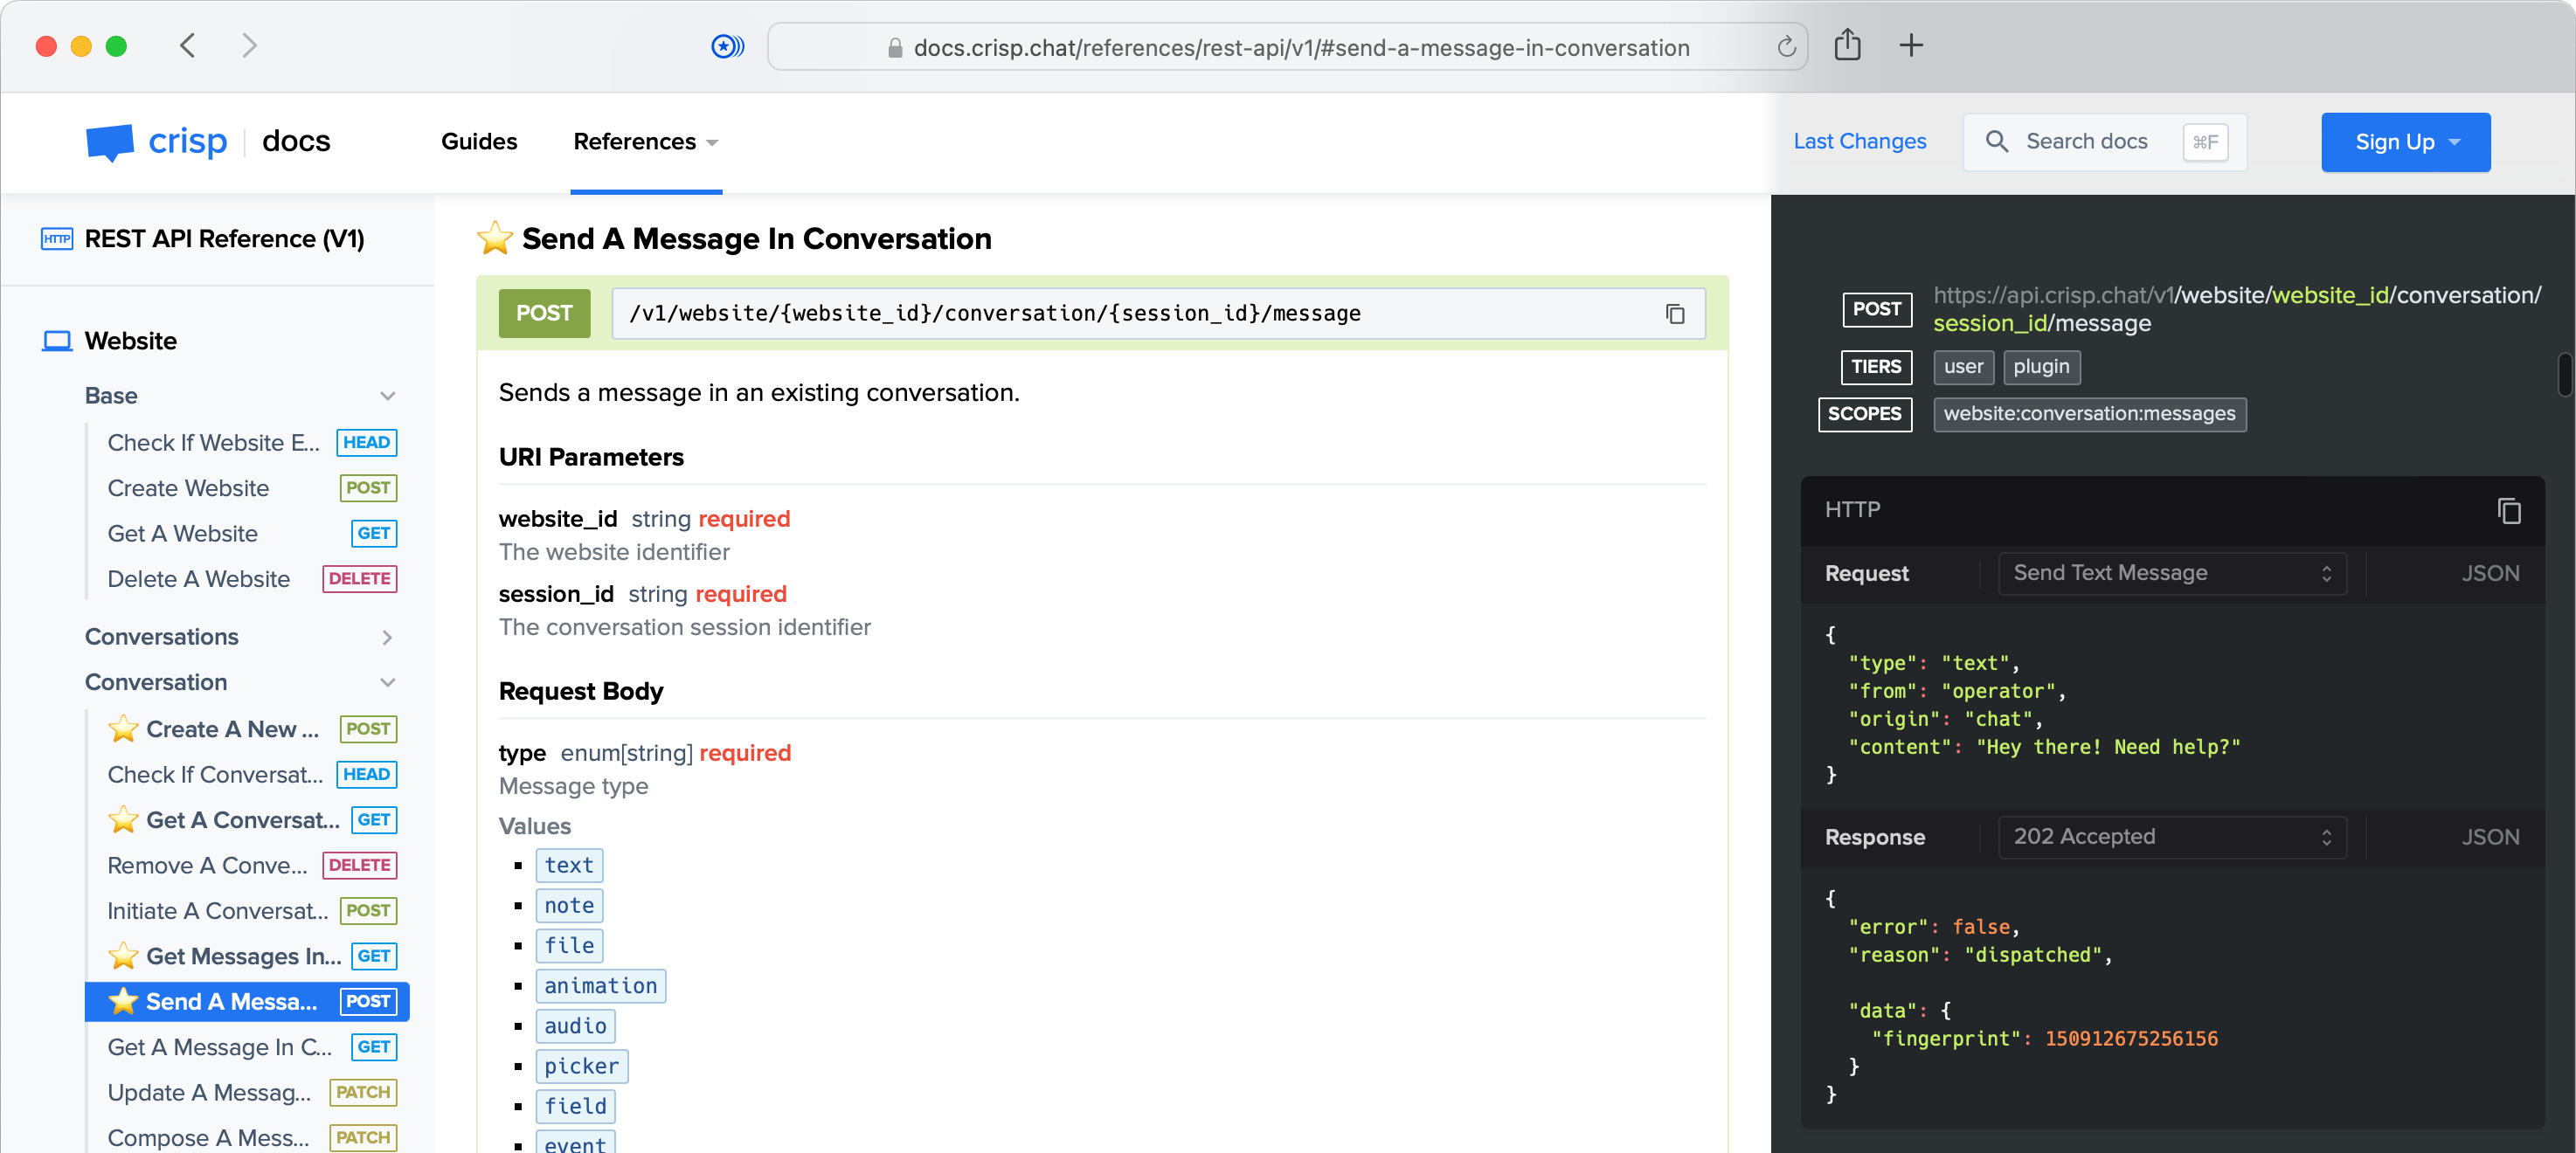
1️⃣ Chappe can generate your REST API reference:
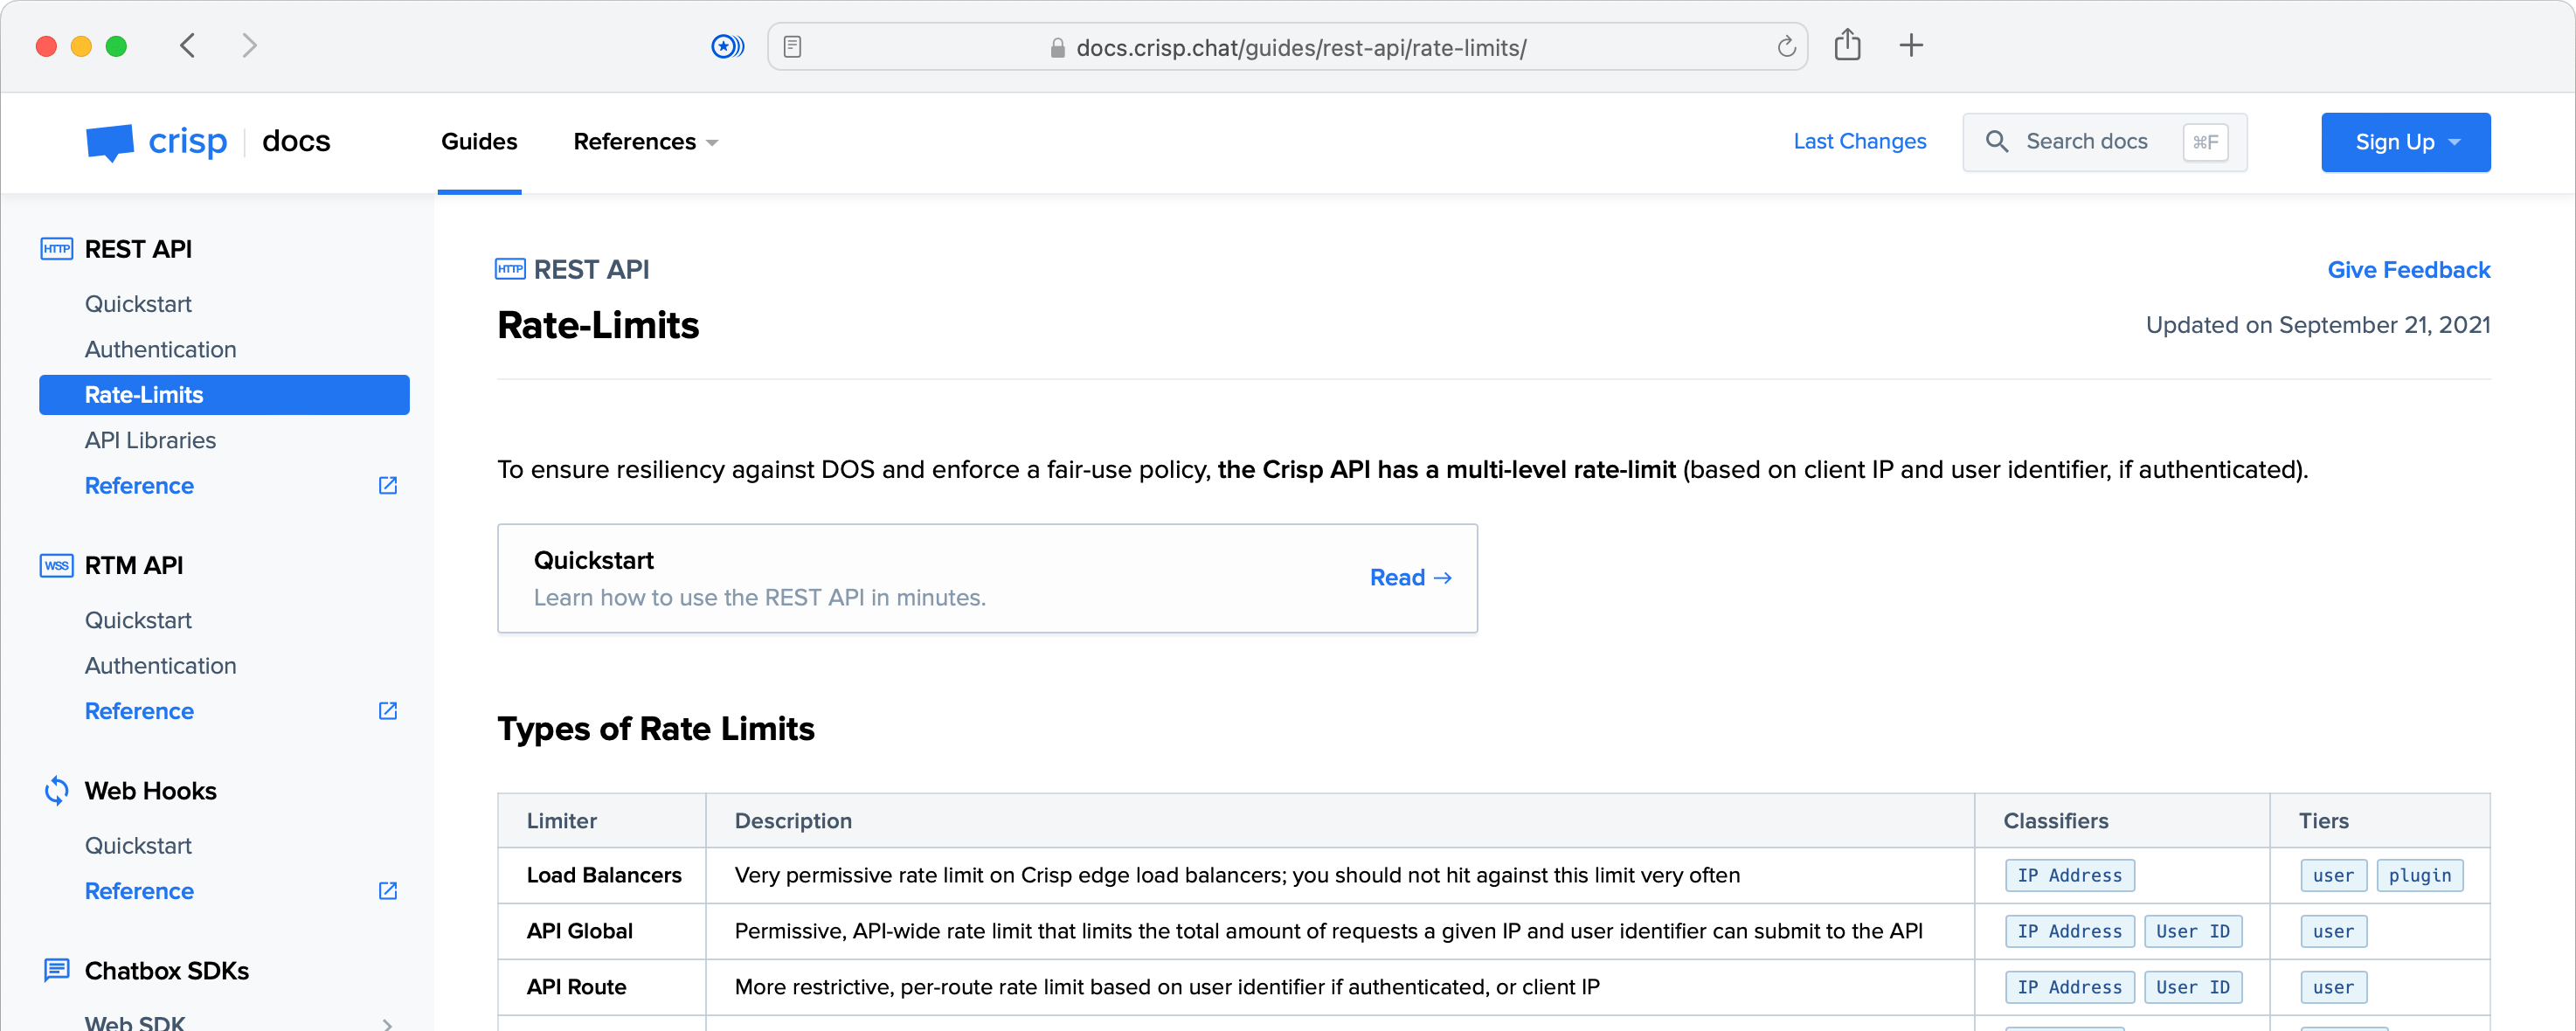
2️⃣ It also generates Markdown-based developer guides:
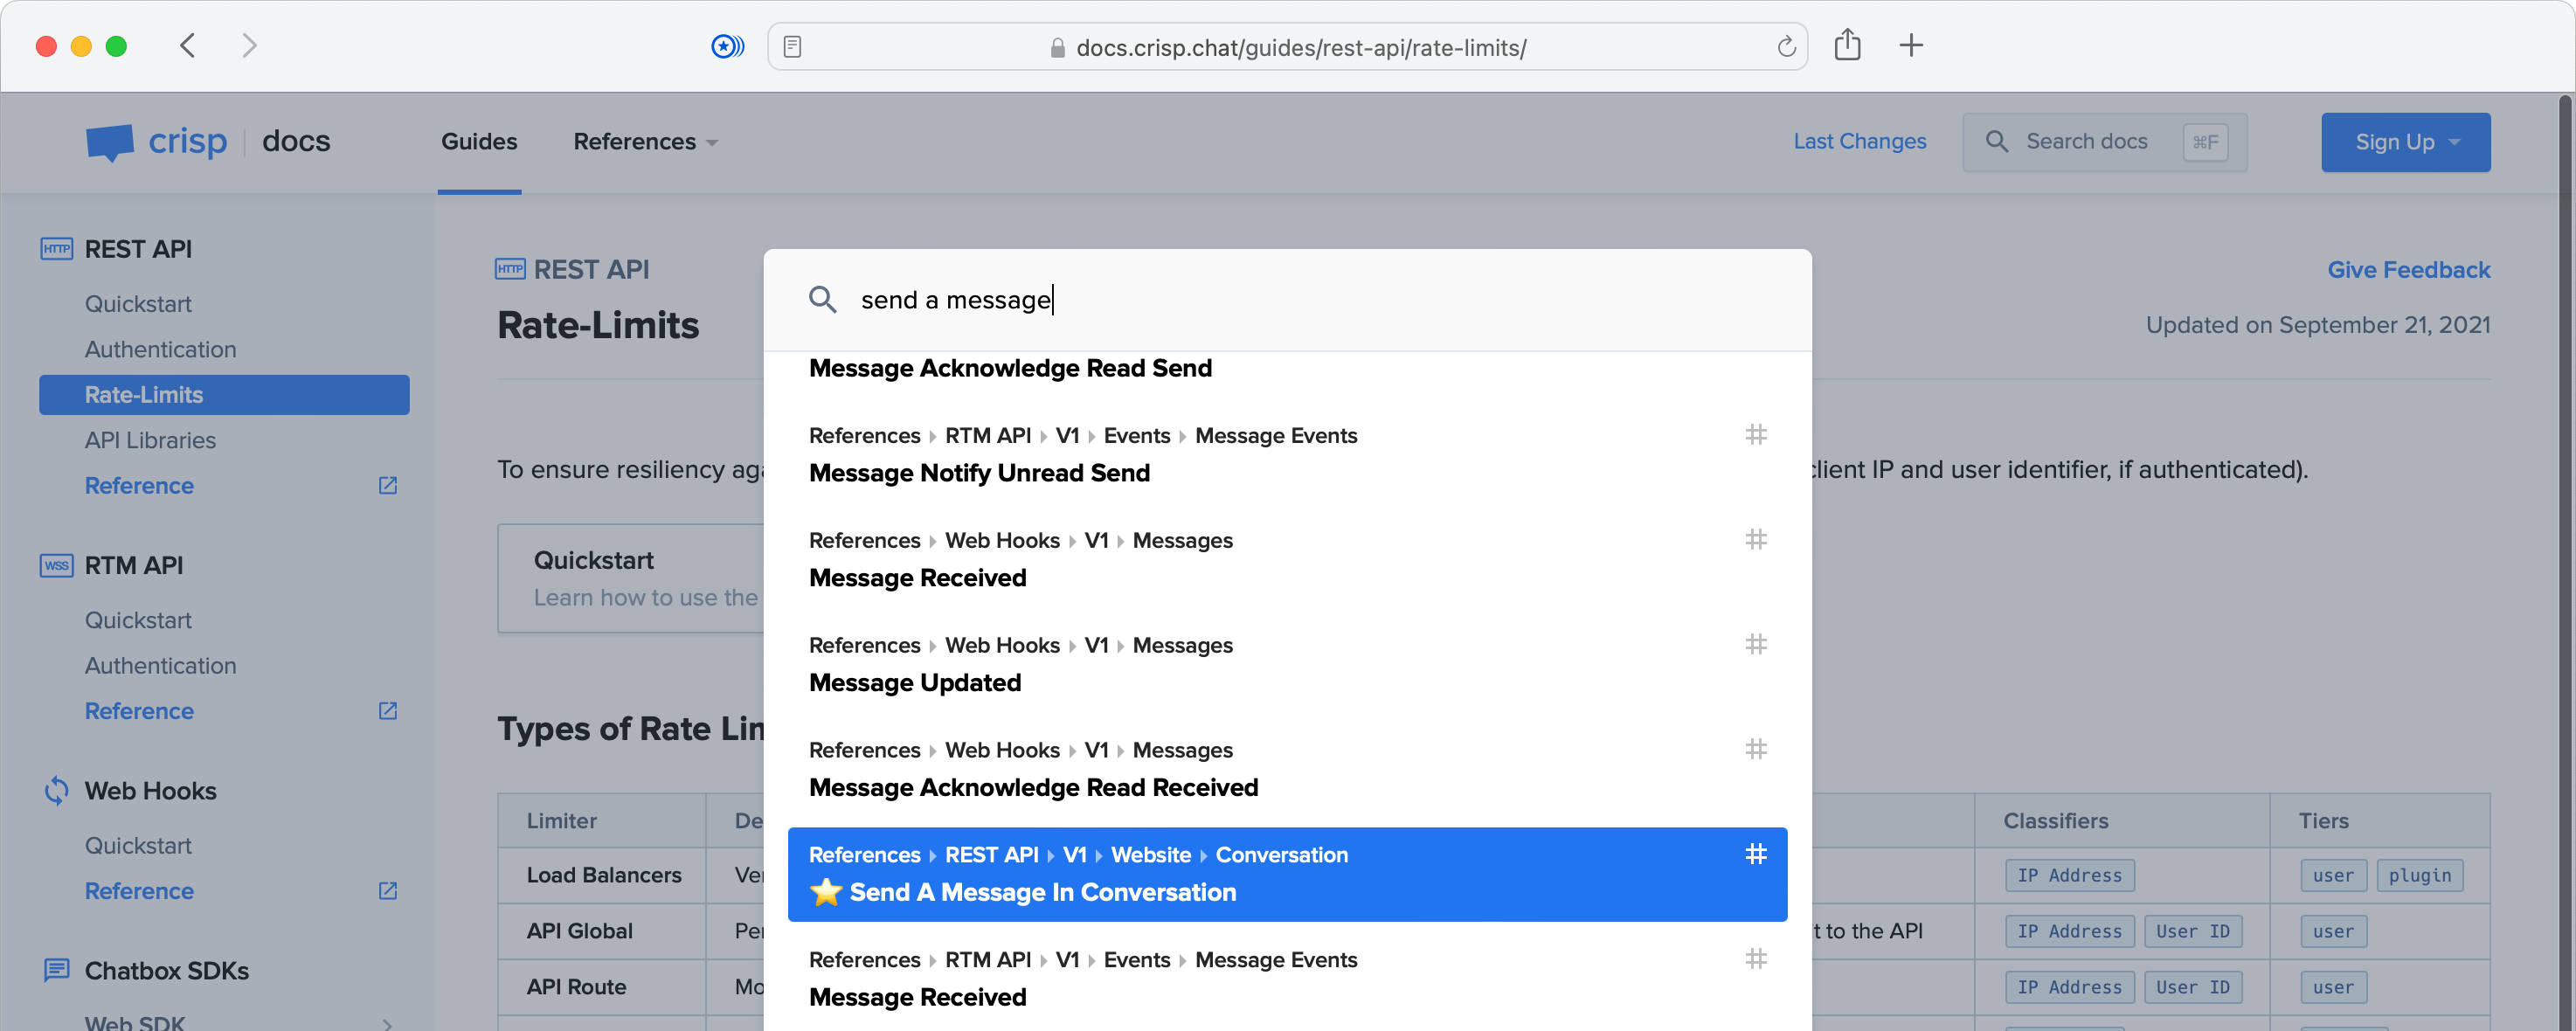
3️⃣ Oh, and it also lets your users search anything in your Developer Docs:
👉 Note that the search engine feature is 100% local. This means that it does not run on an external service like Algolia, though it does provides similar search performance and results. The search index is generated at build time as a JSON file, which gets loaded on-demand when the search box gets opened.
 |
 |
| Crisp | Meowtel |
👋 You use Chappe and you want to be listed there? Open an issue.
The version history can be found in the CHANGELOG.md file.
- Simple & fast: generate a Developer Docs with optimized static assets. No runtime
- Guides: write developer guides in Markdown (rich content support: images, videos, tables, etc.)
- References: document your HTTP REST API specification using API Blueprint
- Changes: maintain a changelog of your platform (eg. your REST API, your SDKs)
- RSS feed: users can subscribe to your changelog over RSS
- Beautiful Markdown rendering: all content that you write gets rendered with a clear and modern style
- Syntax highlighting: coloring for your code examples in 100+ programming languages
- Built-in search engine: the index is generated during build and is hosted locally
- Fully responsive: full support of desktop, tablet and phone screens
- Dark Mode: read your docs either in light mode or dark mode
- Customizable theme: configure an accent color for your docs theme
- SEO-friendly: a deep sitemap is generated for search engines
- Sharing-friendly: full support of the Open Graph protocol, with the auto-generation of preview images
- Private pages support: mark any guide or reference as private or unlisted (prefix its name with
_) - Local preview server: skip setting up a local Web server to preview your docs while writing them, Chappe embeds a preview server that can be started in a single command
The following optional features can also be enabled:
- Chatbox: integrate with the Crisp Chatbox to handle tech support and collect user feedback
- Status page: integrate with your Vigil status page to show live system status (can also be Crisp Status)
To install and use Chappe, please follow those steps:
- Create a new, empty Git repository;
- Copy the
examples/acme-docs/folder contents from the Chappe repository into your project root; - Run:
npm install(make sure that you have a recent NodeJS version installed); - Run:
npx chappe serveto build the docs and serve them over a local Web server (it will also watch for changes); - Open: http://localhost:8040 in your Web browser to access your docs;
- Write your Markdown guides and references in the
data/directory (changes will be hot-reloaded in your browser);
Please refer to sections below for more details on how to write docs, customize Chappe, and deploy your final docs to your Web server.
👉 If Chappe fails to install on your Mac with an Apple Silicon chip, please refer to the Common questions section below.
The configuration of your Chappe docs is stored in a single JSON file, usually named config.json. Your configuration file will make references to images, such as your docs logo, which are stored in the assets/ folder.
An empty definition of the Chappe configuration file is available in: res/config/user.json, although you may rather want to see a filled example: examples/acme-docs/config.json (if you copy-paste it, make sure to change all of its contents).
👇 Notes on certain configuration rules can be found in the Advanced settings section.
Chappe provides you with the chappe command, that builds your docs.
It supports the following actions, defaulting to build if none is specified:
buildto build docscleanto cleandist/and all temporary fileswatchto watch for changes and re-build (useful while writing docs)serveto serve built assets on your local/development computer (useful while testing and writing docs, not used for production)lintto run lints on Chappe internal resources
It supports the following parameters, with a default value if not set:
--config(paths to the configuration files, comma-separated, default value:./config.json)--assets(path to the assets directory, default value:./assets)--data(path to the data directory, default value:./data)--dist(path where to write built resources, default value:./dist)--temp(path where to write temporary files, default value:./.chappe)--env(environment, eitherdevelopmentorproduction, default value:production)
If you are running with the serve action, it accepts additional parameters:
--host(hostname or IP address to use for the local/development server, default value:localhost)--port(port number to use for the local/development server, default value:8040)
Some special parameters are also available:
--quiet(show less output when performing task)--verbose(show more output when performing task)--example(name of the Chappe docs example to build, useful for Chappe developers and quick tests, eg.acme-docs)
To build your docs, you can call the Chappe CLI as such:
npx chappe build --config=./config.json --assets=./assets --data=./data --dist=./distYou can also call the Chappe CLI without any argument, in which case defaults will be used:
npx chappe buildBy default, docs are built for a production target, meaning that all assets produced are optimized for speed and size. In most use cases, you will never need to set it to development, unless you are trying to extend or modify the Chappe core and therefore need to see uncompressed assets output.
To create a local development server on http://localhost:8040, used to write and preview your docs, use:
npx chappe serve👉 If the chappe command is not found, make sure to add chappe to your package.json and call npm install.
Docs can be either: guides, references or changes. The corresponding folders are stored in the data/ directory, which is passed to the Chappe CLI whenever building your docs.
guidesare articles that walk your users through using your systems (example here). They are written in Markdown, and are organized in sub-folders if deep nesting of guides in several sections is required. Chappe will auto-generate the navigation sidebar for you, based on this folder hierarchy.referencesare formal specifications of your systems (examples of: API Blueprint and Markdown). They are written in API Blueprint for your HTTP REST API (a pseudo-Markdown format), or traditional Markdown for other systems (eg. a WebSocket server).changesis a timeline of updates that you made to your systems (example here). They are defined in a JSON format. In addition to the timeline, an RSS feed also gets generated at the/changes.rssURL.
To deploy your docs:
- First, create a Virtual Host on your Web server, using a dedicated domain, eg.
docs.acme.com; - Then, build Chappe with
npx chappe build(on your local computer or a CI/CD runner such as GitHub Actions); - Finally, copy the contents of the
dist/folder to your server folder for your docs Virtual Host (eg./var/www/docs.acme.com);
Here is an example configuration file for NGINX on the Virtual Host docs.acme.com:
server {
  listen 443 ssl http2;
  server_name docs.acme.com;

  root /var/www/docs.acme.com;

  error_page 404 /not_found/;
}
👉 Note that if possible, you should make sure that you have a rule to catch 404 errors and show the not_found page (as the NGINX configuration file above shows).
Guides are stored within guides/ in your data directory. A guide is stored as a Markdown file named index.md in a sub-directory with the guide name eg. hello-world. The sub-directory structure directly maps to the final URL that you get: for instance guides/hello-world/index.md results in eg. http://docs.acme.com/guides/hello-world/.
Each guide Markdown file must start with a meta-data header, which holds information on:
TITLE: The guide article name- Example:
TITLE: Hello World
- Example:
INDEX: Number used to position the article relative to others in the navigation sidebar- Example:
INDEX: 1
- Example:
UPDATED: The date at which the guide article has been updated- Example:
UPDATED: 2021-09-22
- Example:
LINK: Additional navigation links to be added in the navigation sidebar- Optional, Multiple possible
- Example:
LINK: Reference -> /references/rest-api/v1/
Right after the header is defined, you can start writing Markdown for your guide, as normal.
An example of a full Markdown code for a guide is available at: examples/acme-docs/data/guides/hello-world/index.md
Each guide main section can have its icon shown in the navigation sidebar (first-level sections only).
Section icons are defined in the config.json configuration file, within images.categories.guides. The section folder name, eg. hello-world, should be added to the guides object, associated to an SVG icon image from your assets/ folder.
For example:
{
  "images" : {
    "categories" : {
      "guides" : {
        "hello-world" : "images/categories/guides/hello-world.svg"
      }
    }
  }
}While the Markdown specification defines most of the syntax that we need to build a full-featured Developer Docs (text formatting, images, tables, etc.), some non-standard elements had to be defined in Chappe.
To embed a video in a page, use the following Markdown syntax:
${provider}[Video Title](video-id)Supported providers: youtube
Example:
${youtube}[In-depth Introduction to the Crisp RTM API](vS-h6k2ML6M)To insert text in an emphasis block, use one of the following Markdown syntaxes:
! This is a notice text.
!! This is an info text.
!!! This is a warning text.To insert an image with a caption, use the following Markdown syntax:
$[Caption Text]()Example:
$[Copy your Website ID]()To insert a navigation block, with one or multiple links to other pages, use the following Markdown syntax:
+ Navigation
  | Link Title 1: Link Description -> ./link/target/1/
  | Link Title 2: Link Description -> http://external-url.com/target/page/
Example:
+ Navigation
  | Quickstart: Learn how to use the REST API in minutes. -> ./quickstart/
  | Authentication: Read how to authenticate to the REST API. -> ./authentication/
  | Rate-Limits: Learn about request rate-limits. -> ./rate-limits/
| API Libraries: Libraries for your programming language. -> ./api-libraries/If you need to interact with the Crisp Chatbox from your Markdown code, you can include a traditional Markdown link with an URL pointing to special anchors.
The following anchors are available:
- Pop open the chatbox:
#crisp-chat-open - Prompt to submit feedback on the current page:
#crisp-chat-feedback
Example:
If you have any question on this guide, please [contact our chat support](#crisp-chat-open).👉 Note that this only works if you are using the Crisp Chatbox integration, and if the Crisp Chatbox is appearing on your docs.
References are stored within references/ in your data directory. A reference is stored either as an API Blueprint or Markdown file named for example v1.md for the API version, in a sub-directory corresponding to the name of the API, eg. rest-api. The sub-directory structure directly maps to the final URL that you get: for instance references/rest-api/v1.md results in eg. http://docs.acme.com/references/rest-api/v1/.
API Blueprint-formatted references are used to specify an HTTP REST API.
Each reference written with API Blueprint must start with a meta-data header, which holds information on:
TYPE: The type of the reference- Value:
API Blueprint
- Value:
TITLE: The reference title (with its version number)- Example:
TITLE: REST API Reference (V1)
- Example:
UPDATED: The date at which the reference has been updated- Example:
UPDATED: 2021-12-22
- Example:
Immediately following, come API Blueprint meta-datas:
FORMAT: The API Blueprint format (do not change this)- Value:
1A
- Value:
HOST: The HTTP REST API host URL- Example:
https://api.crisp.chat/v1
- Example:
Then, a main title with the following mandatory content:
# ReferenceAfter that, you can specify all your HTTP REST API routes in API Blueprint as normal.
Also, note that as done with guides above, reference sections can have their own icon images. Section icons are defined in the config.json configuration file, within images.categories.references.
An example of a full API Blueprint code for a reference is available at: examples/acme-docs/data/references/rest-api/v1.md
Markdown-formatted references are used to specify anything that is not an HTTP REST API. For instance, a WebSocket endpoint, a network protocol or a programmatic interface.
Each reference Markdown file must start with a meta-data header, which holds information on:
TYPE: The type of the reference- Value:
Markdown
- Value:
TITLE: The reference title (with its version number)- Example:
TITLE: RTM API Reference (V1)
- Example:
UPDATED: The date at which the reference has been updated- Example:
UPDATED: 2021-09-22
- Example:
After that, you can write the specification contents in Markdown.
Also, note that as done with guides above, reference sections can have their own icon images. Section icons are defined in the config.json configuration file, within images.categories.references.
An example of a full Markdown code for a reference is available at: examples/acme-docs/data/references/rtm-api/v1.md
Changes are stored within changes/ in your data directory. They are organized in JSON files for each year, eg. 2021.json.
A changelog file for a year contains an array of all individual change entries. Think of it as a yearly feed of all dated changes.
For instance, a 2021.json file with a single change would contain:
[
  {
    "group" : "rest_api",
    "type"  : "change",
    "date"  : "2021-12-03",
    "text"  : "Markdown-formatted text for this change on the REST API."
  }
]
An example of a full changelog file is available at: examples/acme-docs/data/changes/2021.json
A change is structured as such:
group: the category of this change — define your custom categories labels intexts.changes.groupsand colors incolors.changes.groupswithin yourconfig.json;type: the type of the change (either:changeordeprecation);date: a date for the change (formatted as:YYYY-MM-DD);text: the description text for the change, Markdown-formatted — make sure that any URL you define there is a full URL, as this is also used in RSS feeds
Code coloring rules for programming languages must be added manually, for each syntax that you intend use. As the rules are quite heavy for each syntax, Chappe includes none by default.
For instance, if you need to show examples of Java code, you'd need to add the java code coloring rule in plugins.code.syntaxes in your config.json. Chappe runs on Prism for code coloring.
Most often used syntaxes are listed below (pick yours!):
markup
markup-templating
css
clike
c
javascript
bash
go
java
groovy
json
objectivec
php
python
ruby
rust
swift
objectivec
All available Prism rules can be found here.
👉 Note that some rules depend on others. For instance, objectivec requires the c rule to be also included. If you do not get code coloring for a certain syntax after including it, then it probably means that one of its dependency is missing. Please refer to the list of Prism components for more details.
Once Chappe is done building your docs, it checks for all built files sizes against maximum build size rules. This is done to ensure that you do not get bad surprises about your Developer Docs users experiencing slow load times, especially when including a lot of heavy images in guides.
In the event a build size rule threshold is reached, the Chappe CLI will error out, informing you which file is over-sized.
To adjust size thresholds or disable this checker rule, open your config.json file and refer to the rules.build_size property:
- To circumvent build failure when a file is over-sized, set the
failproperty tofalse; - Maximum sizes can be adjusted where relevant with the
sizesproperty (note that sizes are in bytes, so 10KB is about10000);
Chappe relies on the gulp-ogimage dependency to auto-generate Open Graph images, which itself uses a library named canvas. Unfortunately, as of December 2022, canvas does not provide any pre-built binary for the arm64 CPU architecture, leading to Chappe failing to install on Macs with Apple Silicon chips.
In order to install Chappe on arm64 architectures, you will need to ensure that Homebrew is setup on your system, then run:
brew install pkg-config cairo pango libpng jpeg giflib librsvg pixmanOnce those tools are installed, try installing Chappe again.
In order to customize your docs style — ie. override the default Chappe style past what can already be customized in the config.json configuration file — open config.json and look for the includes property (that contains stylesheets, that contains urls and inline).
You can easily deploy your own custom stylesheet on your docs domain, along with Chappe-generated dist/ assets, with CSS classes overriding Chappe default styles:
{
  "includes" : {
    "stylesheets" : {
      "urls"   : [
        "/overrides/style.css"
      ],

      "inline" : []
    }
  }
}To add inline scripts such as Google Tag Manager, open your config.json configuration file for Chappe, and look for the includes property (that contains scripts, that contains urls and inline).
Add a new entry to the urls and inline array, separately, giving eg.:
{
  "includes" : {
    "scripts" : {
      "urls"   : [
        "https://www.googletagmanager.com/gtag/js?id={YOUR_GTM_ID}"
      ],

      "inline" : [
        "window.dataLayer = window.dataLayer || [];\nfunction gtag(){dataLayer.push(arguments);}\ngtag(\"js\", new Date());\ngtag(\"config\", \"{YOUR_GTM_ID}\");"
      ]
    }
  }
}
The urls property will include the JavaScript at the provided URL on all pages, while the inline property will append the inline JavaScript in a script element on all pages.
To build your docs to GitHub Pages, you will first need to host your docs project as a GitHub repository. Then, make sure that GitHub Actions is configured and running for your project.
You can then use the deploy-to-github-pages action to proceed with building your docs via npx chappe build and then deploying the dist/ folder to GitHub Pages.
Chappe was named after Claude Chappe, a French inventor, pioneer in long-distance communications. He invented the optical telegraph (a.k.a. semaphore telegraph), later replaced by the electrical telegraph. Those technologies were the founding blocks of what took over the world next: analog and digital telecommunications.
Quoting from his page on Wikipedia:
This [the optical telegraph] was the first practical telecommunications system of the industrial age, and was used until the 1850s when electric telegraph systems replaced it.
Credits to Baptiste Jamin for the name idea.


