An Ambari service package for VNC Server with the ability to install developer tools like Eclipse/IntelliJ/Maven as well to 'remote desktop' to the sandbox and quickly start developing on HDP Hadoop. Also includes the option to install the Spark 1.2.0 Tech Preview
Author: Ali Bajwa
- Setup VNC service
- Connect to VNC
- Getting started with Eclipse/IntelliJ
- Getting started with Storm and Maven in Eclipse environment on HDP
- Getting started with Spark on HDP
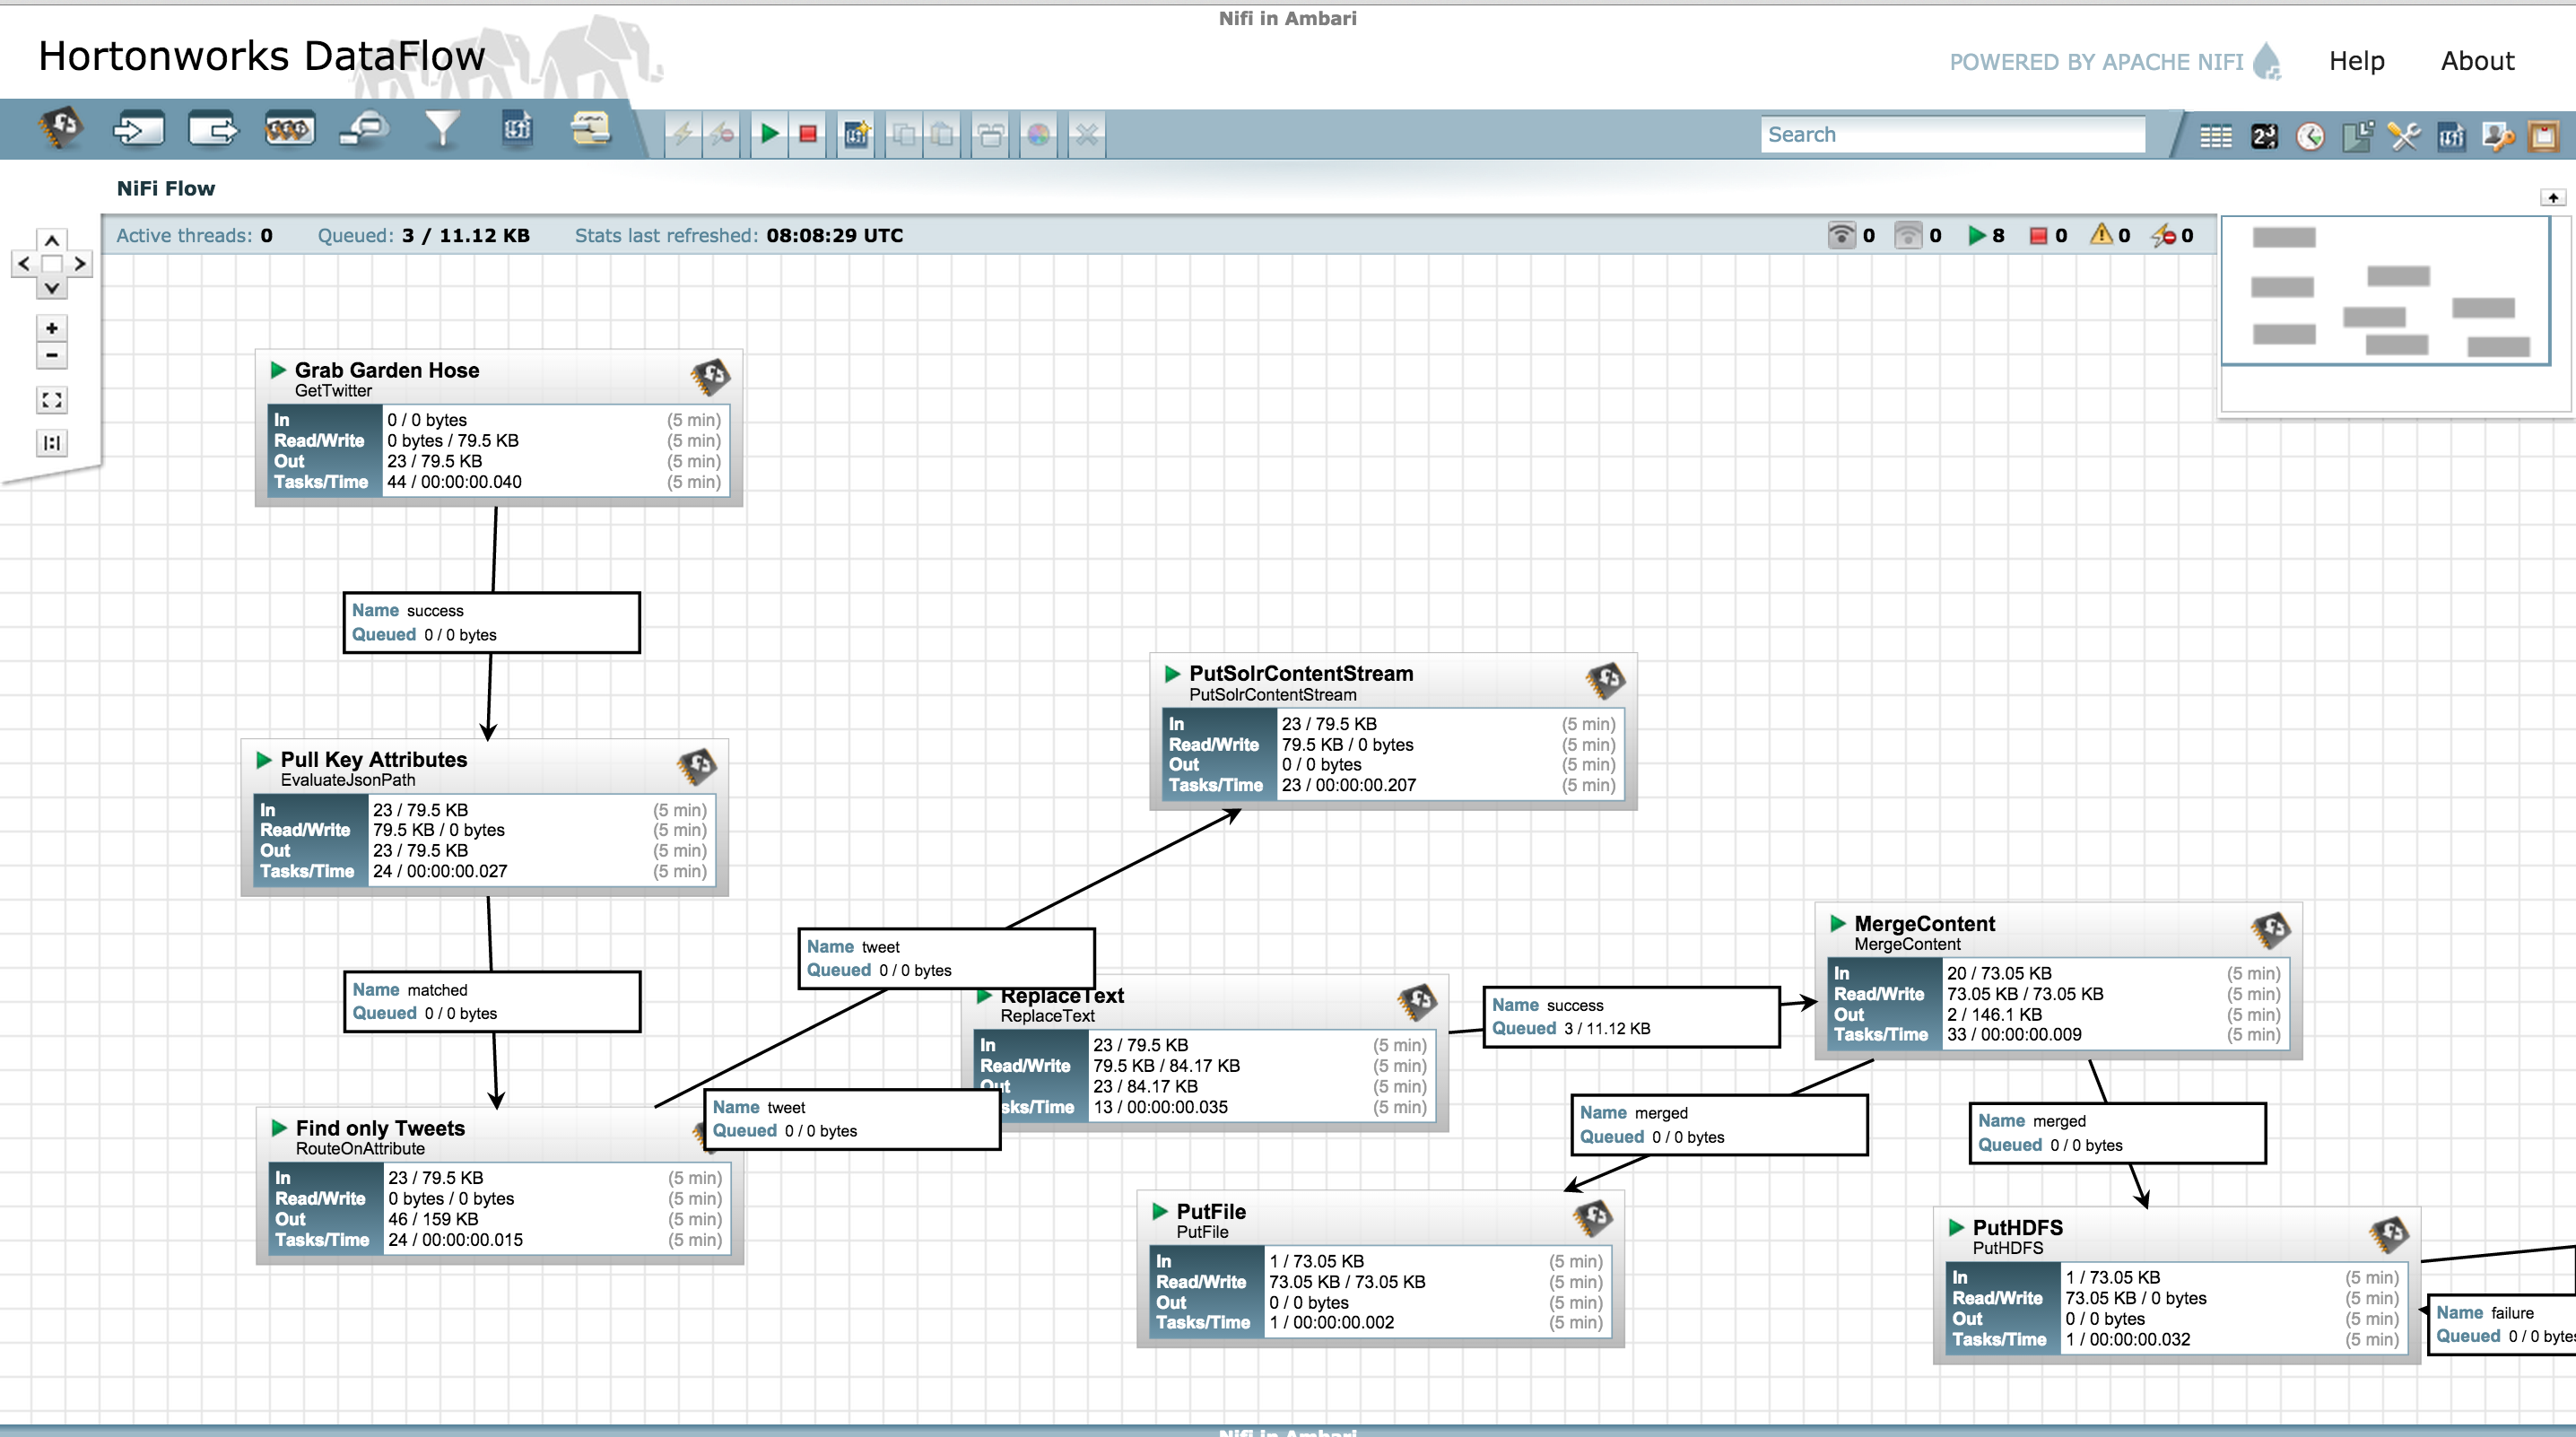
- Getting started with Nifi on HDP
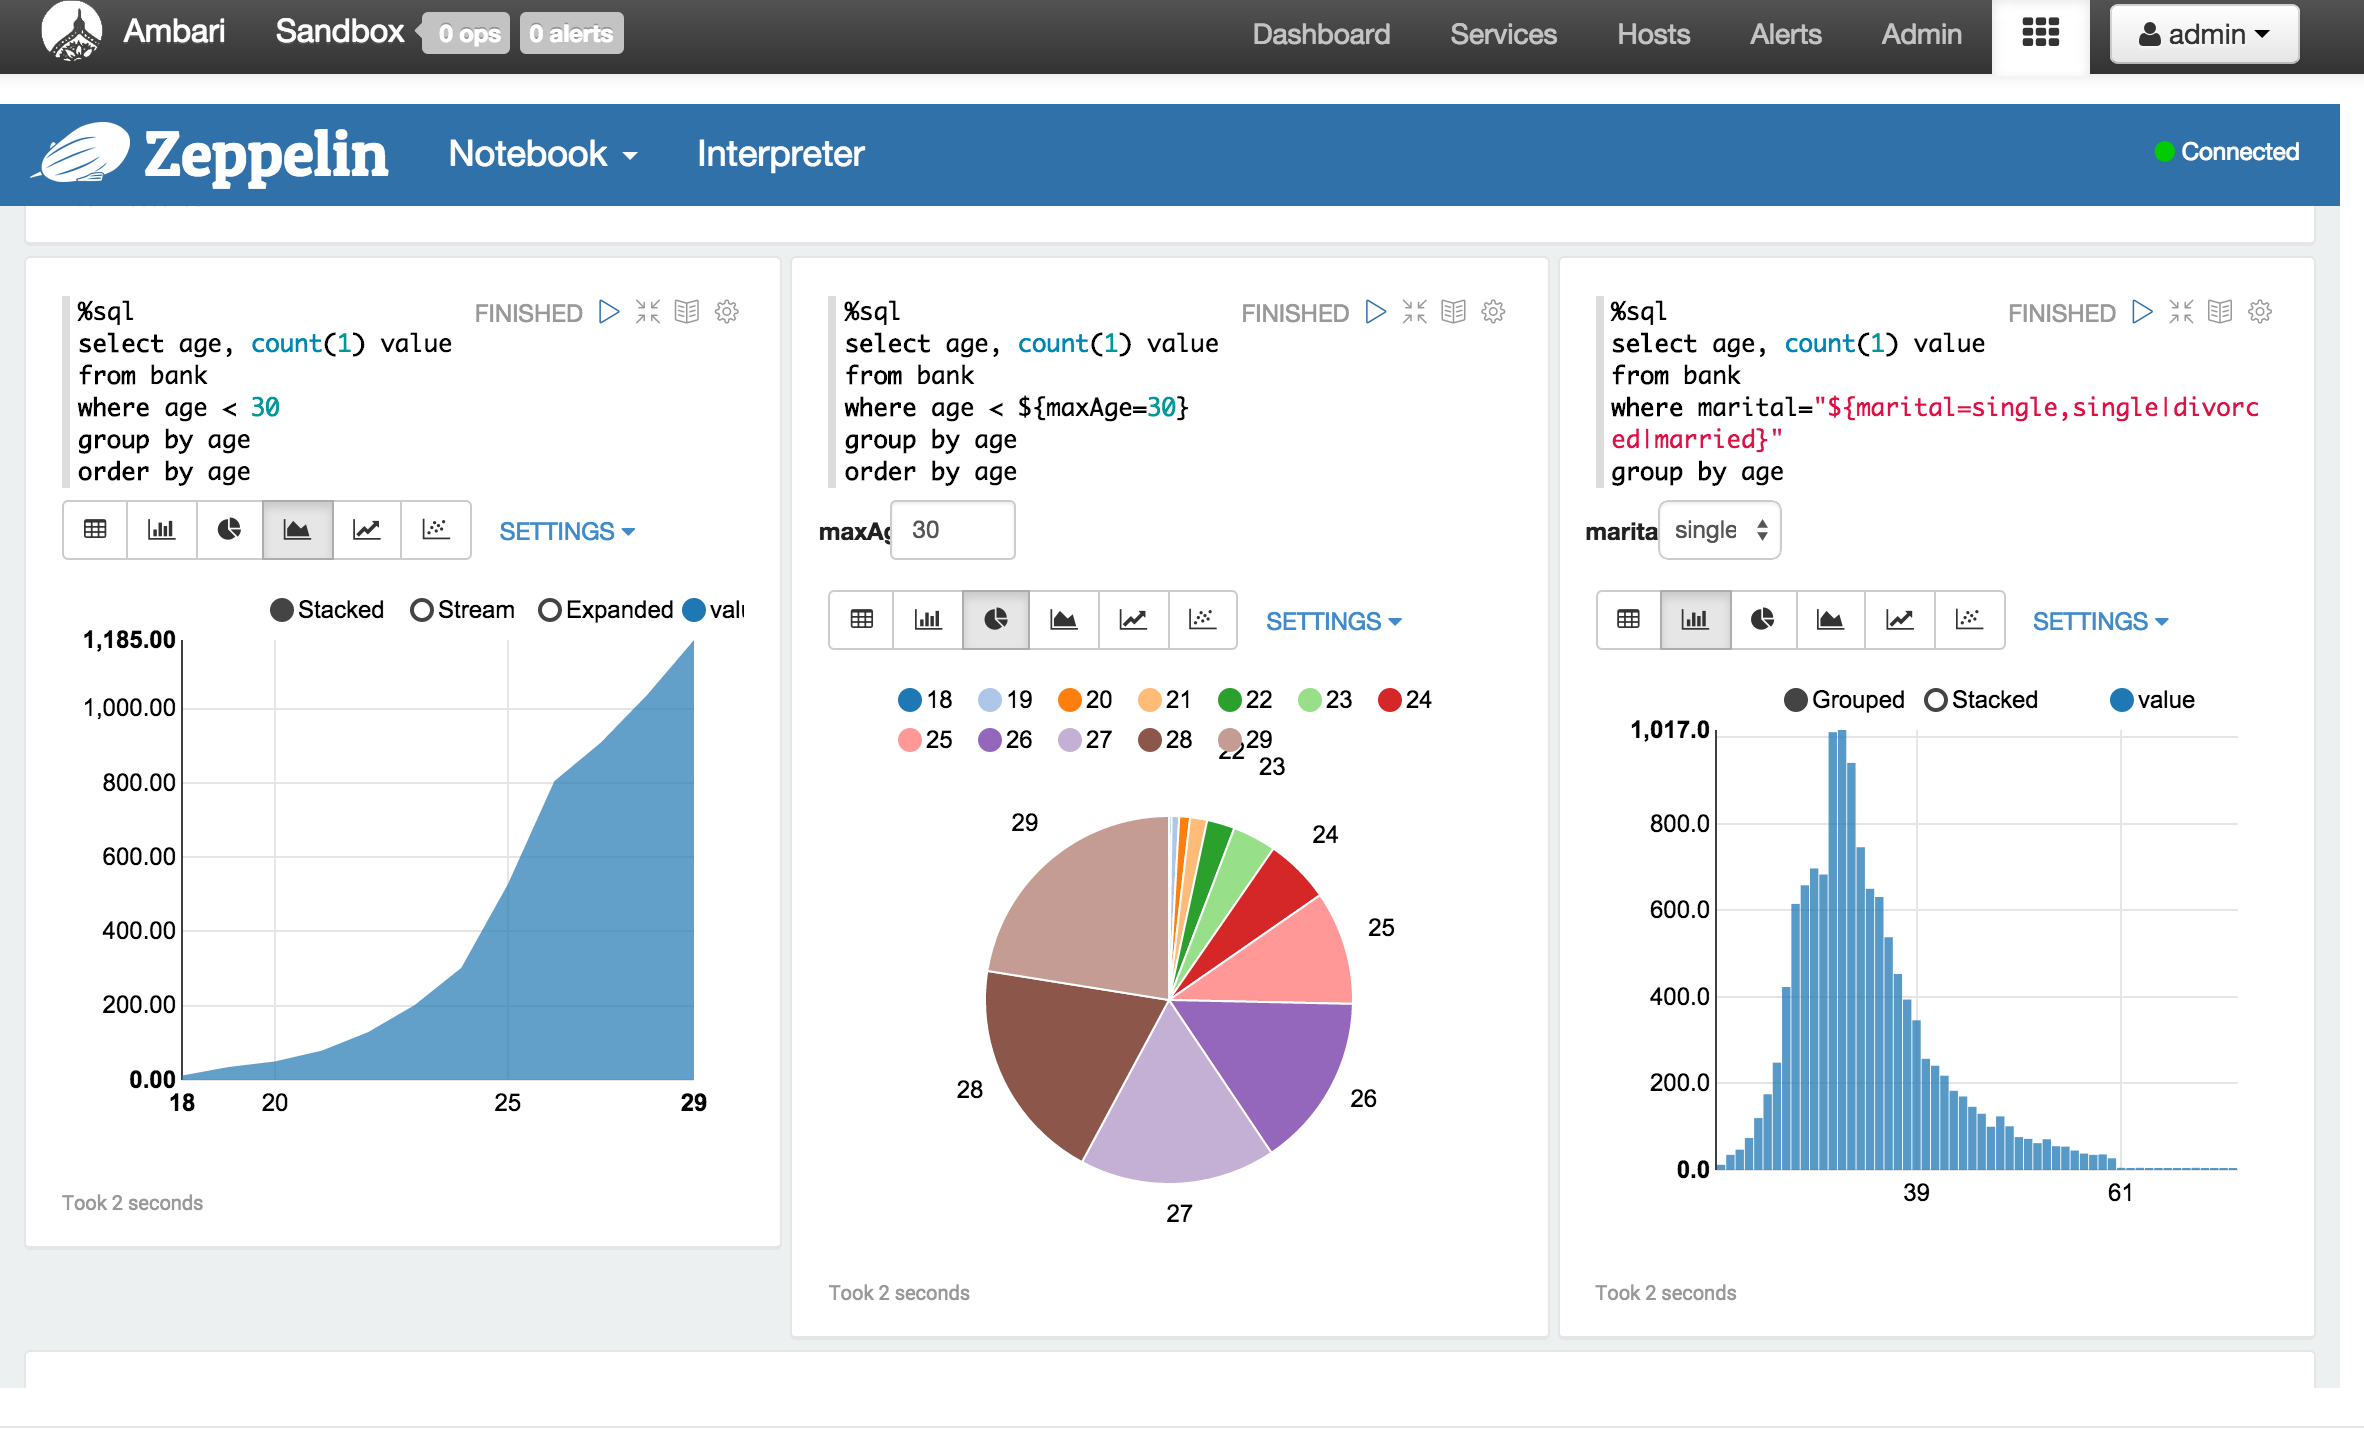
- Getting started with Data science with Zeppelin on HDP
- Getting started with Data science with iPython on HDP
- Download HDP 2.3 sandbox VM image (Sandbox_HDP_2.3_VMWare.ova) from Hortonworks website
- Import Sandbox_HDP_2.3_VMWare.ova into VMWare and set the VM memory size to 8GB
- Now start the VM
- After it boots up, find the IP address of the VM and add an entry into your machines hosts file e.g.
192.168.191.241 sandbox.hortonworks.com sandbox
- Connect to the VM via SSH (password hadoop)
ssh root@sandbox.hortonworks.com
- To deploy the VNC service, run below
VERSION=`hdp-select status hadoop-client | sed 's/hadoop-client - \([0-9]\.[0-9]\).*/\1/'`
sudo git clone https://github.com/hortonworks-gallery/ambari-vnc-service.git   /var/lib/ambari-server/resources/stacks/HDP/$VERSION/services/VNCSERVER
- Restart Ambari
#on sandbox
sudo service ambari restart

#on non-sandbox
sudo service ambari-server restart
- Then you can click on 'Add Service' from the 'Actions' dropdown menu in the bottom left of the Ambari dashboard:
On bottom left -> Actions -> Add service -> check VNC Server -> Next -> Next -> Enter password -> Next -> Deploy

-
Note that currently you cant change these configurations after installing the service (this is WIP) -
To change the geometry you can edit this file /etc/sysconfig/vncservers -
You can also remove the service using the steps below and re-install with correct settings
-
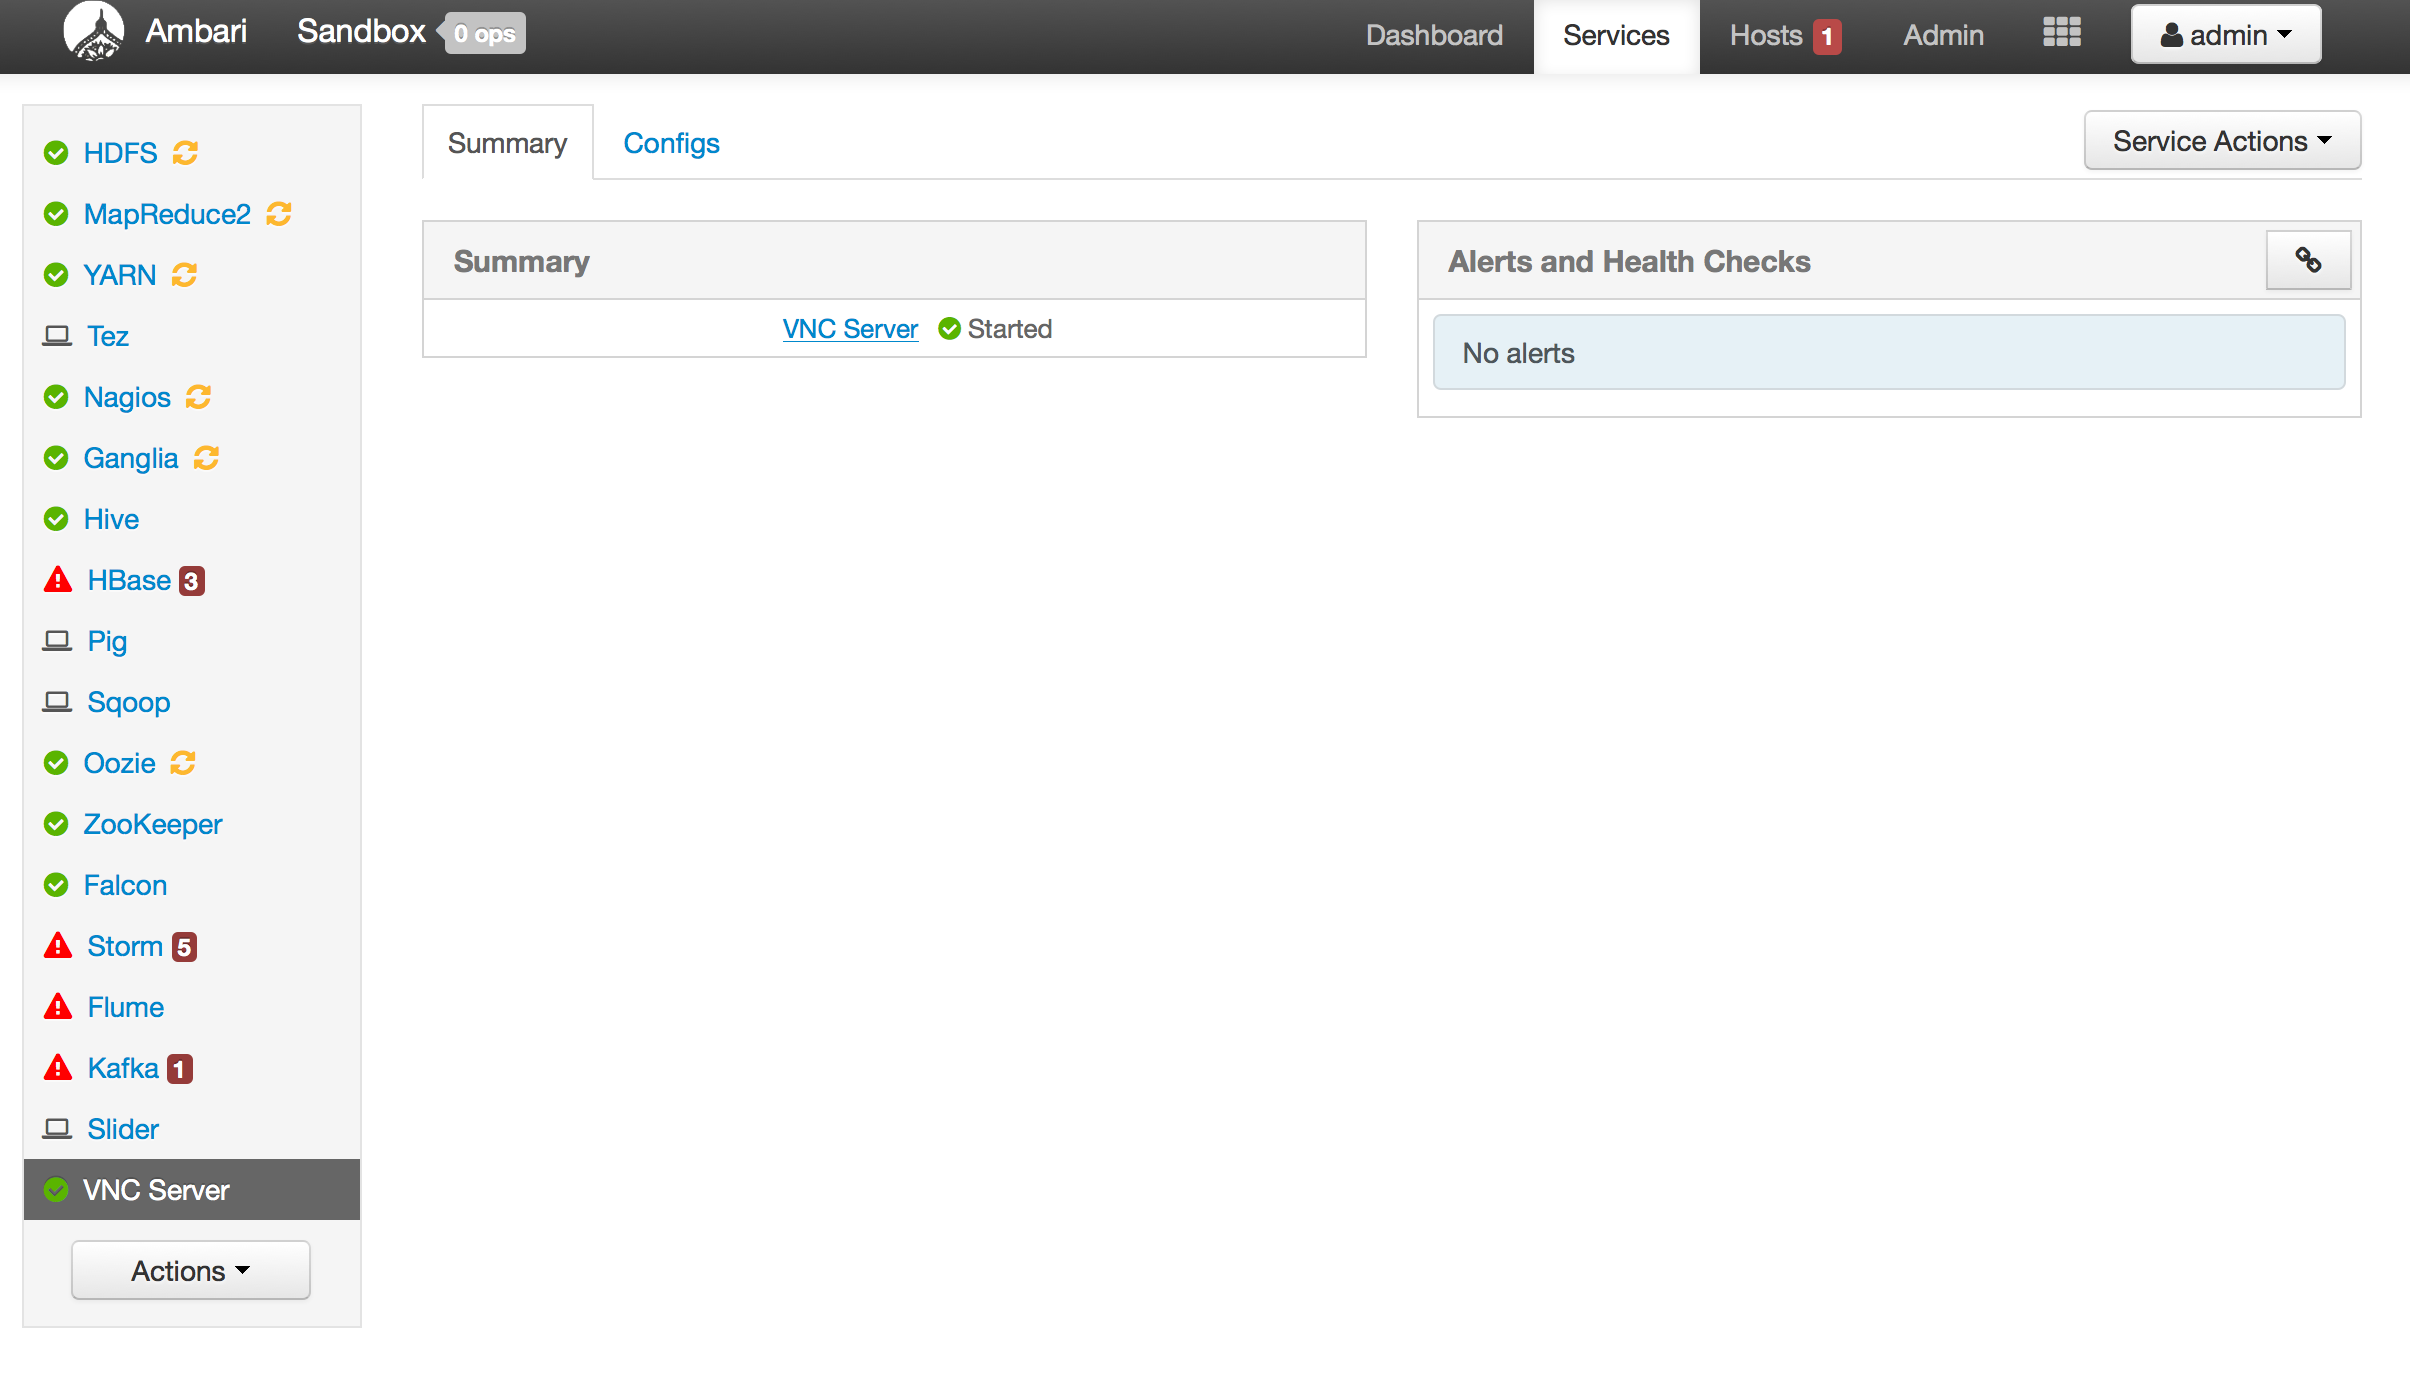
On successful deployment you will see the VNC service as part of Ambari service and will be able to start/stop the service from here:

-
When you've completed the install process, VNC server will be available at your VM's IP on display 1 with the password you setup.
-
One benefit to wrapping the component in Ambari service is that you can now monitor/manage this service remotely via REST API
export SERVICE=VNC
export PASSWORD=admin
export AMBARI_HOST=sandbox.hortonworks.com
export CLUSTER=Sandbox

#get service status
curl -u admin:$PASSWORD -i -H 'X-Requested-By: ambari' -X GET http://$AMBARI_HOST:8080/api/v1/clusters/$CLUSTER/services/$SERVICE

#start service
curl -u admin:$PASSWORD -i -H 'X-Requested-By: ambari' -X PUT -d '{"RequestInfo": {"context" :"Start $SERVICE via REST"}, "Body": {"ServiceInfo": {"state": "STARTED"}}}' http://$AMBARI_HOST:8080/api/v1/clusters/$CLUSTER/services/$SERVICE

#stop service
curl -u admin:$PASSWORD -i -H 'X-Requested-By: ambari' -X PUT -d '{"RequestInfo": {"context" :"Stop $SERVICE via REST"}, "Body": {"ServiceInfo": {"state": "INSTALLED"}}}' http://$AMBARI_HOST:8080/api/v1/clusters/$CLUSTER/services/$SERVICE
-
Option 1: install Chicken of the VNC client on your Mac and use it to connect. On windows you can also install Tight VNC or UltraVNC clients to do the same.

-
Note that:
- For VirtualBox users, you will need to forward port 5901 to avoid connection refused errors.
- You may need to stop your firewall as well:
service iptables save service iptables stop chkconfig iptables off- On logging in you will see the CentOS desktop running on the sandbox


- Option 2: You can also configure using your browser as a VNC client via Java applet
- Check your browser supports Java and test it. If not, fix it
- Open your Java control panel and add exception for sandbox.hortonworks.com
- Allow Java applets permissions on your local Mac (you should revert this change after you are done with VNC)
sudo vi "/Library/Internet Plug-Ins/JavaAppletPlugin.plugin/Contents/Home/lib/security/java.policy" #add permission line below the grant grant { permission java.security.AllPermission;- Restart browser and navigate to http://sandbox.hortonworks.com:5801
- If all goes well you should see a Java applet in your browser requesting your VNC password. Enter hadoop


- To remote desktop into your sandbox from within Ambari, you can also setup an Ambari iFrame view and point it to http://sandbox.hortonworks.com:5801:


-
To start Eclipse, click the eclipse shortcut

-
To start IntelliJ, click the intellij shortcut

-
To remove the VNC service:
-
Stop the service via Ambari
-
Delete the service
curl -u admin:admin -i -H 'X-Requested-By: ambari' -X DELETE http://sandbox.hortonworks.com:8080/api/v1/clusters/Sandbox/services/VNC -
Remove artifacts
/var/lib/ambari-server/resources/stacks/HDP/2.2/services/vnc-stack/remove.sh
-


-
As a next step, try setting up streaming samples like the trucking demo tutorial or the Twitter IoT workshop or the starter Twitter topology project in Eclipse to become familiar with how it works.
-
Optional 1: Download code for trucking demo tutorials
mkdir /opt/TruckEvents
cd /opt/TruckEvents
wget https://www.dropbox.com/s/7gk1u3khrfaz3tu/Tutorials-master.zip
unzip Tutorials-master.zip
- Option 2: Download code for the Twitter IoT workshop topology if not done already
cd
git clone https://github.com/hortonworks-gallery/hdp22-twitter-demo.git
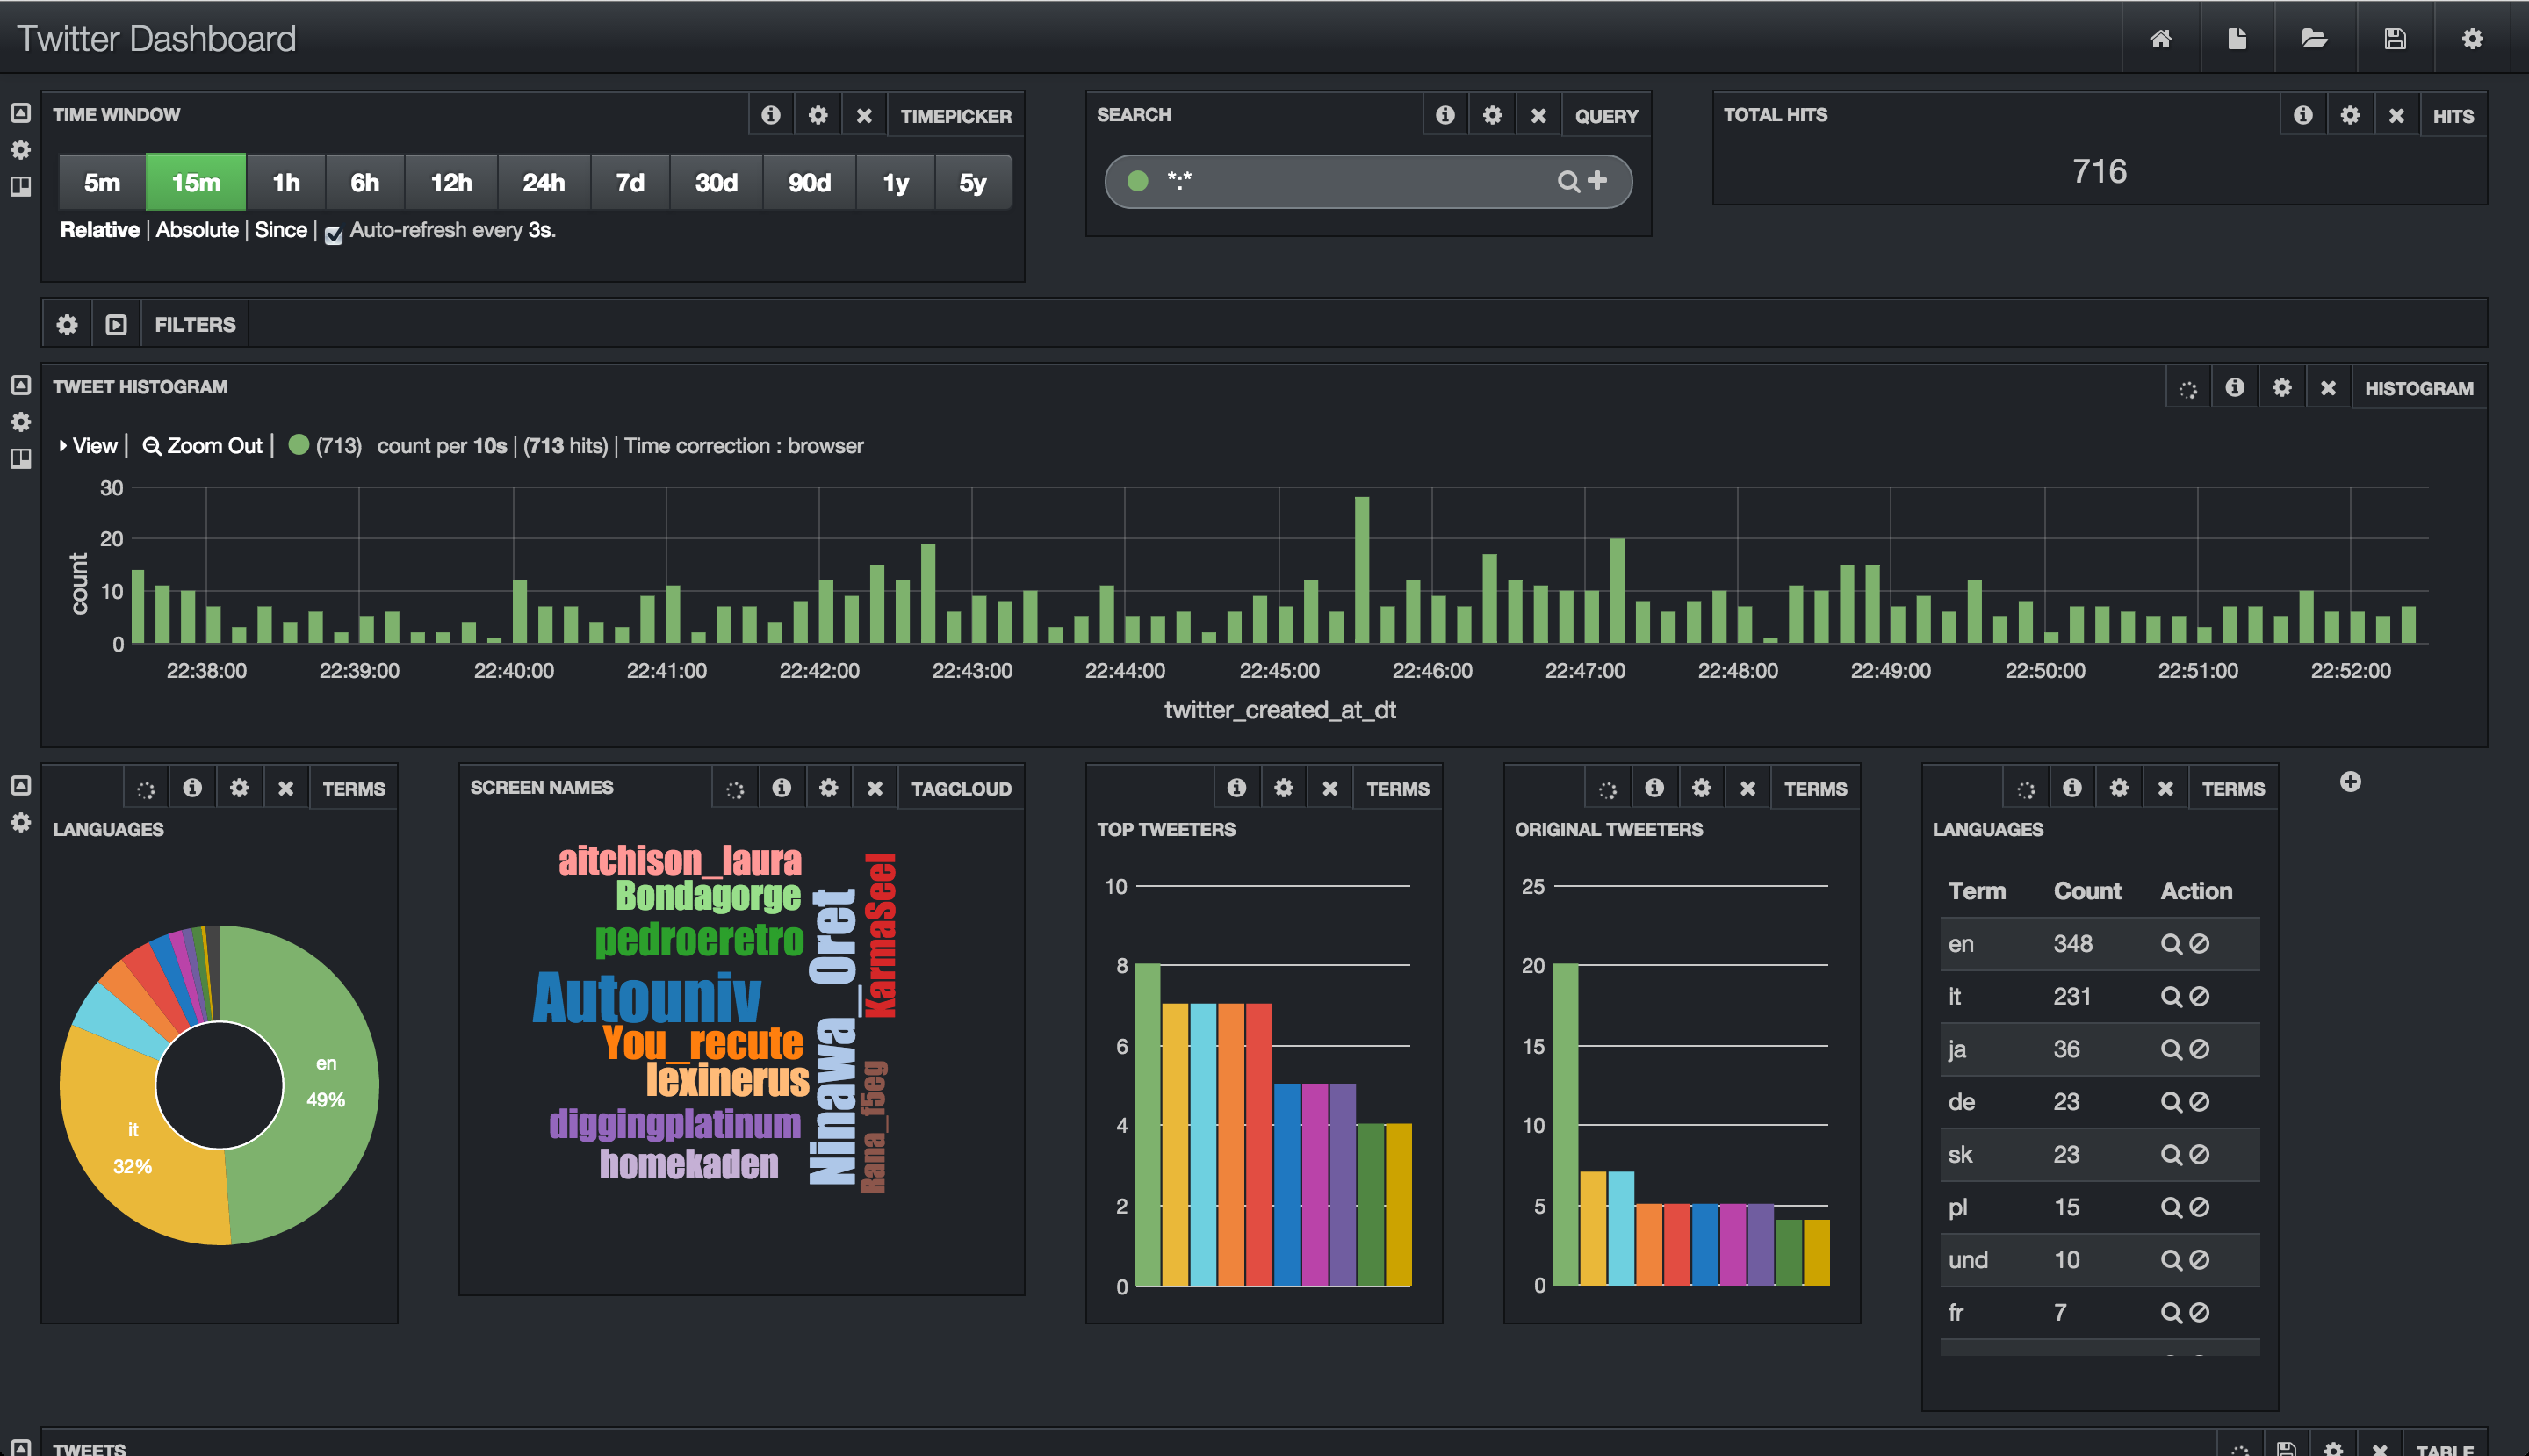
- Also start Solr/Banana if not already started at http://sandbox.hortonworks.com:8983/solr and http://sandbox.hortonworks.com:8983/banana
/root/hdp22-twitter-demo/setup-scripts/restart_solr_banana.sh
- Option 3: Download code for starter Twitter storm topology
cd
git clone https://github.com/abajwa-hw/hdp22-hive-streaming.git
cd /root/hdp22-hive-streaming
- For option 3, you will need to complete the pre-requisites mentioned (i.e. install mvn, create Hive table etc) here.
#update your twitter keys in this file
vi src/test/HiveTopology.java

#install maven (if not already installed)
curl -o /etc/yum.repos.d/epel-apache-maven.repo https://repos.fedorapeople.org/repos/dchen/apache-maven/epel-apache-maven.repo
yum -y install apache-maven

#Create persons table in Mysql
mysql -u root -p
#empty password

create database people;
use people;
create table persons (people_id INT PRIMARY KEY, sex text, bdate DATE, firstname text, lastname text, addresslineone text, addresslinetwo text, city text, postalcode text, ssn text, id2 text, email text, id3 text);
LOAD DATA LOCAL INFILE '~/hdp22-hive-streaming/data/PII_data_small.csv' REPLACE INTO TABLE persons FIELDS TERMINATED BY ',' LINES TERMINATED BY '\n';
exit;

#import persons table into Hive using Sqoop
sqoop import --verbose --connect 'jdbc:mysql://localhost/people' --table persons --username root --hcatalog-table persons --hcatalog-storage-stanza "stored as orc" -m 1 --create-hcatalog-table

#create user_tweets table in Hive
hive -e 'create table if not exists user_tweets (twitterid string, userid int, displayname string, created string, language string, tweet string) clustered by (userid) into 7 buckets stored as orc tblproperties("orc.compress"="NONE","transactional"="true")'
sudo -u hdfs hadoop fs -chmod +w /apps/hive/warehouse/user_tweets
-
For all 3 options (option 1 , option 2, option 3): follow steps below for next steps...
-
Once you already have your storm code on the VM, just import the dir containing the pom.xml into Eclipse:
- File
- Import
- Maven
- Existing Maven Projects
- Browse
- navigate to your dir containing pom.xml:
- For option 1: /opt/TruckEvents/Tutorials-master
- For option 2: /root/hdp22-twitter-demo/stormtwitter-mvn
- For option 3: /root/hdp22-hive-streaming
- OK
This will start building the project and importing the maven jars which may run for a few minutes. You will see errors in the project because the correct java version was not picked up.
- Check the java compiler is using 1.7.
- select the project
- File
- Properties
- Java Compiler
- uncheck "use compliance from..."
- set "Compiler compliance level" to 1.7
- Yes
- OK

-
The eclipse project should build on its own and not show errors (if not, you may need to add jars to the project properties)
-
To run maven compile:
-
In Eclipse, click:
- Run
- Run Configurations
- Maven Build
-
The first time you do this, it will ask you for the configuration:
- Name: specify anything (e.g. streaming compile)
- Base dir: base dir of source code:
- option 1: /opt/TruckEvents/Tutorials-master
- option 2: /root/hdp22-twitter-demo/stormtwitter-mvn
- option 3: /root/hdp22-hive-streaming
- Under ‘Goals’: clean install
- Under Maven Runtime: (scroll down to see this option) add your existing mvn install on the sandbox (its faster than using the embedded one)

- Configure > Add > click ‘Directory’ and navigate to the dir where it installed mvn (i.e. /usr/share/apache-maven)
- So now your maven run configuration should look as below

- Click Run to start compile
-
-
Eclipse should now be able to run a mvn compile and create the uber jar. In the future you can just select below to compile:
- In Eclipse, click:
- Run
- Run History
- streaming compile
- In Eclipse, click:
-
Now to setup Eclipse to run the compiled topology lets create an external tools config:
-
In Eclipse, click
- Run
- External Tools
- External Tools Configurations
- Program
- New
-
Then configure the external config based on which option you are using:
-
Option 1: For trucking demo tutorial
- Name:
Run storm locally - Location:
/usr/bin/storm - Working Directory:
/opt/TruckEvents/Tutorials-master - Arguments:
target/Tutorial-1.0-SNAPSHOT.jar com.hortonworks.tutorials.tutorial3.TruckEventProcessingTopology - click Run
- Name:
-
Option 2: For Twitter IoT workshop
- Name:
Run storm locally - Location:
/usr/bin/storm - Working Directory:
${workspace_loc:/storm-streaming} - Arguments:
jar target/storm-streaming-1.0-SNAPSHOT.jar hellostorm.GNstorm runLocally localhost- Note the above runs the topology locally. To run on the cluster instead: replace
runLocallywithrunOnCluster
- Note the above runs the topology locally. To run on the cluster instead: replace
- click Run

- Name:
-
Option 3: starter Twitter topology
- Name:
Run starter Twitter topology - Location:
/usr/bin/storm - Working Directory:
/root/hdp22-hive-streaming - Arguments:
storm jar ./target/storm-integration-test-1.0-SNAPSHOT.jar test.HiveTopology thrift://sandbox.hortonworks.com:9083 default user_tweets twitter_topology - click Run
- Name:
-
-
This should run your topology. In the future you can just select below to run the topology:
- In Eclipse, click:
- Run
- External Tools
- Run storm topology locally
- In Eclipse, click:
-
You can also run your topology from command line, for example:
- For option 1: for trucking demo tutorial:


cd /opt/TruckEvents/Tutorials-master/
storm jar target/Tutorial-1.0-SNAPSHOT.jar com.hortonworks.tutorials.tutorial2.TruckEventProcessingTopology
storm jar target/Tutorial-1.0-SNAPSHOT.jar com.hortonworks.tutorials.tutorial3.TruckEventProcessingTopology
- For option 2: For Twitter IoT workshop
cd /root/hdp22-twitter-demo/stormtwitter-mvn

#to run locally
storm jar ./target/storm-streaming-1.0-SNAPSHOT.jar hellostorm.GNstorm runLocally localhost

#to run on cluster instead
storm jar ./target/storm-streaming-1.0-SNAPSHOT.jar hellostorm.GNstorm runOnCluster localhost
- For option 3: starter Twitter topology
cd /root/hdp22-hive-streaming

#sumbit topology
storm jar ./target/storm-integration-test-1.0-SNAPSHOT.jar test.HiveTopology thrift://sandbox.hortonworks.com:9083 default user_tweets twitter_topology

#check user_tweets hive table
hive -e 'select * from user_tweets'

#stop topology
storm kill twitter_topology
- You have successfully imported a Storm maven project into Eclipse and setup the ability to compile/run from Eclipse
Spark now comes installed on HDP sandbox. You can get started using the tutorials provided:
-
Try tutorials form here: http://hortonworks.com/hadoop/spark/
-
Try the code samples from our techical webinars on Spark: http://hortonworks.com/partners/learn/#spark http://hortonworks.com/partners/learn/#ml2
- Install Nifi on sandbox via Ambari and build a Twitter dashboard: https://community.hortonworks.com/content/kbentry/1282/sample-hdfnifi-flow-to-push-tweets-into-solrbanana.html
- After installing eclipse on sandbox, use it to build a custom Nifi processor: https://community.hortonworks.com/articles/4356/getting-started-with-nifi-expression-language-and.html
-
Install Zeppelin service from here
-
Open the notebook from http://sandbox.hortonworks.com:9995 and run though the example notebooks
- Install iPython notebook service using instructions here.
-
Setup the airline demo in iPython using steps below:
-
Make few changes to sandbox VM before setting up airline demo. Instructions to do these tasks are available on the same airline demo page above.
- Make sure the sandbox VM is started with large amount of memory (15 GB) and disk to 65GB in order to run.
- Also change Ambari setting to run using Tez.
-
Download airline delay and weather data and copy into HDFS
export HOME_DIR=/home/ipython
export PROJECT_DIR=/tmp/HDP_DS_setup

sudo -u hdfs hadoop fs -mkdir /user/ipython
sudo -u hdfs hadoop fs -chown ipython:ipython /user/ipython
hadoop fs -mkdir /user/ipython/airline
hadoop fs -mkdir /user/ipython/airline/delay
hadoop fs -mkdir /user/ipython/airline/weather


mkdir $PROJECT_DIR
cd $PROJECT_DIR

wget http://stat-computing.org/dataexpo/2009/2007.csv.bz2
bzip2 -d 2007.csv.bz2
wget http://stat-computing.org/dataexpo/2009/2008.csv.bz2
bzip2 -d 2008.csv.bz2
hadoop fs -put *.csv /user/ipython/airline/delay
#delete copy of data from local FS to save space
rm $PROJECT_DIR/*.csv


wget ftp://ftp.ncdc.noaa.gov/pub/data/ghcn/daily/by_year/2007.csv.gz
gunzip -d 2007.csv.gz
wget ftp://ftp.ncdc.noaa.gov/pub/data/ghcn/daily/by_year/2008.csv.gz
gunzip -d 2008.csv.gz
hadoop fs -put *.csv /user/demo/airline/weather
#delete copy of data from local FS to save space
rm $PROJECT_DIR/*.csv
- download the the python version of the airline demo notebook
cd /home/ipython/notebooks
wget https://github.com/abajwa-hw/hdp-datascience-demo/blob/master/demo-HDP2.2/airline_python.ipynb
-
Launch ipython notebook url and open the notebook at http://sandbox.hortonworks.com:9999
-
Run the demo by running through the cells of the ipython notebook using Shift+enter